Digital Blending Using Apply Image to Create Beautifully Natural Images
On Shutter…Evolve I’ve had the pleasure of writing tutorials on 3 different exposure blending methods, The Rapid Blend If Technique, Gradient Masking, and of course, the Daddy of them all, Luminosity Masks. However, another superb way of blending exposures is through using the Apply Image function in Photoshop. We can use Apply Image to create natural, clean HDRs, just like any other form of digital blending.In fact, one of the best techniques is Digital Blending Using Apply Image to Create Beautifully Natural Images. Apply Image can also be used in a similar way to luminosity masks, but in a slightly more awkward fashion. So if you’ve mastered Luminosity Masks, you can now add even more skills to your digital blending arsenal!
Essentially, Apply Image looks at your exposure and separates it into 50% lights and 50% darks. This means we can affect changes to areas based on brightness alone, which, in exposure blending, is extremely important. In other words, if we only want to make changes to our bights, the mask generated by Apply Image will allow us to do just that, without affecting our shadows.
Before looking at how to do it, let’s look at the three exposures we’ll be blending:

Brightest Exposure 
Middle Exposure 
Darkest Exposure
We are using the brightest exposure to restore details in the foreground, the darkest exposure for the sky, and the middle exposure to act as a bridge between these two exposures. If you’re new to digital blending, I’ve written an article on how many exposures you need in digital blending: How Many Exposures Do I Need For Digital Blending?
-Tutorial Continued Below-
Enter your email below and join our community of more than 100,000 photographers who receive regular tutorials and have also

Subscribed to our newsletter,
Downloaded our FREE Photoshop Course
Got our FREE Easy Panel for Photoshop
And have our FREE Essential Guide To Luminosity Masks E-Book
Digital Blending Using Apply Image to Create Beautifully Natural Images – Them Method
First, here is a visual representation of the process (click to enlarge):
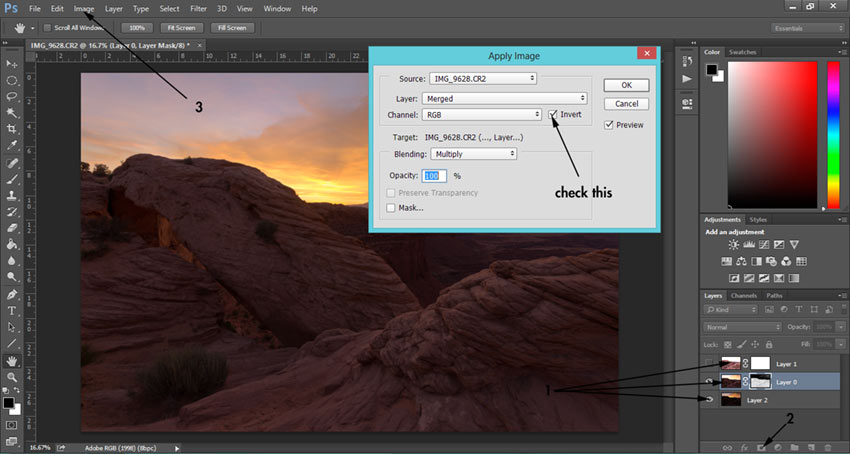
1. Bring your exposures into Photoshop. Place the darkest exposure at the bottom, the brightest exposure at the top, and the base exposure in the middle. Make the brightest exposure invisible by pressing the eye next to it.
2. Now create a layer mask on the medium exposure by going down to the bottom of the layers panel and clicking on the square icon with a circle in it. When you’ve created this mask, make sure it is selected by clicking on it.
3. Go to the Image menu at the top and choose Apply Image. A new dialogue will appear. You don’t need to do much in here. Make sure Layer is set to Merged, Channel is RGB, and Blending is set to Multiply. To the right of the Channel box you will see Invert. Check this! Now press OK. You will see that the darker areas in your image have now brightened somewhat. You will also see that a mask has been applied to this layer.
4. Do the exact same thing with the brightest exposure to brighten the foreground even more. When you’re finished, depending on the scene, you may see that the foreground is too bright. Reduce the opacity of this layer until it looks natural. For this image, I lowered the opacity to 40%.
That’s it! After Digital Blending Using Apply Image to Create Beautifully Natural Images ee should now have an image with a good balance of light throughout.

Looking Further into Apply Image
Like the Rapid Blend If technique, Apply Image makes global changes, which may not necessarily be what we’re looking for. We may have to mask out certain areas that have been negatively affected by the blending process. That’s one of the benefits of Luminosity Masks, you can make more selective changes, which is also possible with Apply Image but beyond the scope of this tutorial.
For the rest of the workflow on this image, I applied a few Curves/Levels layers to make specific contrast adjustments, a light detail enhancer to certain areas, and changed the balance of light in the image to affect the mood. All of these techniques can be found in the Art of Digital Blending course.
Thank you for reading this article. You might also be interestend in some more articles on Shutter…Evolve
Ask Jimmy/Challenge Jimmy Photography YouTube Series
How To Prepare Your Images in ACR Before Digital Blending in Photoshop
How To Create Your Own Luminosity Masks
Enter your email below and join our community of more than 100,000 photographers who have also
Subscribed to our newsletter.
Downloaded our FREE Photoshop Course.
Got our FREE Easy Panel for Photoshop.
And, have our FREE Essential Guide To Luminosity Masks E-Book.
To go directly to any of our products, simply click on the image below.


