Camera Settings – How To Shoot For Exposure Blending with Luminosity Masks
Capturing the scene correctly in-camera is certainly the most important step in any photography workflow – a Digital Blending workflow is no different. No amount of post-processing can save a mood-less, blurry scene. It is important that we understand the incredible machine that is our camera so that we can truly do justice to the wonderful scene in front of us. This understanding comes from regular study and practice. In this week’s article, we’re going to look at our Camera Settings – How To Shoot For Exposure Blending with Luminosity Masks.
Visualise the Final Result
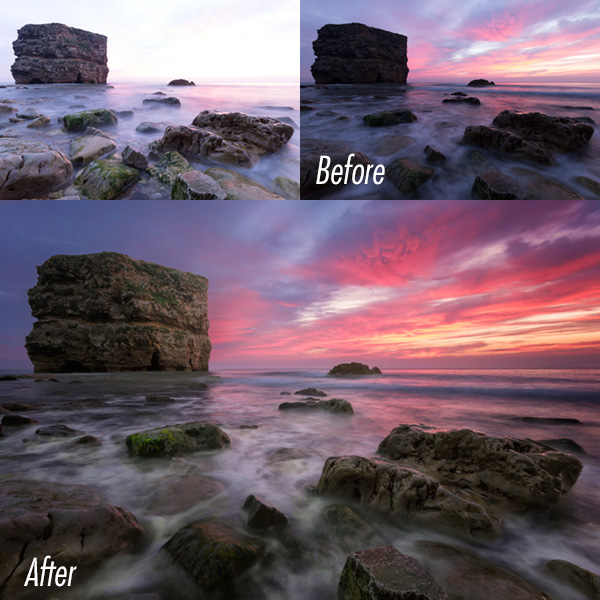
Although it may not seem obvious at first, our knowledge of post-processing will often shape how we decide to shoot a scene. Some see post-processing as something that just happens afterwards, maybe to salvage a poorly shot image. However, it is better to view the entire photographic experience as one process, from planning to shooting to post-processing, rather than separating them. That way we can better visualise the final result, and what steps we need to take in order to realise the final image.
-Camera Settings – How To Shoot For Exposure Blending with Luminosity Masks Tutorial Continued Below-
Enter your email below and join our community of more than 100,000 photographers who receive regular tutorials and have also

Subscribed to our newsletter,
Downloaded our FREE Photoshop Course
Got our FREE Easy Panel for Photoshop
And have our FREE Essential Guide To Luminosity Masks E-Book
How is shooting for Digital Blending different to shooting for HDR?
HDR programs have a number of limitations. Some of them don’t like exposures that are shot at varying exposure values. For example, using exposures with an EV of -3,-2,0,+2 doesn’t always go down well because the EV spacing is inconsistent.
More restricting, it is almost impossible to get the most out of your files when shooting with varying apertures, which is sometimes necessary for Digital Blending, or when you wish to merge parts of a long exposure image into your scene. HDR programs simply cannot handle these demands.
That is why in HDR we usually shoot a standard set of brackets to feed into our HDR program of choice. With Digital Blending, we have far more freedom, which also means more choices to make in the shooting stage.
How to Shoot for exposure blending with Luminosity Masks
Below are the steps I take when setting up and shooting a scene. However, it’s important not to remain rigid in your workflow. We have to change our processes according to the scene we’re shooting.
Composition and Visualisation
The very first step I take is to look at the scene and try to understand what mood is most dominant and then look for elements that will enhance that mood. Some scenes may have particular elements which require special treatment. For example, shooting long light trails or capturing smooth water may need longer shutter speeds.
I’ll note these elements and take them into consideration when I begin shooting.
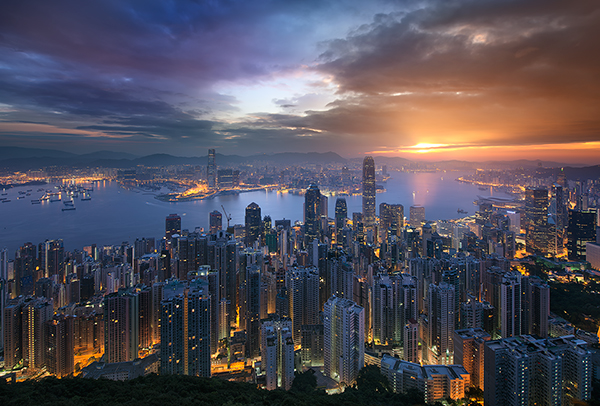
Sometimes you may wish to blend multiple exposures across different times, like in the image below. The main part of the image was shot at blue hour in the morning, but the right side of the sky was taken from a shot 30 minutes later, from the same spot. It takes confidence in your compositional ability to decide on a single composition and keep it for a long period of time.
When I’ve decided on the composition, I begin setting everything up in Live View. I rarely use the View Finder. This gives me the added benefit of using the digital horizon to keep my images straight.
Setting the White Balance
I almost always use K (Kelvin) mode for my white balance. This is a very simple way of manually adjusting the warmth of your image. By looking at Live View, I slide the K value left or right until I’m happy with the general colours. For more information on K Mode, see: Color by Kelvin: A Better Approach to White Balance
Aperture Priority
The vast majority of my shooting is done in Aperture Priority. This shooting mode allows me to alter both the ISO and aperture, while the camera calculates the appropriate shutter speed. This is far more convenient than working in Manual and determining the shutter speed yourself.
You can learn more about Aperture Priority here: A Beginner’s Guide to Using Aperture Priority Mode
ISO and Aperture
Your ISO and aperture will determine your shutter speed. However, the two aren’t equal. A large aperture (small number), will shorten shutter speed times, as will a large ISO value. However, the strong noise created by a high ISO can greatly diminish image quality. In a low light situation, where shutter speeds exceed our 30-second limit, I will always choose a large aperture over a high ISO to decrease exposure time.
But it’s important to know your camera and lens’ capabilities so that you can make the best choice. For example, the Nikon D800 handles low light extremely well. I don’t worry about raising the ISO in low light, especially when shooting with the Nikkor 14-24 f/2.8 lens. But I will still choose a large aperture over a higher ISO to retain image sharpness. In my Canon 60D, the image quality degrades significantly when I exceed ISO800.
On the other hand, while my Sigma 24-70mm f/2.8 (for the D800) is a very good lens, it softens slightly at f/2.8 so I choose to raise the ISO slightly instead of going for a larger aperture.
With Digital Blending, however, we can also alter our settings for specific parts of an image that we may blend into the final scene. For example, let’s say we have a cityscape in front of us with some superb car trails. We already have a set of sharp exposures that cover the entire range of light in the scene. (for an article on how many exposures you need, see: How Many Exposures Do I Need For Digital Blending?).
The challenge is, that your middle exposure was only 2 seconds long. At 2 seconds it is very difficult to capture beautiful, sweeping car trails. You can decrease your aperture (larger number) to extend your exposure time. But be aware that the smaller the aperture, the closer you will get to the 30-second exposure time limit. Once you’re set, you can capture car trail after car trail in as many exposures as you like, and then blend them into the final image. You can learn how to do this rapidly here: How To Add Dramatic Car Trails To Your Photos In Photoshop.
There are two reasons why you wouldn’t have used a small aperture in the first place when capturing the exposures. First, if you’re auto-bracketing and your base exposure has a long exposure time, of let’s say, 15 seconds, your brighter exposures will not develop fully as you will be exceeding your 30-second shutter limit.
Second, I find it better to create the cleanest, sharpest possible images for my base exposures. This often involves shooting between f/5-f/9, in my opinion. Choosing a smaller aperture in order to increase exposure time may soften your images or leave you with excessive chromatic aberration.
Metering Mode
Metering modes give you different methods for determining exposure. When shooting with my D800, I almost exclusively use the Evaluative Metering mode. This is the default auto mode, where the camera examines much of the scene and determines the exposure for you. I use this mode because the D800 allows me to bracket 9 exposures, so I can be fairly certain I’ll capture the correct range of light within those exposures.
However, my Canon 60D only brackets 3 exposures, so I had to be more specific about how I exposed for a scene. Instead, I would use Spot Metering. This allowed me to pick a specific part of the scene that I would choose as my normally exposed image. Then the auto-bracketing would fire 2 more brackets, one dark and one bright, around this exposure. If I found that I still had some overexposed parts in my brightest exposure, I would then expose for a brighter part of my image, and create more brackets around that. Or vice-a-avers if I had under-exposed areas.
For more information on metering modes, see: Metering mode cheat sheet: how they work and when to use them
Manual Focus
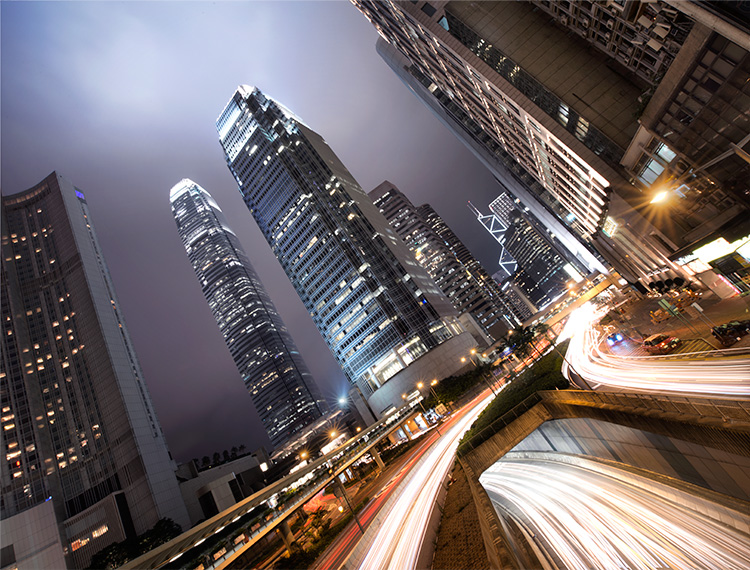
With the exception of the cityscape image below, I haven’t used auto-focus in about 2 years.
While our cameras and lenses are getting increasingly better at auto-focusing, nothing, in my opinion, will produce better, and more consistent sharpness, than manual focusing.
Beginners to photography sometimes worry that manual focus is beyond them. However, manual focus is extremely easy. With Live View on, simply press the magnifying glass button on your camera (Sony A-series cameras, use the C1 button). Zoom in as far as you can go, and with focus set to manual, begin slowly shifting the focus ring until the image is as sharp as possible. Now go out of magnify mode and begin shooting. You’ll be amazed at how sharp your images will be, even in low light!
Tip: Always review every shot after you’ve taken it. Zoom in to see if the details are sharp, and check to see if the exposures cover the full range of the light (if you’re auto-bracketing).
The other benefit of using Live View to focus is that in most cameras, the mirror locks up, which when shooting, reduces camera shake and blurriness.
As for focal points, I almost always focus on something in the middle distance, or further out, instead of the foreground. Some photographers focus in the far corners of the scene in order to reduce edge blur as well. Give it a try and see what you think.
Bracketing
In almost every standard scene I will auto-bracket. My goal here is to get a solid base of exposures, 1 stop apart, that are sharp, well-exposed, and with good colour. After I have these exposures, I may then switch to manual bracketing. I’ll do this in order to experiment with the scene a little or capture certain elements, as we discussed earlier. Or I may still have some under or overexposed areas that I need to compensate for.
When it’s a scene of very low contrast, I will bracket manually, simply because it’s easier just to manually bracket 2 exposures than fire off many more than I need.
To bracket manually in the D800, I adjust the exposure using the exposure button. You could also use spot metering, and choose a different spot to expose for each time.
To Finish
This is a brief outline of the steps I take when shooting for Digital Blending. In articles to come, we will look at each point in more detail, so that each step becomes clearer, and you can shoot scenes with confidence.
What to do once you’ve shot the scene? Check out this article on how to prepare images for Digital Blending. And if you’re ready for the next step, you can take your processing to new levels with the Art of Digital Blending course.
Thank you for reading this tutorial on Camera Settings – How To Shoot For Exposure Blending with Luminosity Masks, be sure to sign up for our newsletter for more tutorials and great offers.
Enter your email below and join our community of more than 100,000 photographers who have also
Subscribed to our newsletter.
Downloaded our FREE Photoshop Course.
Got our FREE Easy Panel for Photoshop.
And, have our FREE Essential Guide To Luminosity Masks E-Book.
To go directly to any of our products, simply click on the image below.


