Add Warmth To a Sunset or Sunrise in Photoshop
As human beings, we seem strongly affected by sunrises and sunsets. All over the world, people gather at the most beautiful places from which they enjoy the golden goodbye in the evening or hello of the rising sun. Capturing these scenes with our cameras is relatively simple. But when editing How To Add Warmth To a Sunset or Sunrise in Photoshop. We’ll share two very easy techniques in this tutorial.
As photographers, we understand the incredible impact these golden scenes have on the mood of our images. That’s why we often wake up early, half-asleep, and drag ourselves out to photograph when the world is in full dream mode.
Sometimes our sunsets/sunrises are spectacular. Sometimes they’re flat. In this tutorial, we’re going to look at two techniques to add more colour to your golden hour images, so that you can beautifully enhance the mood of your images. We’re going to do this selectively so that you don’t create a colour cast throughout your image.

– Tutorial Continued Below –
Enter your email below and join our community of more than 100,000 photographers who receive regular tutorials and have also

Subscribed to our newsletter,
Downloaded our FREE Photoshop Course
Got our FREE Easy Panel for Photoshop
And have our FREE Essential Guide To Luminosity Masks E-Book
Painting With Warmth – Technique One
You can actually see this first technique in action in our very popular Blend Mode video tutorial: Photoshop Blend Modes. We are going to literally paint extra colour into the area of the sun, in a very natural, but impacting way. This is the image we’ll be working on:
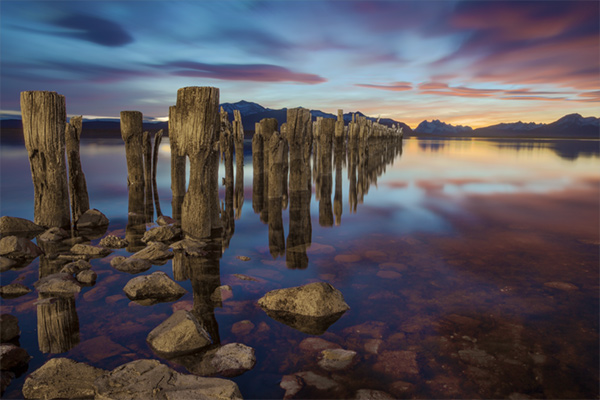
The sunset has a lot of potential, but at the moment it’s a bit dull, and lacking in colour. The two things we’re going to do here is to paint more pink into the sky and water, and paint more orange into the area of the sun.
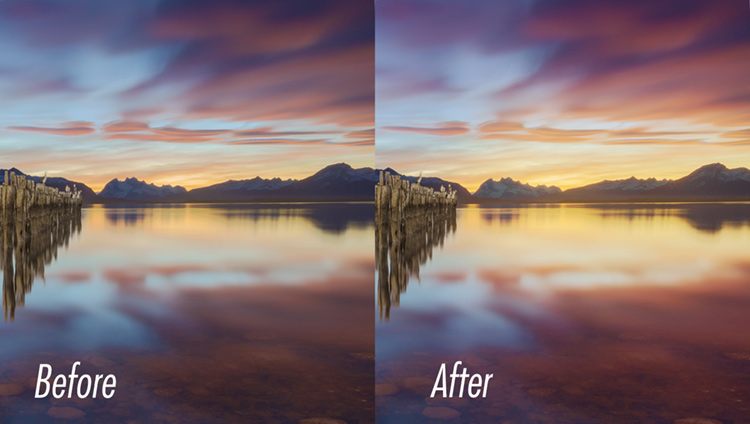
Here’s a before and after using the Painting With Warmth technique.
Below you’ll see steps 1-6 for creating the first effect. And here is a print screen so you can visualize the steps.
Step-By-Step Guide to Painting Warmth in Photoshop
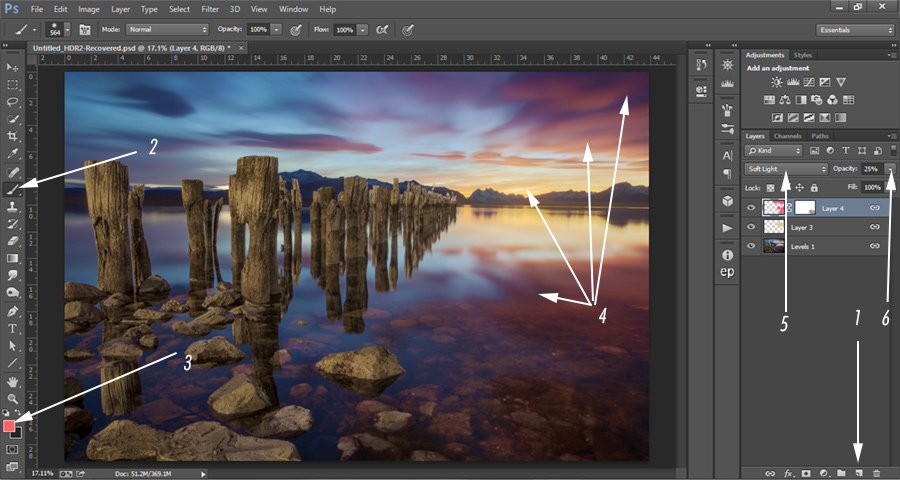
1. Create a new layer. At the bottom of the Layers palette, press the button near the trash can that says ‘Create new layer’ when you hover your mouse over it.
2. Select Paintbrush. Choose your paintbrush on the left, set the size to a medium-to-large brush, with a hardness of 0 and an opacity of 100%.
3. Click on the foreground colour. To the bottom left, click on your foreground colour. Take your cursor to the sunset area where there is a golden colour. Your cursor will now be an eyedropper. Select the golden colour by left-clicking. This will now become your foreground colour.
4. Paint across the sunset. Take your brush and paint across the sunset, trying not to affect other areas. It’s okay if you go across the horizon on this type of image. But we should avoid the sticks to the left.
5 & 6. Change blend mode to Overlay or Soft Light and change the opacity. For the sunset area of this image, I changed the Blend Mode to Overlay, which creates a stronger contrast effect. But I lowered the opacity of this layer to 30%. You’ll instantly see stronger colours coming from the sunset.
Mask out any areas that you don’t want to affect. In this image, I accidentally went over the sticks, so I created a black foreground colour and just masked that area of the adjustment out.
Now do the same to enhance the pinks (selecting a pink foreground colour), this time painting around the sunset and in the sky and water. I used the Soft Light Blend Mode and an opacity of 25% on this layer.
Colour filter + 50% grey – Technique Two
In this technique, we’re going to be combining and Photo Filter and a 50% grey layer
Before and after

Tutorial Preview
Step-By-Step Guide to Colour filter + 50% grey
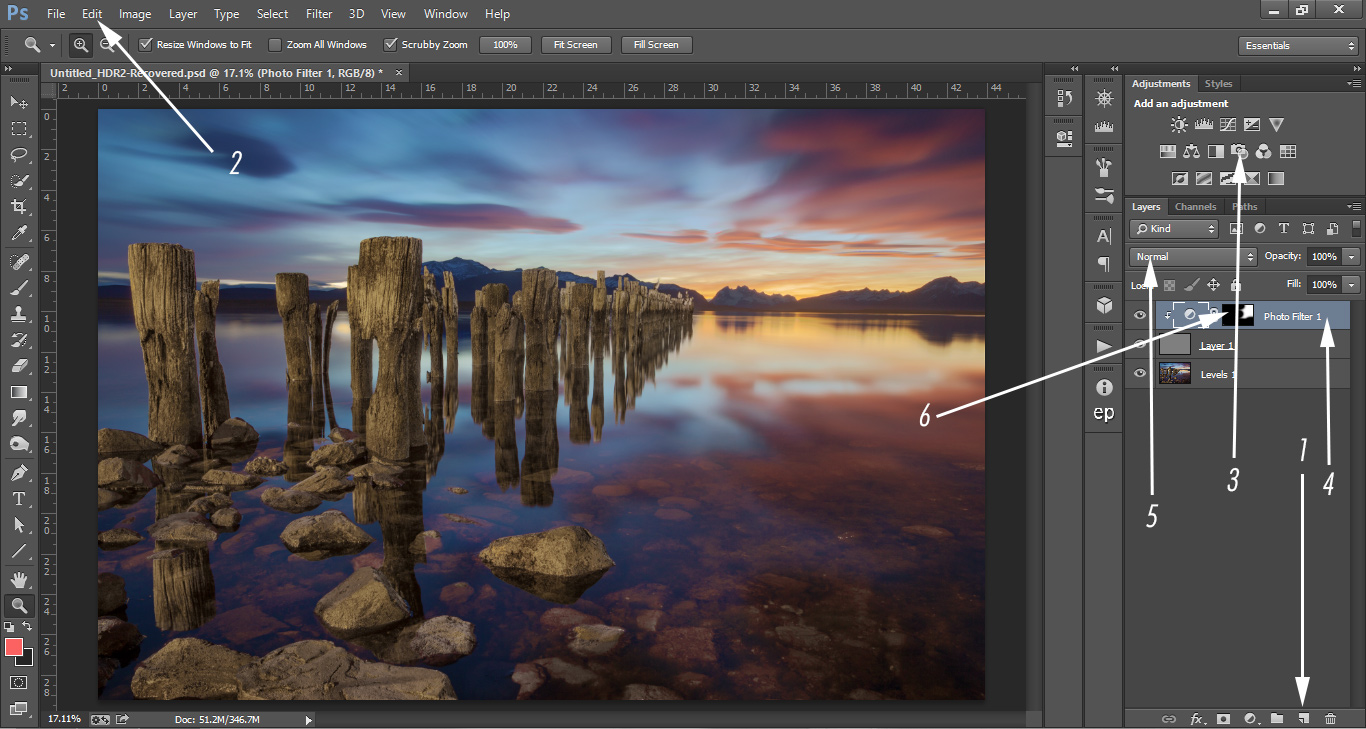
1. Create a new layer. As we did before, at the bottom of the Layers panel, press Create a new layer.
2. Fill with 50% Grey. Go to Edit>Fill, and in the dropdown box choose 50% Grey.
3. Open photo filter. Open a Photo Filter adjustment layer. I used the default Warmth option and moved the strength of the effect to 50%.
4. Create a clipping mask. Now we want to attach the photo filter to our new layer. Right-click on the photo filter layer and choose create a clipping mask. Any changes will now only affect the 50% grey layer.
5. Change the grey layer to overlay. Now change the Blend Mode of the 50% grey layer to Overlay. You’ll see some lovely warmth added to our image. To see what the difference is without using the 50% grey layer, right-click on the photo filter layer and choose release clipping mask. You’ll see that the warmth is too strong. By creating a clipping mask, and add this warmth through a 50% grey layer, we’re protecting many of our tones.
6. Mask areas out. Change your paintbrush to black, with the photo filter mask selected, paint out the areas you don’t want to affect with the warm filter.
And that’s it! Two easy, but effective ways of bringing more life and mood to your sunset images.
And after a full workflow, here’s the final image (you can learn to create this in the new Art of Digital Blending):
Other Articles on How To Add Warmth To a Sunset or Sunrise in Photoshop
How To Edit Golden Hour Photos In Lightroom
Create a Beautiful Sunset Effect for Your Cold Daylight Photos
Other Articles on Shutter Evolve…
Take a Look at What Images Look Like Before and After Digital Blending
Advantages Of Having A Photography Blog
10 Tips For Effective Seascape Photography
Enter your email below and join our community of more than 100,000 photographers who have also
Subscribed to our newsletter.
Downloaded our FREE Photoshop Course.
Got our FREE Easy Panel for Photoshop.
And, have our FREE Essential Guide To Luminosity Masks E-Book.
To go directly to any of our products, simply click on the image below.


