Luminosity Masks – Why Can’t I Paint Inside The Selection?

Luminosity Masks – Why Can’t I Paint Inside The Selection?

As beginners to luminosity masks, there are a number of challenges we face in understanding their application. LMs are a wonderful tool for any landscape or cityscape photographer, but one of the most common questions I’m asked by newcomers to LMs is, ‘why can’t I paint inside the mask selection?’

It is easy to understand why we first come up against this challenge. When I ask these photographers to show me the images they’re working on, I often see the same type of scene, similar to the one below.

paint-inside-luminosity-mask-selection

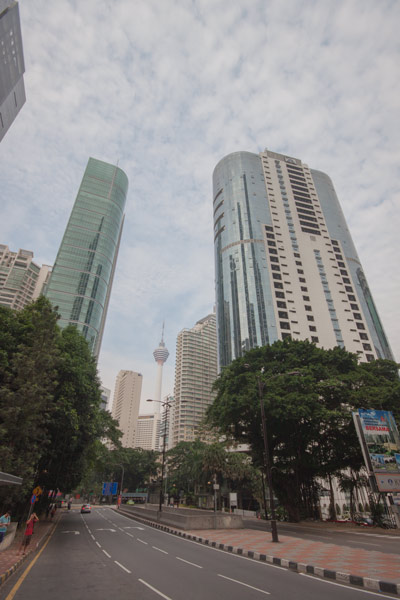
When I say the ‘same scene’, I’m not referring to cityscapes, but to the light distribution of the scene – in other words, how much contrast is in it.

The scene above is flat, with no over or under exposed areas. Often, with scenes like this, people will try to paint in the sky from a darker exposure, without wanting to affect the buildings. Their goal, therefore, is to use luminosity masks to make a selection of the sky and not the buildings.

However, with luminosity masks this isn’t possible because the buildings and sky are of a similar brightness. But more importantly, it isn’t necessary to combine exposures here. The goal of exposure blending is to recover over exposed or under exposed areas. If your image doesn’t have any, then you are in a very fortunate position. You can do all of your editing on a single image, which is more straightforward.

In fact, much of your editing can be done in ACR or Lightroom. You can bring back some of the highlights with the Highlights slider, and recover the shadows with the Shadows slider. Then you’ll have an image with the full range of light.

Let’s take a look at an example luminosity mask from this image. Below is a Brights 2, one of the masks we’d typically use to recover a blown out sky.

luminosity-mask

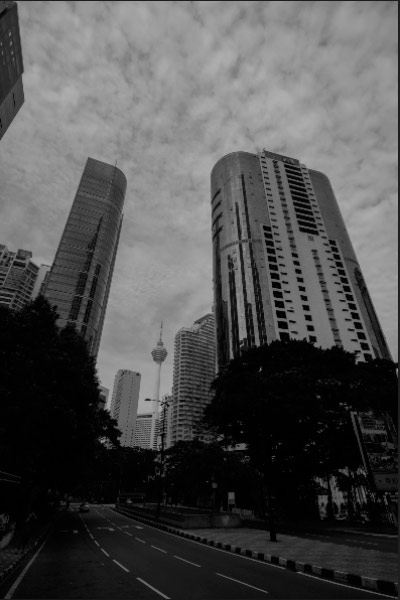
As you can see, the top of the buildings are grey, as is the sky. If we try to create a mask here, both the sky and buildings will be selected because there is not enough difference in brightness between the two objects. There will be some separation, because the buildings are marginally darker than the sky, but the difference isn’t strong enough.

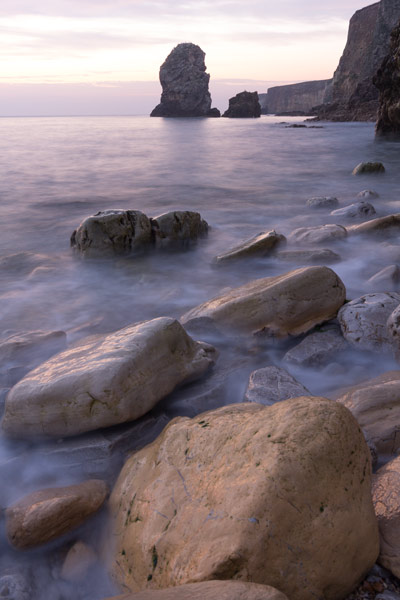
Let’s look at a different example where luminosity masks will work. Below we have a seascape where the sky is over exposed. We also have a sea stack in the background and cliffs to the right. We want to paint the sky from a darker exposure into this exposure, but without affecting the sea stack and cliffs.

seascape-luminosity-masks

After running luminosity masks, this is what Brights 2 looks like:

brights-2

In the mask the sea stack is almost completely black, while the sky is either white or light grey, and parts of the over exposed water are also included in the selection. This is almost a perfect selection. By using this mask, we can paint the sky in from a darker exposure, while not affecting the sea stack and cliffs.

This is what a quick paint using Brights 2 with a white brush at 100% opacity achieved (no other processing applied).


finished-luminosity-mask1

To Finish

As you can see, it is essential that you have enough contrast between the areas you wish to select and the areas you don’t wish to include in your selection in order to paint within the mask.

But with scenes of low contrast, ask yourself first, ‘do I need to blend multiple exposures or will 1 exposure suffice?’ If there are no clipped areas, stick with one exposure.

Enter your email below and join our community of more than 100,000 photographers who have also
Subscribed to our newsletter.
Downloaded our FREE Photoshop Course.
Got our FREE Easy Panel for Photoshop.
And, have our FREE Essential Guide To Luminosity Masks E-Book.

To go directly to any of our products, simply click on the image below.

Raya Pro
Lumi32
Gradiate
Gradiate
Art of Photography
Art of Digital Blending
Exposure Blend Like an Expert
Mastering Lumi32
Jimmy’s Big 5 Photos

Shutter Evolve Complete Product Range

Luminosity Masks – Why Can’t I Paint Inside The Selection?

7 thoughts on “Luminosity Masks – Why Can’t I Paint Inside The Selection?

  1. Great clarification. I now understand that luminosity masks might not but the answer for the example provided.. But what might work better? How can someone selectively darken that sky without affecting the buildings? (Assuming a brush or gradient won’t cut it…) Don’t want to resort to tone mapping and I think the colors are too similar for a color selection… Help!

    1. I am not an expert on this topic. But personally, I would give the Pen Tool a try on this specific image. Probably combined with a bit of feathering. There are a lot of straight lines and regular curves which normally makes the Pen Tool the perfect choice.
      It will probably take a bit of precision work here and there. But I think it might work due to a rather well defined edge between the buildings and the sky.

  2. Here’s how I would handle it – if you want to work with luminosity
    masks. Open the image in Photoshop and add a Levels Layer. Drag the
    sliders inward to create a high contrast image. One thing you’ll notice
    is that the sky brightens while the buildings darken. Now if you create
    the luminosity masks they will reflect the new settings. They
    important thing to remember is the luminosity masks will always reflect
    the image at the time they are generated. You can always mess with the
    levels or curves on a temporary level to change the way the masks will
    look when generated. In this image,
    the sky really needs both brightening and darkening to increase the
    contrast of the image. A lights selection can brighten the whites in the
    sky and a darks can darken the buildings and the darker areas in the sky to increase the contrast.
    Don’t forget to turn off or delete the original levels layer.

    1. Sorry for the duplicate post. I was having a bit of difficulty getting it to post and I guess I submitted it twice.

  3. I might handle it differently – if you want to work with luminosity
    masks. Open the image in Photoshop and add a Levels Layer. Drag the
    sliders inward to create a high contrast image. One thing you’ll notice
    is that the sky brightens while the buildings darken. Now if you create
    the luminosity masks they will reflect the new settings. They
    important thing to remember is the luminosity masks will always reflect
    the image at the time they are generated. You can always mess with the
    levels or curves on a temporary level to change the way the masks will
    look when generated. In this image,
    the sky really needs both brightening and darkening to increase the
    contrast of the image. A lights selection can brighten the whites in the
    sky and a darks can darken the buildings and the darker areas in the sky to increase the contrast.

  4. hi! I used the luminosity masks in one of my images (I am combining 2-3 long exp images) and it worked fine. Then I started to work on the next image, which is very similar but has a better perspective. While doing exactly the same procedure, after making selection based on one of the generated luminosity channels, same as with previous image I started to paint brush on the mask, and as a result, the brush painted everything regardless of the selection. I don’t understand why, since the previous very similar image was ok in doing the same steps.

  5. YES. The first thing that you have to do is checking the Histogram of the pic on your camera. Then, decide what exposure and shutte speed you need. After that, how many pics you need is obvious.

Comments are closed.

Scroll to top