
The Tourbox Controller Review – speed up your Photoshop editing
We were contacted recently and asked to test and review the TourBox Console. I’d never heard of it until that point. I am a real stickler for gadgets and gizmos so felt compelled to at least give it a go and share my honest opinion. The TourBox is a controller device which has been created to work in Photoshop and Lightroom to speed up our workflow. I’ve also tested some features in Adobe Camera Raw as well and it works.

Enter your email below and join our community of more than 100,000 photographers who receive regular tutorials and have also

Subscribed to our newsletter,
Downloaded our FREE Photoshop Course
Got our FREE Easy Panel for Photoshop
And have our FREE Essential Guide To Luminosity Masks E-Book
What’s In The Box?
- TourBox
- Connecting Cable
- Quick Start Guide
- Safety Instructions
- Warranty Card (1 Year Warranty)
TourBox Review – The Design
The TourBox is very cleverly designed with the user in mind. It’s ergonomic compact design helps to pack a load of functionality in the palm of one hand. The console itself is deceptively heavy for its size. This gives it a solid purchase on your desk or workstation. With four rubberised feet on the base, it sits firmly when in use. It feels good quality as well.
The shape and placement of the buttons and dials have clearly been well thought out. Everything seems to work from the knob in the centre outwards.
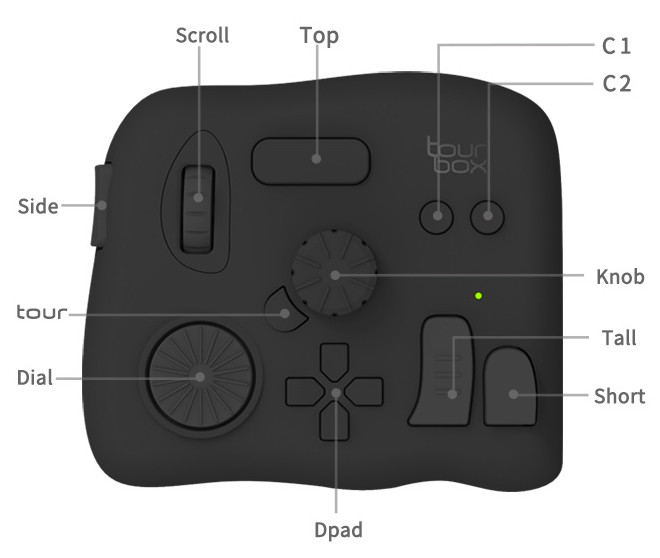
By placing your left hand over the centre of the console the only area you can’t access immediately is the Dpad. The dial and side button can be controlled by your little finger. You can use the scroll wheel with your ring finger. The Top button is ideally placed for your middle finger. Whereas the C1 and C2 buttons can be reached with ease using your index finger. That leaves your thumb to use the Tall and Short buttons. I’m not sure how it would fare under the right hand for those of you who use the mouse with your left hand. The buttons, of course, can still be accessed but I feel it’s not as free-flowing in the right hand as it is with the left hand.
TourBox Review – The Functionality
Essentially what the TourBox Editor for Photoshop, it’s a very quick way of accessing Keyboard Shortcuts. For example, by default, pressing the Tall Button is the same as holding down the Alt or Option key. The Short Button is the same as pressing the Spacebar. Also, quick tool selection, pressing right on the Dpad is the same as pressing the B key on your keyboard which selects the Brush tool. It’s very simple in its concept and functionality. When your TourBox arrives, the first instruction is to go to www.tourboxtech.com to download the latest software.

The software is really easy to navigate. This is where you can reset functions. Something you will have heard if you’ve watched any of our Youtube videos is the term “to hide the marching ants…”. As a default, there isn’t a function set up to hide the marching ants/ active selection. We can change a function to do this. For example, I don’t often use the Feather function in Photoshop so I change it. it’s really easy.
First, we find the controls that we want to change and click on it. The Feather function is Top button + Up on the Dpad, indicated by the diagram on the left.
![]()
We know that the keyboard shortcut for the feather function is SHIFT+F6. When we click on this control the setting box appears and this is what we see. The highlighted key is SHIFT and the input key is F6.

We also know that the keyboard shortcut to hide the marching ants or hide active selection is Crtl+H or Cmd+H. So, if we change the highlighted key to Ctrl and type in the H key, it comes up with the function Extras.

I don’t know this keyboard shortcut as “Extras”, it is called “Hide Active Selection”. We can rename it to whatever we want. All we need to do is click the small edit icon on the right which looks like a pencil and type in the name that you want.

Deselect the edit function and click Ok which will be in the bottom right corner. Now the Feather shortcut has been replaced with the Hide Marching Ants shortcut.
![]()
The ability to re-program this console very easy. It means that you don’t have to use it straight out of the box as it is. You can personalise the TourBox straight away to your most-used shortcuts.
TourBox Review – Sections
The TourBox Editor for Photoshop is divided into three sections, Rotating, Prime Four, and Kit.
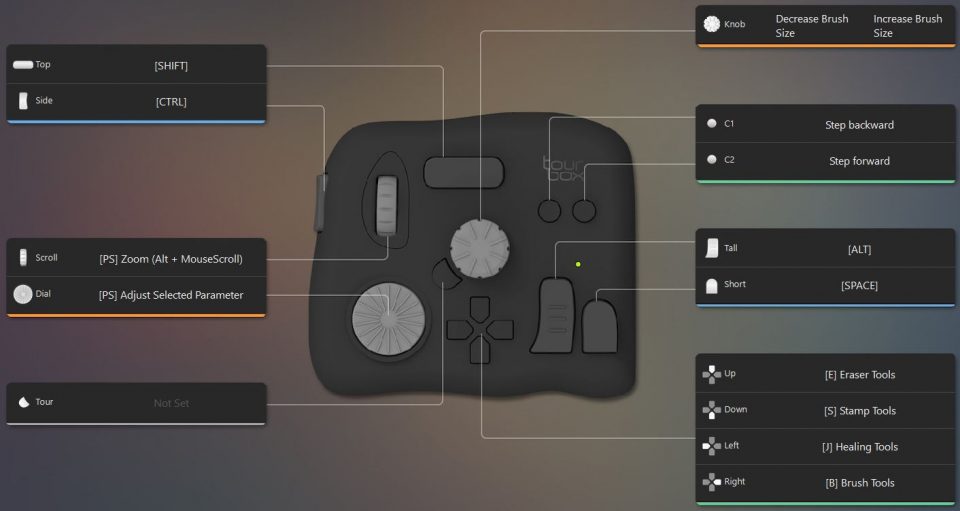
Rotating Section
This section focuses on the Knob, the Scroll, and the Dial. By default these controls bring you:
- Zooming
- Layer Selection
- Blend Modes
- Adjust Values
- Brush size
- Brush Opacity
- Brush Hardness
- Brush Flow
They are the functions that are preset in the Rotating Section of the TourBox. There are three slots with no functions installed so you can add to these. You can also change all of them to your own preference.
Prime Four Section
This section focuses on the Top, Side, Tall and Short buttons. These buttons are more like command keys:
- Top = SHIFT
- Side = CTRL/CMD
- Tall = ALT/OPT
- Short = SPACE
There is also the ability to set double clicks for these buttons with alternative function. For example, we could set a double-tap of the top button to serve as the ENTER key. The Prime Four keys can also be used in conjunction with each other such as the Side + Tall buttons when pressed together will apply the Deselect function (CRTL+D or CMD+D). Again ALL of these buttons can be changed.
Kit Section
This section focuses on the C1, C2, and Dpad buttons. These buttons are more like function buttons keys:
- C1 = Step Backward
- C2 = Step Forward
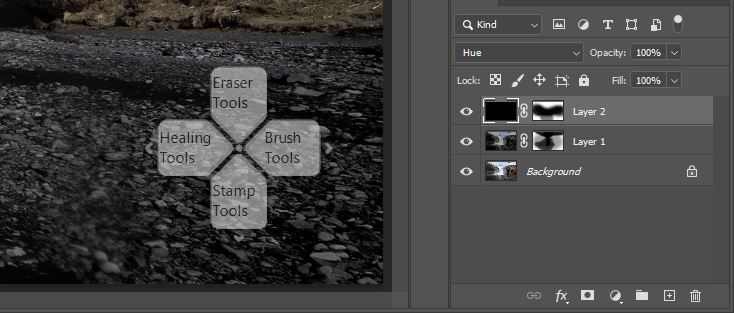
The four buttons on the Dpad can have up to 12 functions. The four buttons work independently or in conjunction with the Side or Top buttons. Here are the default functions for the Dpad.
| Dpad Only | Side Button +Dpad | Top Button + Dpad | |
| Up | Eraser Tool | Marquee Tools | Feather |
| Down | Stamp Tool | Lasso Tools | Fill… |
| Left | Healing Tool | Quick Selection | Inverse |
| Right | Brush Tool | Crop Tools | Free Transform |
We receive a small commission for each sale, but the review is unbiased.
Enter your email below and join our community of more than 100,000 photographers who receive regular tutorials and have also
Subscribed to our newsletter,
Downloaded our FREE Photoshop Course
Got our FREE Easy Panel for Photoshop
And have our FREE Essential Guide To Luminosity Masks E-Book
TourBox Review – Guides and Support
The Quick Start Guide that comes with the TourBox is very simple. Straight to the point and richly informative. It takes you through the installation which is really simple, then into console familiarisation. Like the TourBox Software and Console, the Quick Guide is multilingual. The supported languages are English, Spanish, Italian, French, Dutch, Japanese, Korean and Chinese. As well as having a printed version of the Quick Guide included in the box, a digital copy is also installed on your computer for quick access.
When you open the TourBox Console software there’s even more help. There are Tips, which when pressed opens a guide to help you understand how to navigate around the “Console”. “The Console” is the main software that you download (the first image of this article). This is where you got to reprogram functions. It also shows you the TourBox layout and introduces you to the TourBox HUD.
The HUD panel displays the Dpad buttons and their functions. You can display this or hide it as you please. It certainly will help remind you what the functions are when you’re first learning your way around the Tourbox.
Our Conclusion of the Tourbox
I’m not a very dexterous person, I’m all fingers and thumbs. I tried to learn how to play the guitar once and I would love to be able to play the piano, I don’t know how many times I’ve tried. Because I know how my hand-eye coordination works, I think the tour box might not be for me.
Then I remembered the reason why I have this device in the first place. To write a review, I must persist.
I have to admit the TourBox is beginning to grow on me. I have been using it in some of my recent post-processing. It’s still new to me but, I am starting to remember what functions I set, and with more practice, it will speed up my workflow. Especially when masking, the default brush tools that are preset in the TourBox are used all of the time. It’s so quick to change brush size, opacity, flow, hardness, and more. This means you can very easily and precisely add to or subtract from the mask that you are building.
If you like to work your own way then you will enjoy the TourBox. All of my own most used functions are set to my TourBox, it is completely personalised to me. The downside is that the concept is new, often new things take a bit of getting used to and this is no exception. But with some persistence, I’m sure we will eventually use it more and more. Like most things, practice makes perfect.
The TourBox will suit any Photoshop user, from beginners to advanced users. Especially for beginners who are getting to grips with learning keyboard shortcuts, with the TourBox you can make your own shortcuts. The TourBox almost entirely does away with the need to use your keyboard. For more advanced users and those who like to have the maximum amount of control in a minimal amount of time. You can whiz through your workflow in no time once you get used to how you have set up your Tourbox.
Is the TourBox Worth $169?
If you take your time and enjoy the post-processing side of photography and have time to spend in this process then it will help. It’s well worth it, it will bring you even more enjoyment, once you have spent time getting used to the TourBox.
If you don’t have a lot of time for post-processing. This will speed up your workflow. Even if you don’t use the TourBox to its full potential it will still help you. For example to test this out. I set the left Dpad button to the Eyedropper tool and the right Dpad button I kept as the Brush tool. Flicking between left and right I was able to rapidly choose different colours and paint without delay. The same principle was used for the Clone Stamp tool and also applied to Quick selection and Quick masking. It was so fast using just a few functions in a simple workflow.
For functionality, you seem to get a lot for your money with the TourBox compared to other similar product available (see below).
$169 is not a small sum of money.
You can save a further $10 by using the following Discount Coupon: TB202011181DM
TourBox Review for Photoshop Pros & Cons
Pros
- Compact Design
- Easy to Program
- Intuitive Support
- 7 Different Languages
- The Price
Cons
- Knob dial can sometimes lag
- Takes time to get used to
- HUD can get in the way of view
- More desk clutter
Thank you for reading The Tourbox Controller Review, You might also be interested in the articles below. Be sure to sign up for our newsletter for more tutorials and great offers.
Enter your email below and join our community of more than 100,000 photographers who have also
Subscribed to our newsletter.
Downloaded our FREE Photoshop Course.
Got our FREE Easy Panel for Photoshop.
And, have our FREE Essential Guide To Luminosity Masks E-Book.
Market Alternatives to the TourBox for Photoshop
Loupedeck CT is a powerful addition to your workstation, helping you achieve professional results fast across photo, video, audio, design and live-streaming. – Approximately $500
MONOGRAM is a modular, freeform control surface designed to streamline editing and make interacting with creative software more engaging. It is perfectly suited for photo editing and retouching, video editing, colour grading, virtual production, audio/music production, and other creative workflows. – Prices vary from $499 – $799