Why Use Luminosity Masks in Exposure Blending
In the cold we wait; in the rain we hope, and during the night we look up at the sky and wonder when, if ever, those clouds will clear. As photographers we have little control over the conditions in which we shoot. We have our optimism, which, in the long run, will take us to that stunning sunset and shimmering Milky Way. So why use Lumisoity Masks in Exposure Blending?
With so little influence over our subject, it is with little wonder that we push so hard in improving all that we can control. We sharpen our compositional eye, we deepen our knowledge of the fantastic machinery which sits upon our specialist tripods, and now, in the digital age, we push the software available to us to its boundaries in order to create an image that represents to us the scene we earlier witnessed.

Benefits of using Luminosity Masks in Exposure Blending
The biggest step in taking control over my own imagery was the day I committed myself to the mastery of luminosity masks in exposure blending. I’d previously relied on HDR software, like Photomatix, to blend multiple exposures. However, while I still enjoyed Photomatix’s tone mapping feature for interior work, I found myself demanding more of my landscape and cityscape photography.
In the following article I’ll present the reasons why luminosity masks have come to form the back bone of my Digital Workflow.
Some Free Luminosity Mask Resources
We offer free actions in our Photoshop PowerPack action set that will create and delete Luminosity Masks for you at the click of a button. See here for more information: Photoshop PowerPack action set
-Tutorial Continued Below-
Enter your email below and join our community of more than 100,000 photographers who receive regular tutorials and have also

Subscribed to our newsletter,
Downloaded our FREE Photoshop Course
Got our FREE Easy Panel for Photoshop
And have our FREE Essential Guide To Luminosity Masks E-Book
Why Use Luminosity Masks?
1. Image quality. We’ve all seen over-saturated, noisy, messy, HDR images. One guaranteed way to avoid the poor image quality we normally associate with HDR is to manually blend your exposures in Photoshop using luminosity masks.
When exposure blending with luminosity masks, you’re working only with the RAW files to restore highlights and shadows. You do not affect any other part of the image. In other words, your final blended image will be, more or less, exactly the same image quality as your RAW files.
You do not affect any colour changes, you retain absolute sharpness, you don’t flare up noise (which means you can shoot at a much higher ISO), and you will not exaggerate chromatic aberration.
This is the major reason why so many are turning to luminosity masking to create natural, balanced HDRs.
2. Choose where you wish to blend exposures. With HDR software we have some control over the way our images are rendered, but with luminosity masks we are given complete control – we decide which areas we wish to influence and which we do not want to affect. For example, in the image below, the only part I wished to affect were the candles on the ground. Everything else was properly exposed for.

However, when you process your exposures through 3rd party software, you cannot guarantee that other areas of your image will not be affected. With luminosity masks, I was able to very quickly generate accurate selections and paint in darker exposures, thus restoring details in otherwise blown out areas without affecting any other part of the image!
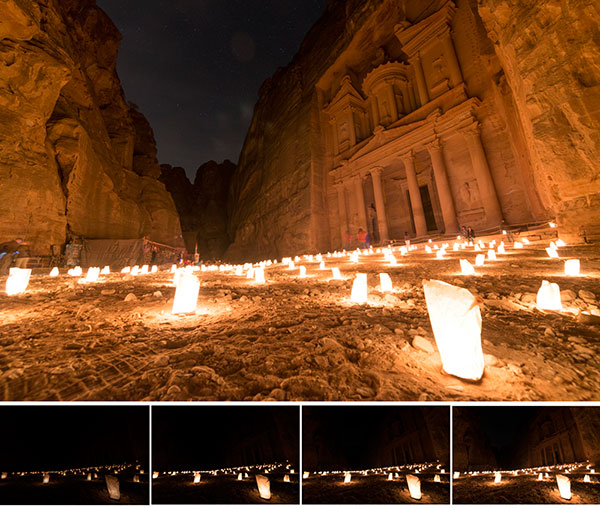
You may notice that the final image has no tourists while the originals do. For a tutorial on how to remove tourists from our images see: How To Remove Tourists From Your Photos
3. Control the strength of the exposure blending. Moving beyond the first point, not only can we choose the exact areas to influence, we can also gain complete control over how much we wish to influence a given area. By selecting the appropriate luminosity mask, by intersecting masks, and by choosing the opacity of our brush the precision of the changes we can make is staggering.
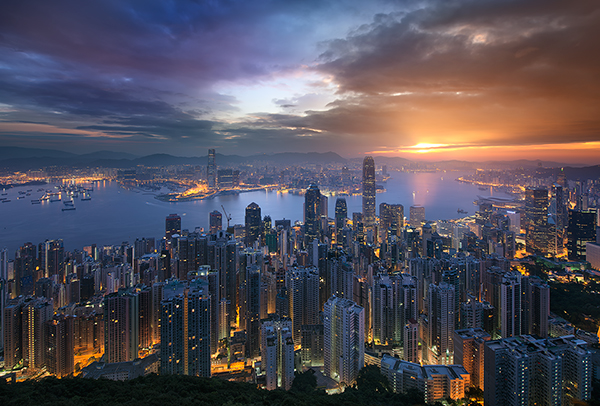
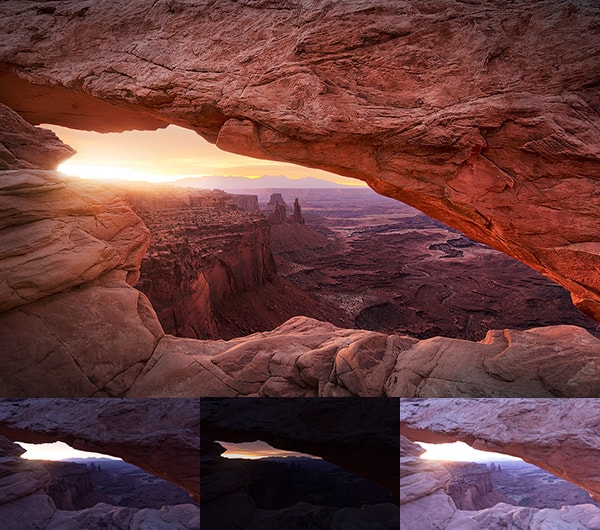
In the image below, while I wanted to bring back detail in the sky, I didn’t wish for the sky to be completely recovered. I wanted the sunrise to have more vibrancy, and light. Therefore, during the exposure blending process, I only blended in the lower exposure at about 50% opacity. This left me with some information in the sky but which wasn’t too dark. I also managed to isolate where the sun was rising with a luminosity mask selection and give it a boost of soft light.
4. Smooth Transitions for perfect blending.There are other ways to blend exposures in Photoshop. A common way is to use a gradient mask, which works quite well when you have a flat horizon. We could also use one of Photoshop’s many selection methods to make a specific selection. However, the power of Luminosity Masks lies in their ability to make feathered selections based on luminosity alone. This one point is why luminosity masks are the most powerful digital blending method around. If you’re new to Photoshop, then feel free to watch this video on feathering in Photoshop to get up to speed.
Why is feathering by luminosity so important? Essentially, our varying exposures don’t fit together like a jigsaw puzzle. Often we can’t simply replace one part of an image for a brighter or darker exposure. We have to feather our selections so that the transitions between exposures is smooth and natural. Luminosity masks, since they are created solely on the brightness of your base exposure, are naturally feathered in all of the right places, making the exposure blending process very straightforward, with natural results.
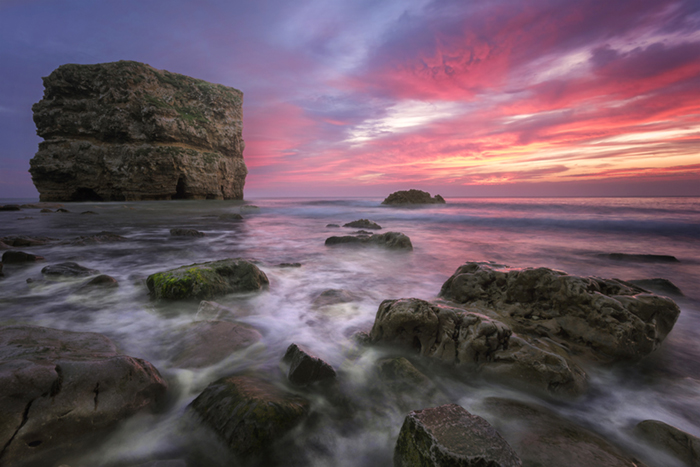
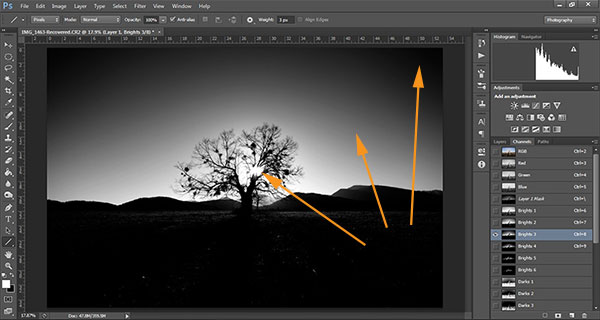
In the examples below, we see a selection from a Brights 3 luminosity mask. Below that is the image on which this luminosity mask was generated. As you can see, the blown out area is where the sun is and is completely white. The black areas of the sky in the corners are normally exposed. In other words, that part of the sky is blue and won’t be selected in the mask. The bits in between, however, span a smooth monochromatic range. The brighter the tone, the stronger the selection. By choosing this mask we will have a perfectly feathered selection that will restore information in the blown out areas from an underexposed image.

5. Speed and creativity. Finally, blending exposures in Photoshop is a fairly quick process. On average I’d spend between 5 and 15 minutes manually blending exposures, depending on the complexity of the image. Considering the huge gains to be had from this type of exposure blending, I see it as 15 minutes incredibly well spent.
In a strange type of way, I garner far more pleasure in manually blending exposures than I do using 3rd party software. In the past I’d upload brackets in a mundane type of way, play with some sliders and that was it. Now, I enjoy gently painting various exposures into one another. The process is extremely satisfying. For the image below, I loved painting in the soft light in the top right and left corners of interior, to create a soft, appealing vignette. I feel, for one reason or another, a greater sense of achievement and satisfaction when I have an image all of my own design.

You can see a Before/After and explanation of the workflow for this here: Petra
Why Use Luminosity Masks in Exposure Blending – Conclusion
Luminosity masks aren’t for everyone. They take a little time to understand and learn. They’re certainly more difficult to master than 3rd exposure blending software. There’s a lot of trial and error at first. However, with mastery comes a dramatic increase in image quality and personal satisfaction. As much as I enjoyed my experiences when I tone mapped many images, I could never go back to that. Regardless of the quality of the tone mapping program, nothing can give control back to the photographer than digitally blending using luminosity masks, in my opinion.
If you’re ready to join over 25,000 of others in consistently creating stunning images, we have a complete Luminosity Mask tutorial available for instant download.
Enter your email below and join our community of more than 100,000 photographers who have also
Subscribed to our newsletter.
Downloaded our FREE Photoshop Course.
Got our FREE Easy Panel for Photoshop.
And, have our FREE Essential Guide To Luminosity Masks E-Book.
To go directly to any of our products, simply click on the image below.


