Do you have a specific question about using Raya Pro?
Click here for the How To Use question and answering page
How To Use InstaMask and Luminosity Masks
InstaMask Tutorial
Video Content
- 1:15 – Tooltips
- 1:30 – InstaMask Structure
- 1:59 – Making a Mask
- 3:09 – Adjusting a Mask
- 3:50 – How To Apply a Mask
- 4:20 – Manually Blend Selection
- 5:50 – Deselect Active Selection
- 6:02 – InstaMask Workflow Logic
- 6:49 – Functions in InstaMask
- 7:47 – Adobe Camera Raw
- 8:41 – More Ways to Make Masks
- 9:45 – Saturation Masks
- 10:54 – Mapping a Selection
- 11:24 – Making a Black & White Image
- 12:02 – Testing a Mask
- 12:44 – Live Testing in Real Time
- 14:43 – Brush Settings
- 15:58 – Workflow Recap
Raya Pro Downloads
Descargar manual de instrucciones / Download Handbuch / Scarica il manuale, / Télécharger le manuel
Useful Written Luminosity Mask Tutorials
The below series of tutorials are superb reading for anyone wishing to learn how to use luminosity masks, and exposure blend with skill. They do not feature Raya Pro or InstaMask, but that shouldn’t stop you reading on. You will still learn a great deal, which you can then apply to your workflow when using InstaMask.
Further videos
How to use Edge Mask for Sharpening
Beginner’s Luminosity Mask video (Features the Easy Panel)
How To Blend a Single Exposure
Written InstaMask Instructions
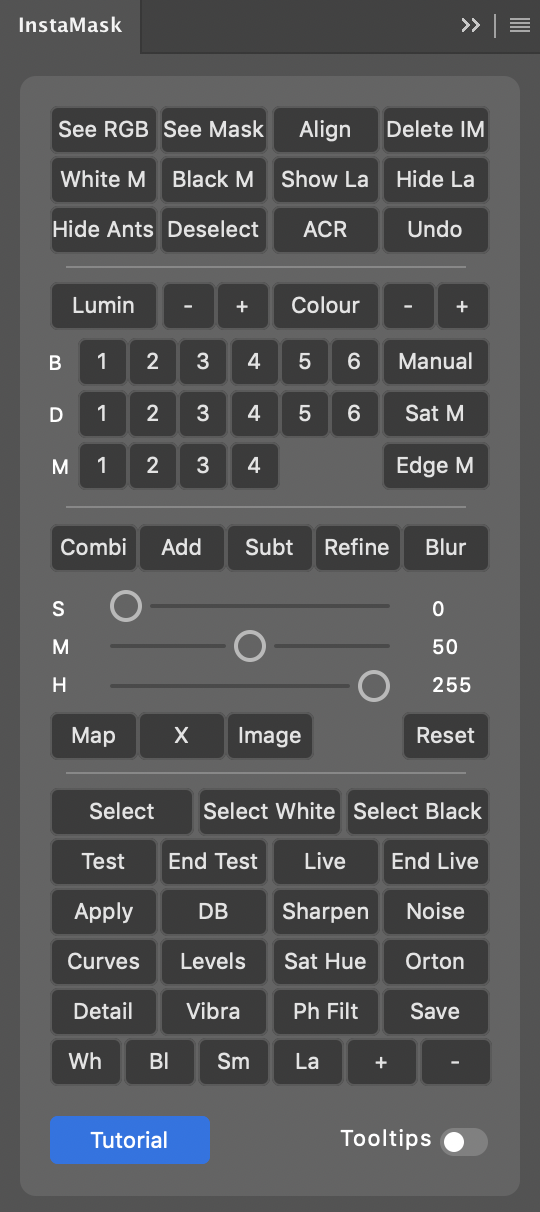
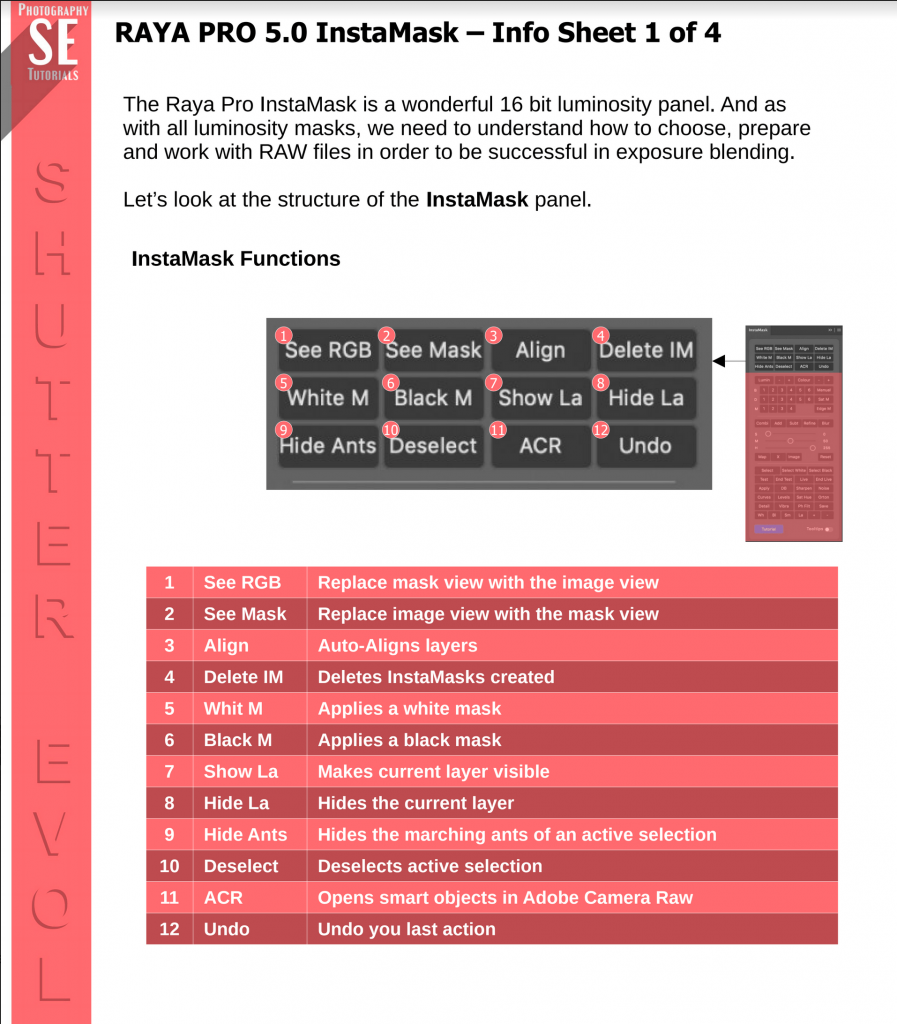
InstaMask is a wonderful 16 bit luminosity panel. And as with all luminosity masks, we need to understand how to choose, prepare and work with RAW files in order to be successful in exposure blending.
Top Buttons Explanation:
- See RGB: When a mask has been created (by pressing the number buttons) and is visible on the large screen, this will switch to your image view, rather than the black and white mask view.
- See Mask: Switches back to the mask view.
- Align: This is will auto-align all layers visible in your layers panel. It cannot align smart objects. To align smart objects, please do this manually. You can see how to manually align in this video, Skip to 6:15:
- Delete IM: Deletes the mask you have created with InstaMask.
- White M: Creates a white mask on the selected layer.
- Black M: Creates a black mask.
- Show La: This makes your layer visible.
- Hide La: Makes layer invisible. Often when we create a brights mask, we need to make the darker exposure invisible, and build the brights mask around the base layer. So with the dark layer selected, we press Hide La to hide it.
- Hide Ants: After we make a selection, marching ants will appear. This will make them invisible, but still active.
- Deselect: This deselects any active selections we may have.
- ACR: Opens Adobe Camera RAW. Your photos must have been opened as smart objects from ACR to do this. See how to do that here: https://www.youtube.com/watch?v=sFr4AlU4Mew
Undo: This will undo your last action.
Mask Button Explanations
All of these buttons are used to generate your luminosity masks.
- Lumin: Allows you to point and click the area of brightness you wish to select. The + and – buttons increase/decrease that selection.
- Colour: Same as Lumin but allows you to make selections based on colour.
- B: Brights masks. The lower the number, the more open the mask.
- D: Darks masks.
- M: Midtones masks.
- Manual: Uses Photoshops (CC only) inbuilt luminosity selection function.
- Sat M: Creates a saturation mask which only targets the most saturated tones.
- Edge Mask: Good for creating a mask that targets all of the edges in your photo.
Refine Buttons
This area allows us to refine the masks we have created from the buttons above.
- Combi, Add, Subt all intersect masks to give even more refined selections as shown in the video above.
- Refine: Allows us to make closer adjustment to our mask, like refining the edge of our selection. This isn’t a frequently used tool. I would avoid it.
- Map: After creating a mask, Map shows us via the colour red which areas will be affected by the mask. Once we’re done with Map, press the X next to it to cancel Map.
- Image: If we happen to create a mask and think that it could make a good black and white photo, this will create a new Window in which our mask is now a normal layer.
- Reset: Resets the sliders.
- The Sliders: These are used to adjust a mask. S is for Shadows, M is for Midtones, and H is for Highlights. Please note we cannot overlap the sliders (bring the Shadows higher than the Midtones, for example). This will give you an error.
Bottom Buttons
All of these buttons, apart from the last line of buttons, need an InstaMask mask to be active. In other words, you need to press one of the numbered buttons above before you can use these buttons. That is because these are output functions. They decide what we will do with our mask.
- Select: Creates an active selection from the InstaMask.
- Select White: This makes an active selection, places a black mask on our layer, sets a white brush and hides the marching ants. So, you’re basically ready to paint on your mask once you press this.
- Select Black: Does everything Select White does, but creates a white mask and selects a black brush.
- Test: This applies our mask to the layer in order to see if it looks okay.
- End Test: We press this once we have finished testing the mask.
- Live: We can adjust the mask and see in real time how it is affecting the layer.
- End Live: This ends the Live editing.
- Apply: Applies our mask directly to the selected layer.
- DB: Applies mask to a dodge and burn layer. To use this, after pressing DB, select the layer (not the mask) and then a white (to dodge) or black (to burn) brush. Paint directly onto the layer to dodge and burn. The mask will restrict where this takes place: Highlights, Mdtones, Shadows. Change the Blend Mode of the layer to Soft light or Overlay, depending on the effect you want. And lower the opacity of the layer to weaken the effect.
- Sharpen: This explains the sharpen function: https://youtu.be/iVgfbiH4-fw
- Noise: Applies the mask to a noise reduction layer. So if you only wanted to apply noise removal to the shadows, for example, you would create a Darks mask, then press Noise.
- Curves: Applies mask to a Curves layer.
- Levels: Applies mask to Levels layer.
- Sat Hue: Applies mask to Hue/Saturation layer.
- Orton: Applies mask to an Orton Effect layer.
- Detail: Applies mask to a detail enhance layer.
- Vibra: Applies mask to a vibrancy layer.
- Ph Filt: Applies mask to a Photo Filter.
- Save: Saves the mask to a new layer for later use.
- Wh: White Brush.
- Bl: Black Brush.
- Sm: Small Brush.
- La: Large Brush.
- +: Make brush larger.
- -: Make brush smaller.
Premium Courses
![]()
“Literally the best digital download ever! I’ve followed Jimmy’s advice and techniques for a while now and thought this course would teach me nothing that I hadn’t already learnt from him but I was wrong. This course really goes into the finer details about both planning and processing” By Lee McDonnell
![]()
“Jimmy is a great teacher, this latest tutorial is a must and highly recommended. Jimmy makes you feel at ease and takes you on his creative journey. Found myself doing a few ahaa moments learning new things and seeing different perspectives. Great work Jimmy” by Mike McDonald
Exposure Blend Like an Expert Course
Art of Photography
Jimmy’s Big 5 Photos Course
