Tutorial – How to create a cityscape reflection in Photoshop
Download Free Luminosity Masks here: Free Luminosity Mask Plugin
Every now and then we have the good fortune of capturing a beautiful cityscape scene with tall buildings reflected crisply in a river. Sometimes, however, things don’t go our way and we choose to become somewhat creative. This article will show you how to create a cityscape reflection in Photoshop.
As fans of post-processing, our workflows in Photoshop become far too elaborate. With all of the amazing-ness that Photoshop provides, we tend to get excited and overdo things.
It’s often most effective to keep things basic. A few tweaks here and there might turn an ordinary image into something much more impressive.
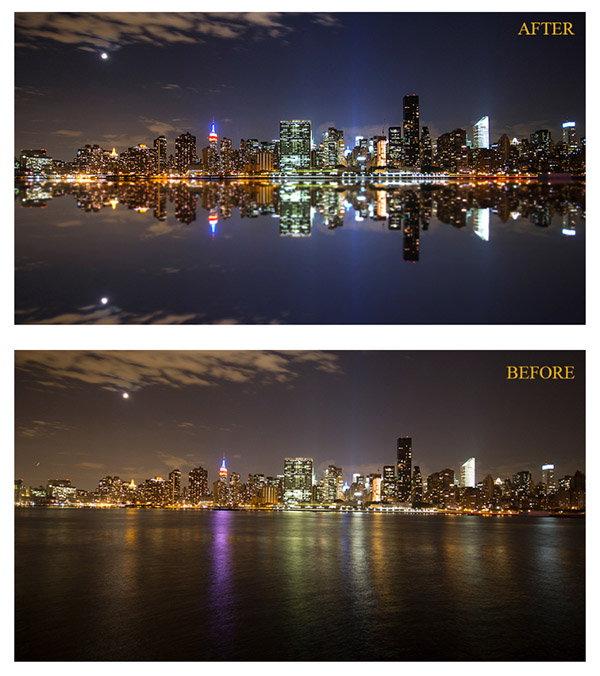
The two images above look completely different, almost unrecognisable as the same photo. Yet, the lifeless cityscape shot I originally took only required a few minutes of Photoshop to get to the final image.
The Cityscape Tutorial
Important note:
You need an image with a cityscape in the back ground that has a flat border underneath it. You don’t need  water in the foreground. A flat border with nothing blocking the view is all that is needed.
1. import image into Photoshop’s ACR. Recover the highlights and shadows if necessary. Settings used here: highlights -68 & Shadows +42.
2. Correct the White Balance. I simply checked Auto to get the cooler, blue tint.
3. Open up in Photoshop. Straighten with the ruler tool so that border is perfectly flat.
How to create a cityscape reflection in Photoshop
4. Now you are going to make a rectangular selection. To do this go to the top left tool bar and choose the Rectangular Marquee tool. From the top left of the image, going towards the bottom right of the skyline border, make a rectangular selection. The only area selected should be the border of the city and everything else above.
5. Right click on the selection and choose Layer Via Copy. This will copy the selected area into a new layer.
6. Now go to Edit>Transform>Flip Vertical. You will see that selection flip upside down.
7. Choose the move tool in the top right tool bar and drag the image downwards until the two borders meet and you now have a perfectly reflected image.
8. Crop the image accordingly.
9. To give the reflection that soft, watery look, go to Filter>Blur>Gaussian Blur and choose around 6 pixels.
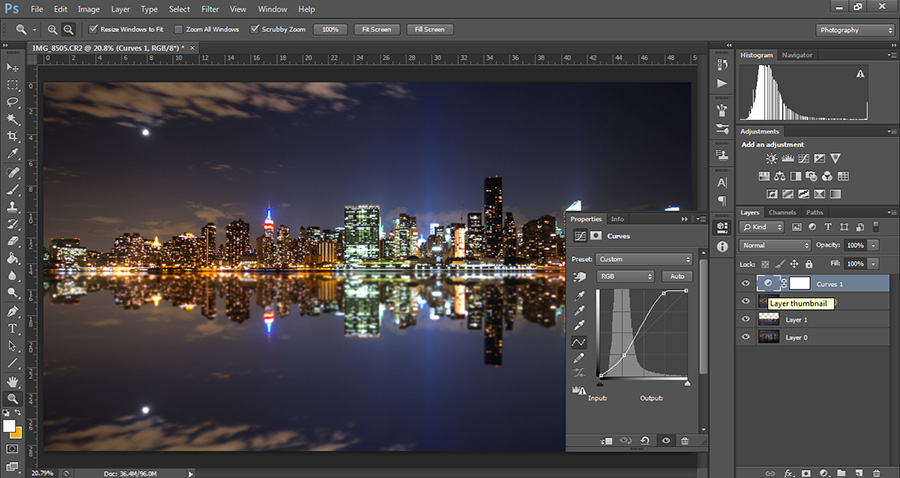
10. Now we simply need to increase the contrast of the image. For this create a curves layer, raise the highlights and lower the shadows (see the image).
11. Finally, sharpen the image anyway you wish.
How to create a cityscape reflection in Photoshop – Alternative Tutorials on the Web
Youtube Video by Blue Lightning
Enter your email below and join our community of more than 100,000 photographers who have also
Subscribed to our newsletter.
Downloaded our FREE Photoshop Course.
Got our FREE Easy Panel for Photoshop.
And, have our FREE Essential Guide To Luminosity Masks E-Book.
To go directly to any of our products, simply click on the image below.


