7 Ways To Instantly Improve Your Photos
Taking a break from my usual video tutorials, I’ve put together an article with some ideas that have helped my photography somewhat. Sometimes, even a small tweak can make a big difference in the final product.
1. Manual focus – Modern day cameras and lenses are capable of capturing extremely sharp images while in auto focus mode. However, nothing is as consistently accurate as your eye. I like to manually focus every shot so that I can achieve a crisp image.
To do this easily, switch to Live View and use the magnifying glass to zoom into an area of interest and slowly shift the focus ring until the image is sharp. Some photographers, when shooting with wide angles, like to focus closer in the corners (not right in the corner), to create a sharp image throughout. Give this a try with your lens and see how it works out.
For creating sharpen image, see this article: 15 Ways To Create Sharp Images
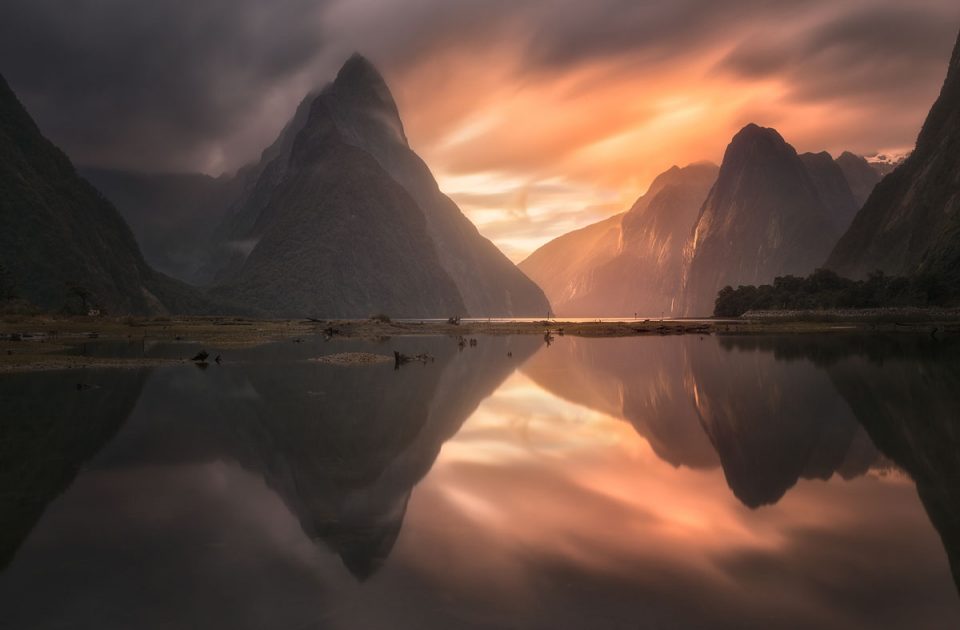
2. Love Thy Foreground. Whenever I’m asked for one piece of compositional advice, I always say the same thing – the foreground is just as important as the background. An image is a visual story. Our background subject, let’s say a beautiful mountain, is the conclusion to which a nicely captured foreground cleverly leads us. The foreground builds the story.
Often the foreground is the story, and everything else in the image works together to further enhance the mood which compliments that foreground.
My personal advice, if you don’t do so already, is to get your camera as low as possible where appropriate. Many of the locations I shoot are frequented by other photographers. Sometimes huge groups will be shooting at the same time as me. And when I look across to them, the vast majority are standing with their tripod at a convenient eye-height, shooting towards the subject.
By lowering your camera, or pushing it closer to an interesting foreground element, you may capture some beautiful textures and colours which tie together the entire scene.
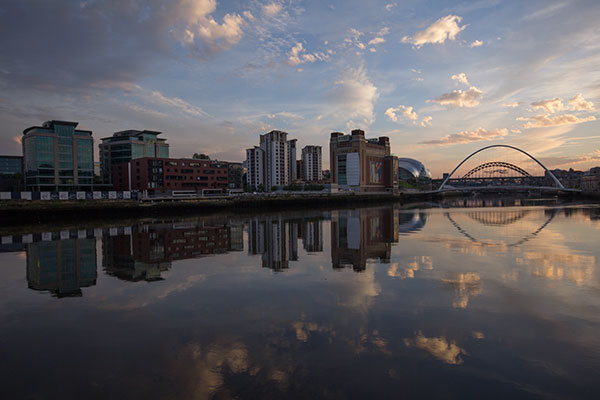
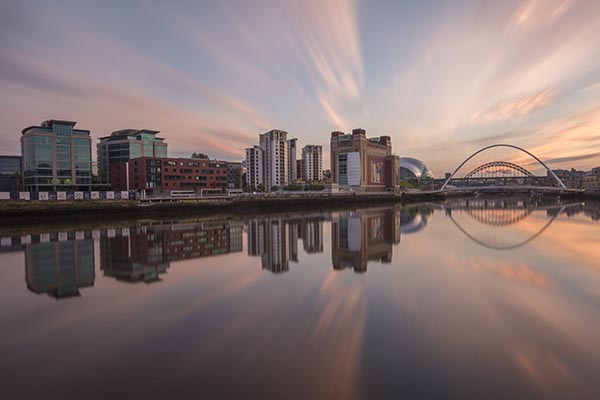
3. Long Exposures (or even fake long exposures). One of the wonderful things about long exposures is that they can turn a relatively lifeless sky into a dynamic element that really enhances the scene.
Image shot without ND filter
Shot with B+W 10-stop ND (hence the warm cast)
If you don’t own an ND filter and find yourself strapped for cash at the moment, you can create a fake long exposure effect in Photoshop. While it doesn’t look as natural as an ND filter it can still be very impacting. Here is a tutorial showing you how to do this in Photoshop: How To Create A Realistic Fake Long Exposure Effect In Photoshop
Fake Long Exposure
4. Shoot Into The Sun. I’m sure, if you’ve been into photography for a while, you would have heard, or read, advice telling you not to shoot into the sun. It’s one of the first rules of photography we learn. This is mainly because flare from the sun can be challenging to deal with. Some photographers also claim it can damage your eyesight and sensor.
I would like to go against the grain and say that this rule is somewhat outdated. You can create some stunning images shooting directly into the sun. And dealing with flare is significantly easier in the digital age. As for damaging the sensor, a friend of mine, Beboy, makes a habit of shooting into the sun regularly and his sensor is still pushing out beautiful image after beautiful image.
When shooting into the sun, use the Live View and not your viewfinder, in order to protect your eyes.
In the image below, there was a lot of flare to the right, but with some simple planning and a couple of seconds in Photoshop, the image was as clean as a whistle. You can see how here: Sunrise in Guilin
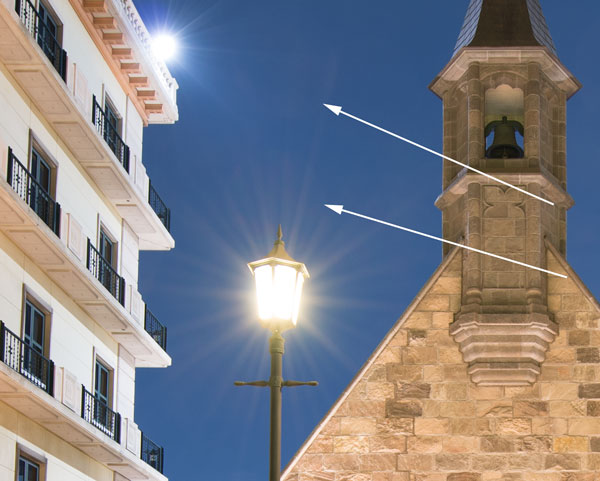
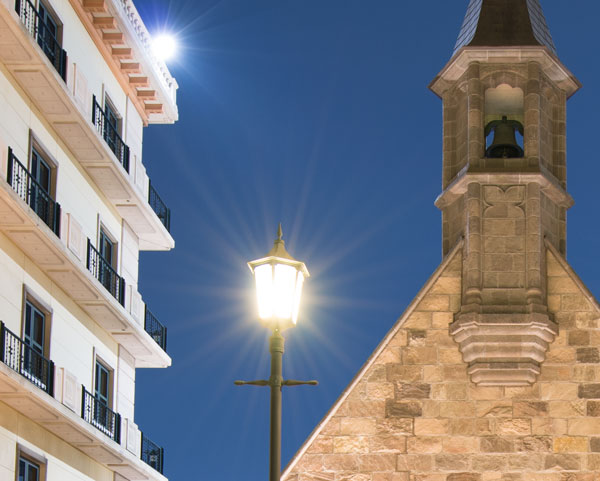
5. Clean Lens. While this may seem like an obvious and less impacting tip, from some scenes, a clean lens is absolutely essential. Night cityscapes are notoriously challenging when there are bright street lamps in your image, creating all sorts of flare.
However, much of that flare can be easily avoided with a clean lens. I shot the image below twice. The first time my lens, although it looked clean, must have been dirty. There was noticeable flare in the image. After a quick wipe with a soft tissue, the flare completely disappeared.
Lens flare above the light in two spots, and the light spikes are not smooth
After a quick clean, it is now lens flare free with clean, smooth spikes
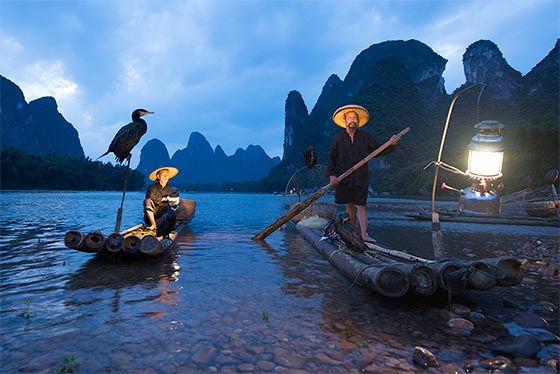
6. Darker Midtones. One great way of deepening the mood of your image is to darken the midtones significantly. This won’t work with all scenes, but naturally darker, moodier scenes could greatly benefit from a shift in midtones.
For example, in the images below we can see a big difference before and after post-processing. Despite colour changes and restoring highlights, the change with the biggest impact was darkening the midtones. This not only enhanced the mysterious feel of the scene, it also pushed the emphasis towards the lantern, which illuminates the scene nicely.
Before
After

We can darken the midtones a number of ways. I usually open a Levels layer, and slide the middle slider (under the histogram) to the right until I’m happy. This may result in some heavily under exposed areas. I often try to avoid pure black in my image. If you see heavily under exposed areas, in the same Levels dialogue at the bottom Output Levels. Where it says 0, I often change that to around 8 depending on the image. This will protect your shadows to some degree (Raya Pro users, you can simply press Shadows to protect the under exposed areas of their images).
Another way to darken the midtones and also create a magical feel is to create the Orton Effect (See this tutorial: How To Create a Dreamy Orton Effect), and change the Blend Mode of the Orton Effect layer to Luminosity. You will see the image darken and look very strange. Bring the opacity of this layer down until the image is nice and dark.
7. Value Local Contrast. What is the difference between local and global contrast? Global contrast is when you change the contrast of an image using a Levels or Curves layer, for example. It creates change at a large level. Local contrast affects contrast on a much smaller level. It can bring out fine details and textures, or add more drama to clouds, for example.
To create local contrast, I use Raya Pro’s DB Details and Nik Color Efex’s Pro Contrast filter. We can also use native dodge & burn tools in Photoshop, and the Clarity slider in Adobe Camera RAW and Lightroom (but this doesn’t always produce clean results).
It is extremely important that most local contrast changes are applied selectively. Let’s say we want to bring out more textures in some clouds. We can open up Nik Color Efex and create some nice local contrast. When we press OK, these changes will be applied to the whole image. While the clouds my now look perfect, the other subjects in the image may not. Therefore we will have to apply these adjustments just to the sky.
Learning to specifically apply local contrast changes will add a great deal of depth to your images.
Here’s a video for Raya Pro users on way to add local contrast to give more life to seascapes.

Enter your email below and join our community of more than 100,000 photographers who have also
Subscribed to our newsletter.
Downloaded our FREE Photoshop Course.
Got our FREE Easy Panel for Photoshop.
And, have our FREE Essential Guide To Luminosity Masks E-Book.
To go directly to any of our products, simply click on the image below.


