Do you have a specific question about using Raya Pro?
Click here for the How To Use question and answering page
How To Use the Dodge and Burn Panel in Raya Pro

Video Contents
- 0:34 – Tooltips
- 0:50 – Dodge & Burn Functions
- 1:02 – Highlights
- 2:25 – Burning Highlights
- 2:50 – Midtones
- 3:29 – Overlay/Soft light/Vivd Light
- 3:56 – Shadows (Dodging)
- 4:42 – Merging Layers
- 4:52 – 50% Grey
- 5:15 – Curves
- 5:38 – Dodge, Burn, Sponge
- 6:03 – Adding Warmth to Highlights
- 7:25 – Adding Detail
- 8:06 – Glow Free
- 9:00 – Zone Contrast
- 9:40 – More Features
- 10:32 – Orton Effect
Raya Pro Downloads
Descargar manual de instrucciones / Download Handbuch / Scarica il manuale, / Télécharger le manuel
dodge and Burn Info Sheet
Written Instructions for the Dodge and Burn Panel
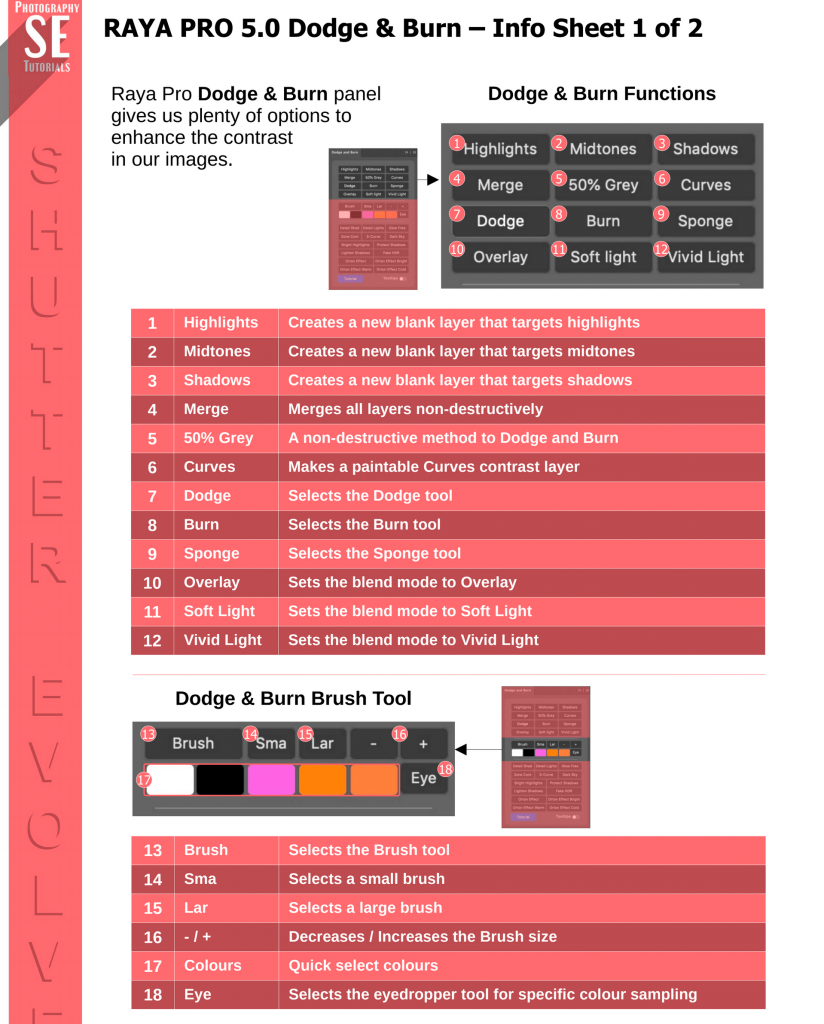
This panel gives us plenty of options to enhance the contrast in our images.
- Highlights, Midtones and Shadows: Each creates a new blank layer, and adds a mask that targets a specific tone. To use this, select the layer it creates (not the mask) and then a white (to dodge) or black (to burn) brush. Paint directly onto the layer to dodge and burn. The mask will restrict where this takes place: Highlights, Mdtones, Shadows. Change the Blend Mode of the layer to Soft light or Overlay, depending on the effect you want. And lower the opacity of the layer to weaken the effect.
- Merge: this merges all of our layers non-destructively. Then we can select Dodge or Burn and paint directly onto the merged layer.
- 50% Grey: Is a non-destructive way of dodging and burning and works the same way as the Highlights, Midtones and Shadows buttons, using a white or black brush.
- Curves: Creates a gentle S-Curve with a black mask that we can paint in.
- Sponge: Selects the sponge tool and lets us desaturate any parts of our image that have become oversaturated when using the Dodge and Burn buttons. Personally, I find it better to change the Blend Mode of the Merged layer to Luminosity if the colours are too strong.
- Brush: Selects the brush tool.
- Sm: Small Brush.
- La: Large Brush.
- +: Make brush larger.
- -: Make brush smaller.
- Colours beneath brush buttons: Select these to change our foreground colour to the corresponding colour.
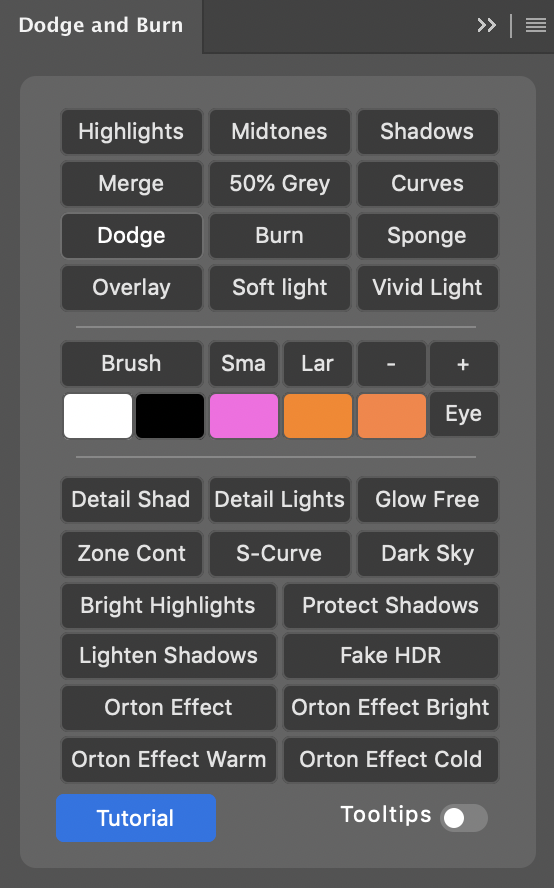
- Detail Shads/Detail Lights: Add detail specifically to the darker or lighter parts of the image. Personally I prefer the Detail Enhancer in the Filters/Finish panel.
- Glow Free: This is a cool way to add a gentle glow to you scene. See how you can do that here: https://youtu.be/nBiB5tP–h0?t=383
- Zone Contrast: This creates 6 layers, each one targeting a different tonal range. All of these layers are Curves layers. Essentially, we can make very specific contrast adjustments based on tonal range. Let’s say our shadows are a little dark. In the Zone Contrast group there are two Shadows layers. Choose one and raise the curve up. This will brighten your shadows without affecting midtones or highlights.
- S-Curve: Creates a standard S-Curve contrast adjustment.
- Dark Sky: This darkens brighter tones, and also deepens the colour within those tones.
- Bright Highlights: Adds extra brightness to the brightest part of the image.
- Lighten Shadows: Automatically recovers shadows if they are getting too dark.
- Protect Shadows: Places a Darks mask on a Levels layer so that you can manually recover the shadows.
- Fake HDR: This both recovers highlights and shadows.
- Orton Effects: All four of these add a dreamy Orton effect to your image. Don’t forget to lower the opacity of the layer if it looks to strange.
Premium Courses
![]()
“Literally the best digital download ever! I’ve followed Jimmy’s advice and techniques for a while now and thought this course would teach me nothing that I hadn’t already learnt from him but I was wrong. This course really goes into the finer details about both planning and processing” By Lee McDonnell
![]()
“Jimmy is a great teacher, this latest tutorial is a must and highly recommended. Jimmy makes you feel at ease and takes you on his creative journey. Found myself doing a few ahaa moments learning new things and seeing different perspectives. Great work Jimmy” by Mike McDonald
Exposure Blend Like an Expert Course
 $44.99 USD
Art of Photography
 $69.99 USD
Jimmy’s Big 5 Photos Course
 $69.99 USD