
HDR Tutorial – how to remove halos in Photomatix
One of the biggest tell-tale signs that a person does not have control over their HDRs or is not fully aware of the artifacts thrown up during the HDR process, is the existence of unnatural halos in his or her images. There are, fortunately, a number of ways to tackle halo reduction. This article will show you how to remove halos in Photomatix 100% of the time.
When using Photomatix, there is one particular method which we’ll look at today that will reduce haloing 100% of the time.
What are halos?
Halos are the glowing elements around high contrast edges. They’re usually most visible in the sky. Sometimes, they also appear as darker, murkier edges too.
Strength Adjustment Sliders in Photomatix
The very first slider in Photomatix, the Strength slider, is often the main culprit for halos. By sliding it all the way to the right, halos have a tendency to pop up.
Large Strength Number
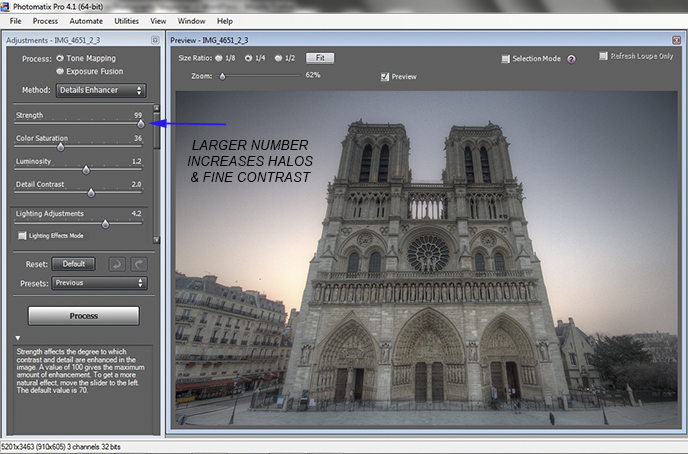
One of the reasons we choose to move the Strength slider to the right is because it can do an outstanding job at bringing out finer details in our images. So how do we enjoy the benefits of the Strength slider while avoiding halos?
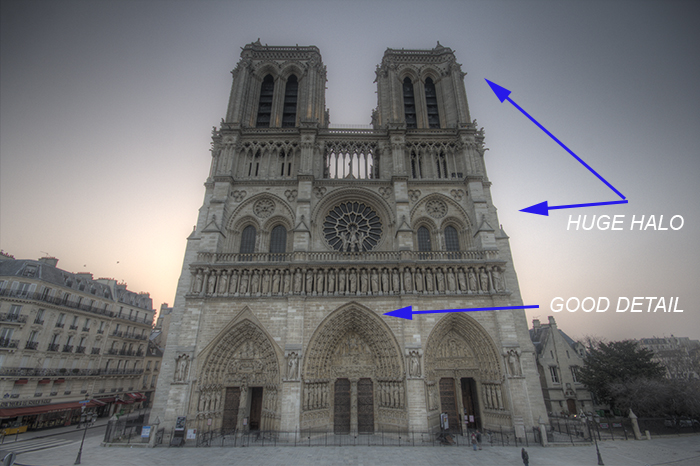
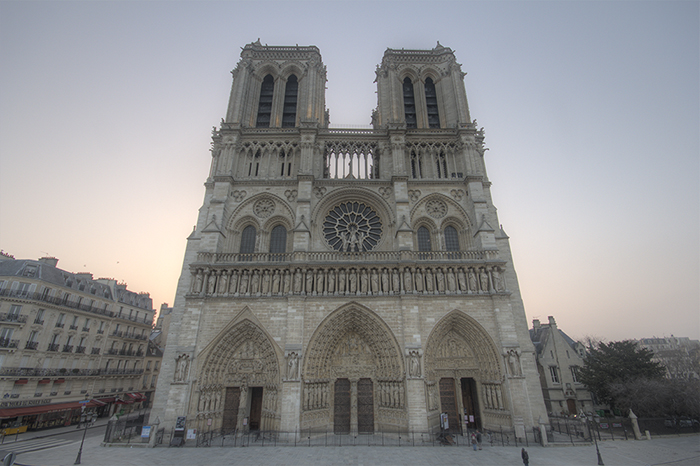
An important note: I chose the image above because it is particularly prone to haloing. As you can see, the sun is rising behind the church, which will create a natural halo to some degree and I’m content to leave a slight, natural halo in this particular image.
-Tutorial Continued Below-
Enter your email below and join our community of more than 100,000 photographers who receive regular tutorials and have also

Subscribed to our newsletter,
Downloaded our FREE Photoshop Course
Got our FREE Easy Panel for Photoshop
And have our FREE Essential Guide To Luminosity Masks E-Book
How to remove halos in Photomatix
The process is extremely simple and involves processing our images twice in Photomatix and cleaning everything up in Photoshop. Quite logically, if moving the Strength slider to the right inflames halos, then we can assume that moving it in the opposite direction will reduce halos, which is indeed the case.
Small Strength Number

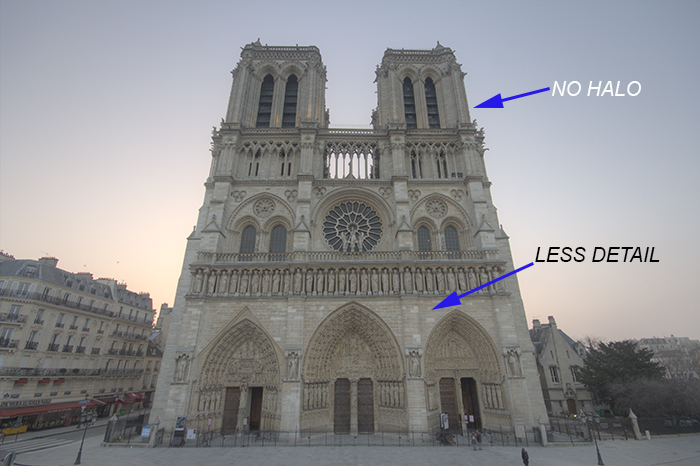
By reducing the Strength slider, we’ve also lost a significant amount of detail. We need to, therefore, combine the best of both worlds so that we’ll ultimately end up with an HDR image free from halos but with a good level of detail.
Step-by-step halo reduction
1. Process brackets in Photomatix twice, one with high Strength to bring out details (name this file Halo), and a second image with low Strength to eliminate halos (name this file Non-Halo).
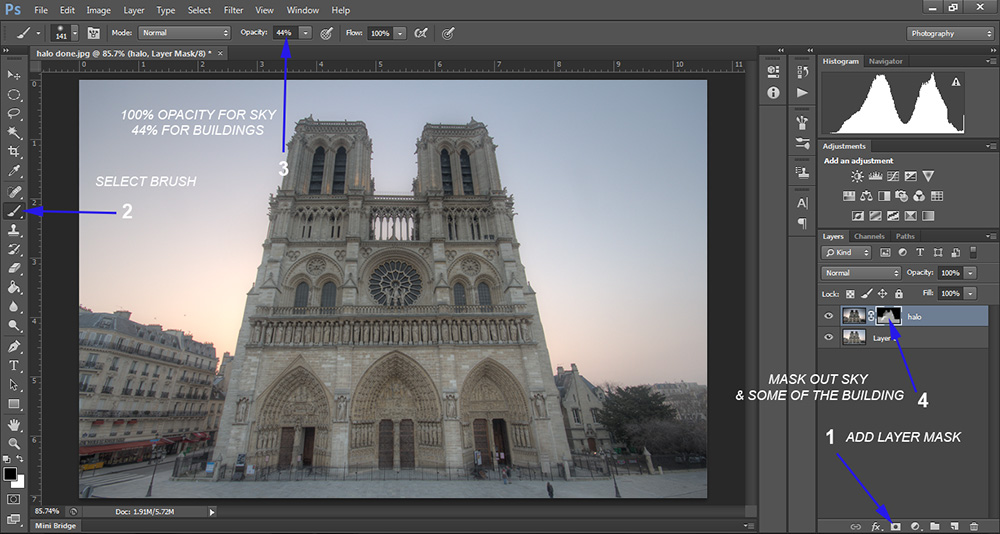
2. Pull both images into Photoshop. With the Non-Halo layer at the bottom, place the Halo image on top.
3. Select both images by clicking on the top layer and holding down ctrl and left-click on the bottom layer. Go to Edit>Auto-Align Layers in order to make sure that the images are properly aligned.
4. Now, with the Halo layer selected, go to the bottom of the Layers panel and click on the white square called Add Layer Mask. You’ll notice a white square appear to the right of the Halo layer. You’ve created a layer mask.
5. Go to the left-hand panel and click on the paintbrush, making sure the colour is set to black. Initially set the opacity to 100% and start to paint across the sky, making sure the white layer mask is selected. You’ll see that you are removing the sky in the top layer, replacing it with the cleaner sky from the layer below.
6. Sometimes this is all we need. However, on this occasion, the texture of the church was too harsh in contrast to the sky, so I set the opacity down to 44% and masked out some of the stronger details of the Halo image to make it look more natural.
Click to enlarge
The final image, therefore, is completely halo-free while still retaining a healthy amount of detail from the Halo image.
As I mentioned earlier, this method is 100% consistent in removing halos in Photomatix. Some people, rather than processing the image twice in Photomatix, simply mask back one of the original, unprocessed exposures. This has difficulties sometimes in that it can be difficult to cleanly mask along the edges of the sky and foreground. And if you’re using the sky from a darker exposure, which is often the case, you may end up with dark edges around objects in the foreground.
This way is significantly easier and since we are using a low Strength, we’ll generally have less noise to clean up in the sky after the HDR process.
The Art of HDR Photography –
A Beginner’s Course This quality course, from an experienced HDR photographer, it’s the best value in its field. High Dynamic Range processing can turn your photos into stunning images that mesmerize onlookers.
Getting that ‘Wow’ factor is not an easy thing to achieve when you first start out. On top of the steep learning curve involved in using HDR programs, you also have to have awareness of the myriad of pitfalls that are a side-effect of the HDR process. Jimmy McIntyre has created this course to push you through that learning curve and arm you with the necessary skills in Photomatix and Photoshop so that you too can produce stunning HDR imagery.
The Art Of HDR Photography was created in 2013. It was one of our very first courses. If you’re starting out in HDR Photography this course is ideal for you.
Was $34.99 Now Only $14.99
Enter your email below and join our community of more than 100,000 photographers who have also
Subscribed to our newsletter.
Downloaded our FREE Photoshop Course.
Got our FREE Easy Panel for Photoshop.
And, have our FREE Essential Guide To Luminosity Masks E-Book.
To go directly to any of our products, simply click on the image below.


