Do you have a specific question about using Raya Pro?
Click here for the How To Use question and answering page
How To Use Raya Pro’s Zone Editor
Zone Editor Tutorial

Video Content
- 0:16 – Apply Zone Editor
- 0:27 – Inside Zone Editor Folder
- 0:34 – Controling Zone Editor
- 0:47 – Adding a Vignette
- 0:52 – Toggle Adjustment Visibility
- 0:58 – Adding Cool Tones
- 1:08 – Undoing an Adjustment
- 1:10 – Adding Warm Tones
- 1:20 – Dreamy Orton Effect
- 1:47 – Deleting unused layers
- 2:02 – Applying Targeted Luminosity Masks
- 2:38 – Delete Target Masks
You can also apply targeted masks to individual layers. For example, if you wanted to apply the Orton effect only to the highlights, expand the Zone Editor folder in the layers panel. Find the layer called “Zone Orton” and click on it to select it. Now press Target Whites/Highlights. This will apply a targeted mask so the orton effect is only applied to your target. The same principles could be used if you wanted to brighten shadows, or darken highlights.
Raya Pro Downloads
Descargar manual de instrucciones / Download Handbuch / Scarica il manuale, / Télécharger le manuel
Zone Editor Cheatsheet
Written Zone Editor Instructions
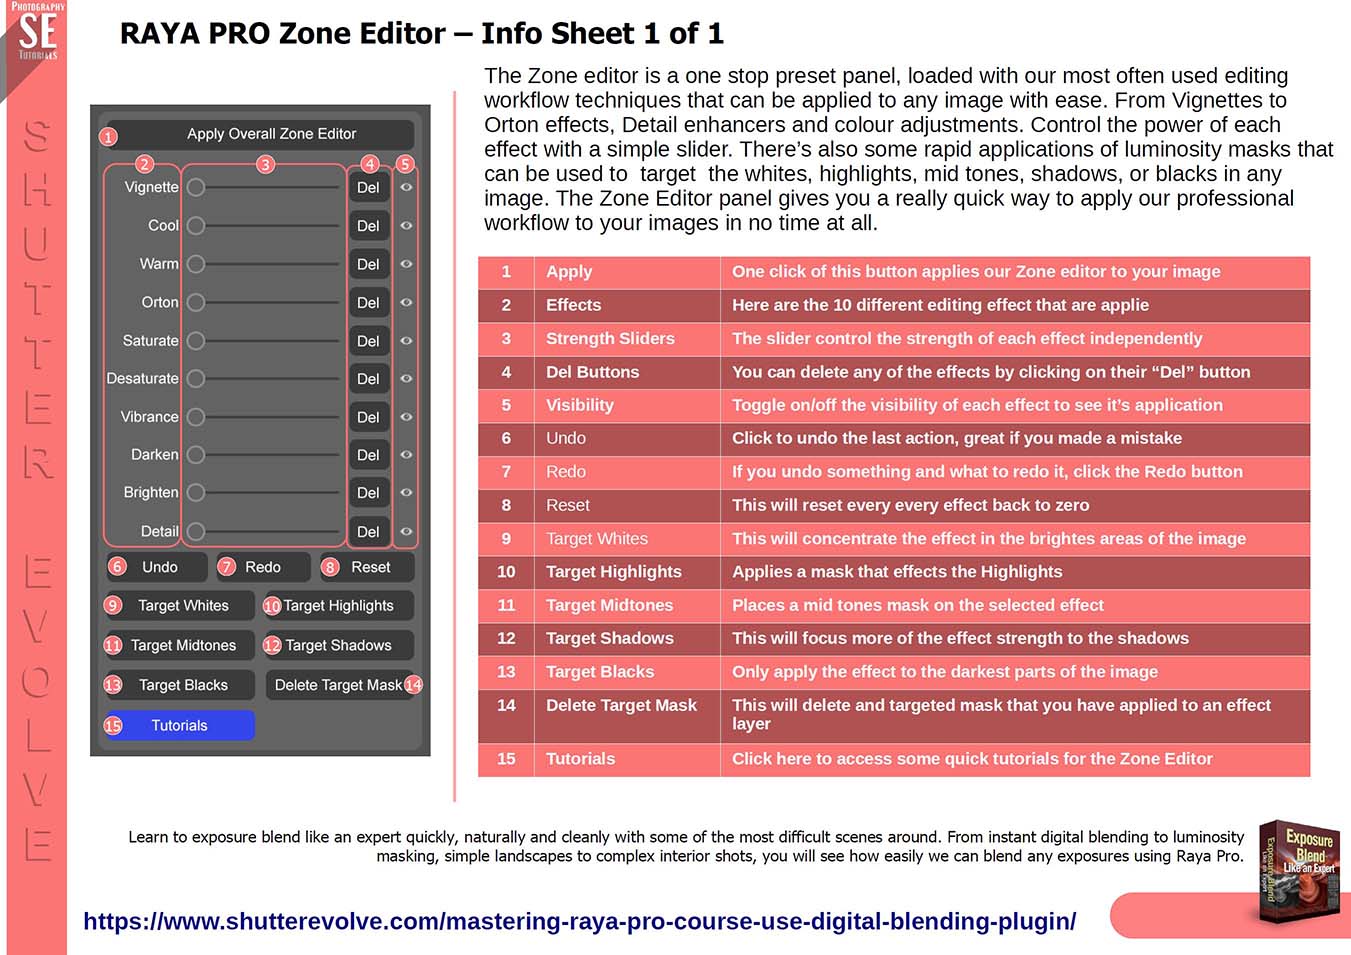
The Zone editor is a one-stop preset panel, loaded with our most often used editing workflow techniques that can be applied to any image with ease. From Vignettes to Orton effects, Detail enhancers and colour adjustments. Control the power of each effect with a simple slider. There’s also some rapid applications of luminosity masks that can be used to target the whites, highlights, mid-tones, shadows, or blacks in any image. The Zone Editor panel gives you a really quick way to apply our professional workflow to your images in no time at all.
Button Explanation:
- Apply Overall Zone Editor: This is the button to click to apply Zone Editor. A series of our work-flow presets will be applied automatically but you won’t notice any change s yet.
- Sliders: By left-clicking and draging the sliders to the right, you will increase the strength of the named preset. For example, the first effect is “Vignette”, moving the slider right will apply a strong vignette.
- Del: This is will delete the corresponding preset.
- Undo: Will undo the last action.
- Redo: Will redo the last action that was previously undone.
- Reset: If you get lost or carried away with your editing and just want to quickly start over. All you need to do is click Reset and all of the adjustments that you have made will be removed.
- Target Whites: This will apply a mask the targets only that brightest parts of an image.
- Target Highlights: This will apply a mask that targets the highlights of an image.
- Target Midtones: This will apply a mask that targets the midtones of an image.
- Target Shadows: This will apply a mask the targets the shadows of an image.
- Target Blacks: This will apply a mask the targets only the darkest parts of an image.
- Delete Targeted Mask: This will delete the mask that has been applied to a selected layer.
Premium Courses
![]()
“Literally the best digital download ever! I’ve followed Jimmy’s advice and techniques for a while now and thought this course would teach me nothing that I hadn’t already learnt from him but I was wrong. This course really goes into the finer details about both planning and processing” By Lee McDonnell
![]()
“Jimmy is a great teacher, this latest tutorial is a must and highly recommended. Jimmy makes you feel at ease and takes you on his creative journey. Found myself doing a few ahaa moments learning new things and seeing different perspectives. Great work Jimmy” by Mike McDonald
Exposure Blend Like an Expert Course
 $44.99 USD
Art of Photography
 $69.99 USD
Jimmy’s Big 5 Photos Course
 $69.99 USD