How To Create The Orton Effect in Photoshop
Sometimes you may want to create a dreamy, surreal effect in your images, almost like a Lord of The Rings style rendering. One easy way of doing this is by using the Orton Effect in Photoshop. This isn’t a built-in PS function – we have to do it ourselves. And this tutorial will show you how to quickly and easily create the Orton Effect in Photoshop.
What is the Orton Effect?
Essentially, the Orton Effect gently blurs your image to give a dream-like quality. It is commonly used among landscape photographers, and was a fairly popular, but over-used, process in portrait photography.
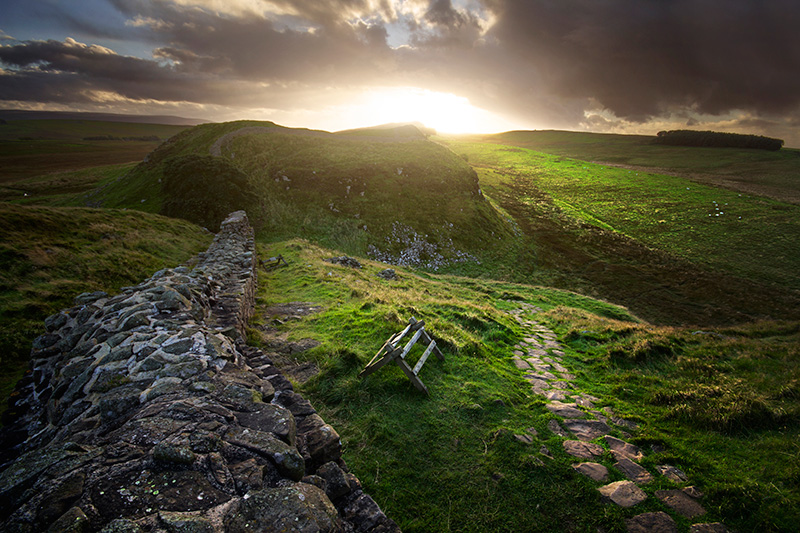
An image before applying the Orton Effect
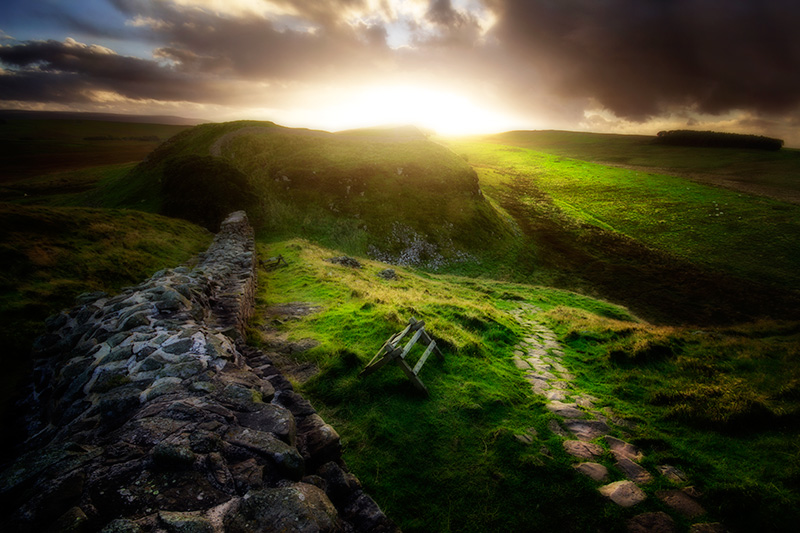
This is after applying a strong Orton Effect
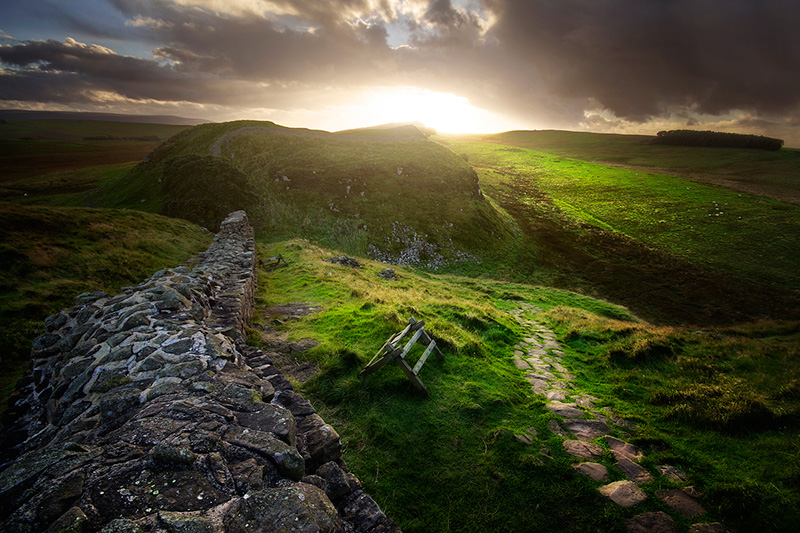
This is after selectively applying the effect
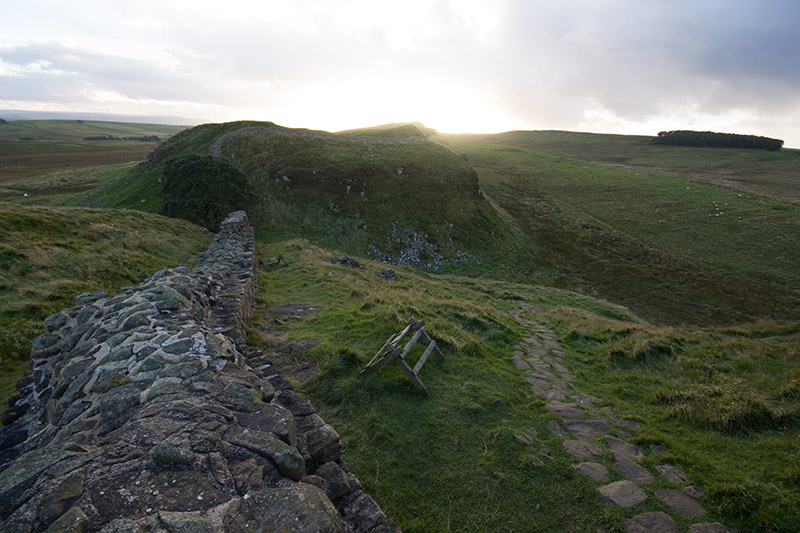
And this is the image before any processing was done
Enter your email below and join our community of more than 100,000 photographers who have

Subscribed to our newsletter.
Download our FREE Photoshop Course
Get our FREE Easy Panel for Photoshop
Enjoy our FREE Essential Guide To Luminosity Masks E-Book
How To Create The Orton Effect in Photoshop
Please see the steps below for creating The Orton Effect in Photoshop, which is a simple process. However, we’ve also created an Action which will do this for you in one click, along with the rest of our awesome actions in the PowerPack which you can download for free.
1. Firstly, duplicate your Background Layer. Do this by right-clicking on it and choosing Duplicate Layer. A new layer will appear called Background Copy.
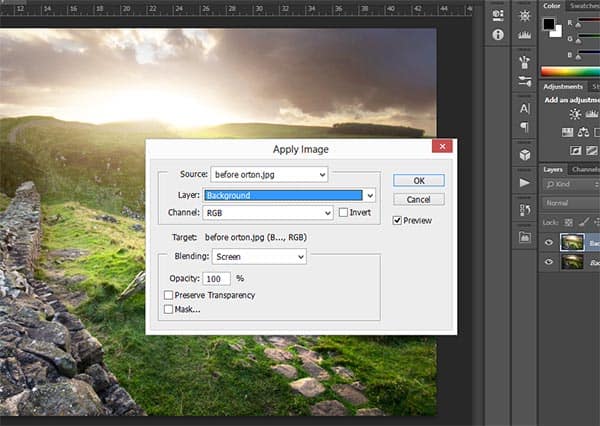
2. Now go to Image>Apply Image. A dialogue box will appear. Make sure to change the Layer to Background. The Channel should already be on RGB, and where it says Normal, next to Blending, change that to Screen and press OK.
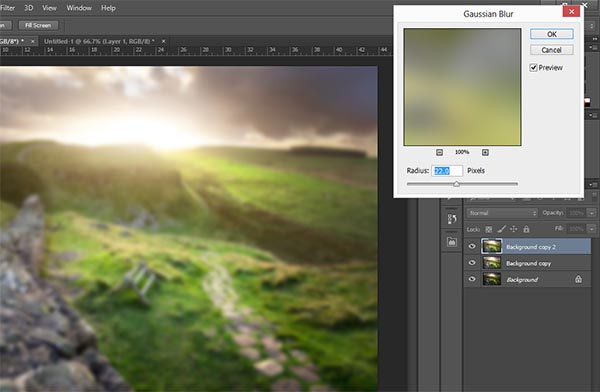
3. Duplicate the Background Copy layer. Now we need to blur this new, top layer, which should be called Background Copy 2. Go to Filter>Blur>Gaussian Blur. The Radius you choose here is dependent on the size of the file you are working on. For this image, which is 5,184px wide, the Radius was set to 22.
4. Select both of the Duplicate layers, go to Layers>Merge Layers, to collapse these into 1 layer. Now go to the Blend Mode of this layer and change it to Multiply. This will create the Orton Effect.
5. Reduce the Opacity of this layer as you like it.
Tip 1: Try to be selective in how you apply the Orton Effect. It can soften important textures and fine detail which adds to the image. In this case, mask it out of the areas you don’t want it to be applied. For the image in this tutorial, the effect was not applied to the wall on the left, the sky, or the hills and trees in the distance.
Tip 2: Control your colours! You tend to find after this effect that your colours have become strongly saturated, like the greens in the image above. Be aware of whether or not that is enhancing or degrading your image.
The post-processing done to the image in this tutorial involved digital blending using luminosity masks, and many other techniques found in our Post-Processing Courses for Photographers. Or you could start learning for free today by subscribing to our free Digital Blending Megapack below.
Enter your email below and join our community of more than 100,000 photographers who have also
Subscribed to our newsletter.
Downloaded our FREE Photoshop Course.
Got our FREE Easy Panel for Photoshop.
And, have our FREE Essential Guide To Luminosity Masks E-Book.
To go directly to any of our products, simply click on the image below.


