Quick Photoshop Secrets 2: How To Make Precise Adjustments Based On Colour

Quick Photoshop Secrets 2: Awesome Adjustments Based On Colour

Quick Photoshop Secrets 2: How To Make Precise Adjustments Based On Colour

In the second video in this series of Photoshop Secrets, we look at how to make very precise changes to your image, based solely on colour.

Surprisingly we do this by using a Black & White adjustment layer. This allows us to break our image down to primary colours, so that we can then start enhancing specific parts of our images within a particular colour range. If it sounds complex, after 2 minutes of this video you will see that it is, in fact, very simple!


Why Do We Need To Make Precise Colour Adjustments

Sometimes, when we’re processing our images there’s just something that’s not quite right. In the three examples that we have chosen, you can see different reasons why we would want to change only certain colours. Whether it be for, dramatic effect, softer tones, or darker skies. Precisely targeting specific colour ranges can be a quick and easy way to finish off your processing.


Step by Step: How To Make Precise Colour Adjustments In Photoshop

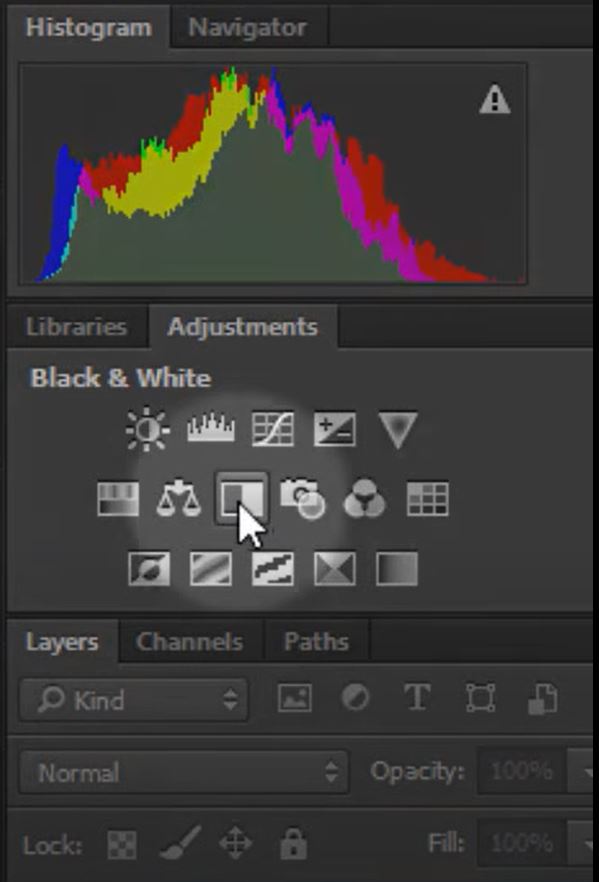
1. First, we need to add a new Black and White Adjustment Layer. There are a few ways we can do this. Either by, clicking on the Black & White icon in the Adjustments panel. Or, on the top menu going to Layer>New Adjustment Layer>Black and White. 
Add a black white adjustment layer
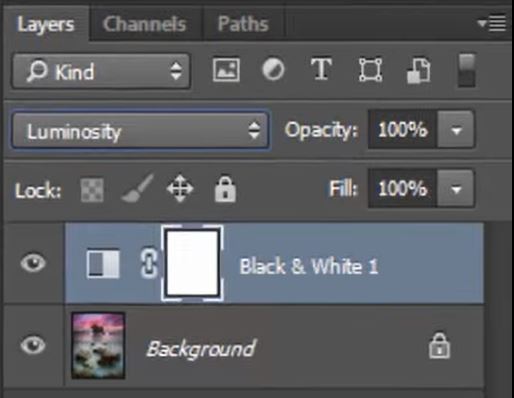
2. Next, with the new Black and White layer selected, change the blend mode Luminosity. This will change the image from black and white back to colour.
Luminosity blend mode
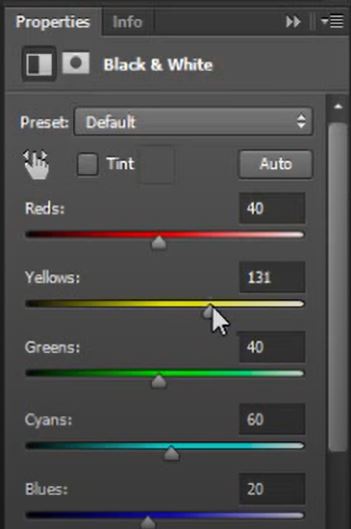
3. Finally, slide the various colour sliders left and right to see what effect they have on your image. See which part of your image the slider’s effect. Don’t worry if some of the sliders don’t change anything,  all that means is there’s not enough colour in that particular range. You might be pleasantly surprised. 

colour tone sliders black and white

Enter your email below and join our community of more than 100,000 photographers who have also
Subscribed to our newsletter.
Downloaded our FREE Photoshop Course.
Got our FREE Easy Panel for Photoshop.
And, have our FREE Essential Guide To Luminosity Masks E-Book.

To go directly to any of our products, simply click on the image below.

Raya Pro
Lumi32
Gradiate
Gradiate
Art of Photography
Art of Digital Blending
Exposure Blend Like an Expert
Mastering Lumi32
Jimmy’s Big 5 Photos

Shutter Evolve Complete Product Range

Quick Photoshop Secrets 2: How To Make Precise Adjustments Based On Colour

15 thoughts on “Quick Photoshop Secrets 2: How To Make Precise Adjustments Based On Colour

  1. Awesome. Seems like getting similar luminosity sliders just like LR… wish Ps would put this in standard. Can’t hear audio due to technical issued on my end, so I apologize if you covered this next question. Wonder if there is a way to do saturation and Hue just like LR as well? I’m thinking you could use the Camera Raw filter and do something similar. It probably isn’t a non-destructive edit though.

      1. Hi guys. In PS you gain far more control because you have the ability to mask out areas you don’t want to affect. In LR, we are forced to make blanket changes across the entire image.

        1. Agree Jimmy. Way I would do it is either multiple raw processing and then mask the layers in PS, or multiple camera raw filters to try the same thing. I do wonder that if we use the same B&W adjustment layer but change blending mode from luminosity to a different one instead, it could change the effect (like hue, saturation, color)? I will try a few on one of my next images.

  2. Adding a B&W adjustment layer in Luminosity blend mode also flattens out the image’s saturation somewhat, especially in the midtones. Toggling the visibility of the B&W adjustment layer in Luminosity blend mode on and off clearly shows this. So while this technique does allow adjustment of brightness of specific colors, you sacrifice some midtone saturation when you employ it. And midtones are an area where you generally want to maintain color saturation.

  3. You are a beautiful man Jimmy! And I mean that in a bromance kind of way 🙂
    Your last three tutorials alone have saved so many of my photos! Thank you for sharing.

Comments are closed.

Scroll to top