Photographic Distortion and Perspective Correction
This Photographic Distortion and Perspective Correction Article is by Chris Mitchell. If you would like to write for us, please read here.
In this article I’m going to talk about correcting “distortions” in digital images. The kind of issues I’m referring to are:
- distortion resulting from differences between the angle of the camera sensor and the subject matter being photographed (perspective or “keystone” distortion);
- distortion introduced by imperfections in the camera lens (lens distortions such as “pincushion” and “barrel”).
These are issues that can affect all photographs not just high dynamic range images, but they are often most noticeable when using wide-angle lenses which are popular amongst HDR photographers. The extent to which these issues have effects that are noticeable or undesirable in a particular image may depend on a number of factors including the lens used, the subject matter and the manner in which the photograph was taken. Whilst I’m using the terms “distortion” and “correction” in this article which kind of infers there’s something wrong that needs to be fixed, that’s not necessarily the case at all. However, there are also times when it is definitely useful to recognise these issues and apply the techniques described below, as one incremental step in a processing work-flow for turning a good image into something really special.
I will discuss some techniques using Adobe Photoshop for making adjustments to digital images to compensate for these distortions. No doubt other image editing programs have functions that can achieve similar results but unfortunately I can’t cover them all. Also, as with most things in Photoshop, there are several different ways to do essentially the same thing, but in this article I’ll just concentrate on the methods I use the most and have found to be effective.
If you wish to experiment with this, I would really appreciate it if you included the Authors name (Chris Mitchell) and www.shutterevolve.com when you publish your image. If you post your published image on our Facebook page I’d be happy to check it out.
Perspective Correction
As I alluded to above, perspective “distortion” is not really a fault at all, more of a manifestation of the perspective from which a photograph was taken. Perspective is what it is – we all know that objects further away from us appear to be smaller than objects closer to us. When we’re looking at things in three dimensions our brain knows that’s how it is and actually uses that information to help with our spatial sensing. When the same phenomenon is captured by a camera and translated into a two-dimensional rectangular image the effect can be particularly noticeable, more so in certain circumstances than others. The most noticeable circumstances are often when using a lens with a wide field of view to photograph a scene featuring prominent straight-lines, such as architecture.
I don’t want to get too caught up in the technicalities of why perspective distortion occurs or how to prevent it in the first place, which is more about optics, equipment and photographic technique. For the purposes of this article I’ll mostly stick to what you might do about perspective distortions in processing, after the photo’s already been taken.
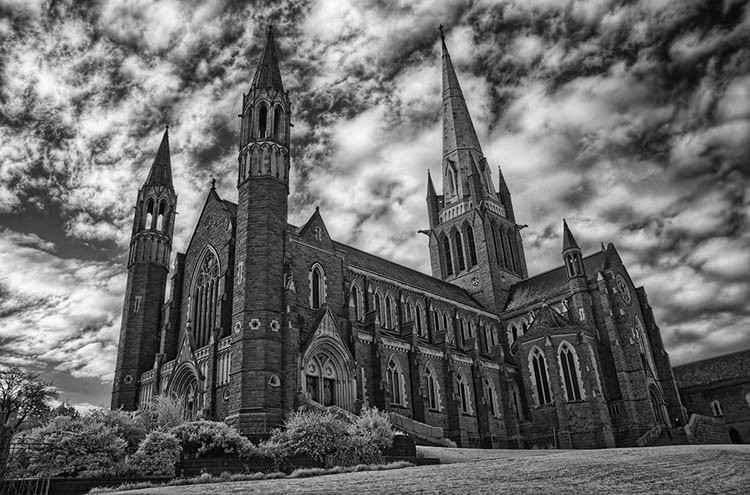
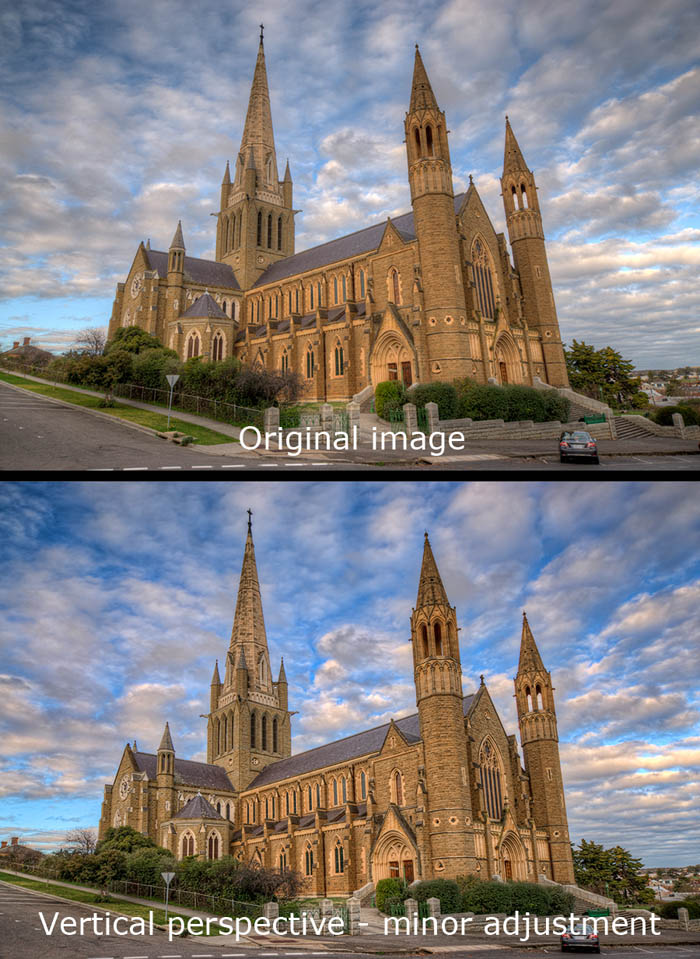
The left image shows a classic example of how perspective distortion can appear in a photograph. This is a picture of the Sacred Heart cathedral in Bendigo, Australia which reportedly has the second-tallest church spire in the country. The image is infrared hdr converted to black and white, and the photos were taken with a lens focal length of 18mm. In order to fit the cathedral spires in the frame I had to aim the camera up (I was also standing downhill from the church) and as a result of this perspective the vertical towers appear to be leaning. The vertical lines are no longer vertical as we might expect them to be and are instead converging toward the middle. I’m sure we’ve all seen other examples of images exhibiting this characteristic.
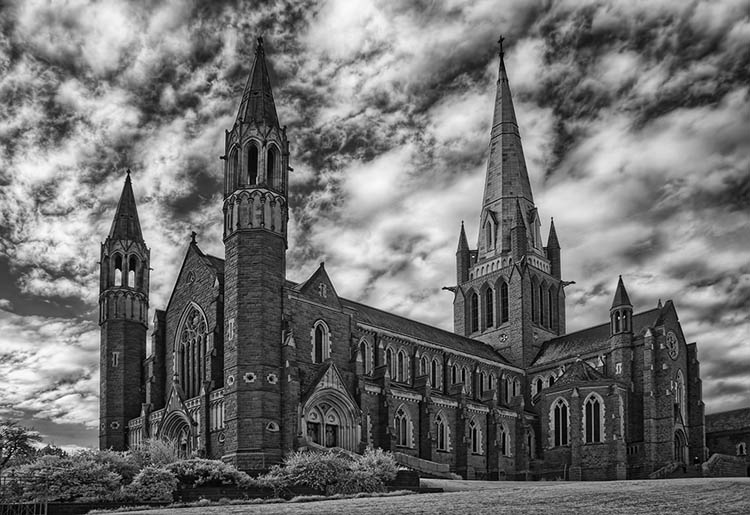
I thought this was a good example to show first because it illustrates a case where I don’t think any “correction” is required. I like the way the lines of the spires converge in this instance which, for me, adds to the appeal of the image and also permits to show more of the wispy clouds and sky which I also like. For the sake of comparison I’ve included a version of the same image with the vertical perspective “corrected”, so that vertical lines on the cathedral also appear as vertical in the image. You can make up your own mind which one you prefer.
-Tutorial Continued Below-
Enter your email below and join our community of more than 100,000 photographers who receive regular tutorials and have also

Subscribed to our newsletter,
Downloaded our FREE Photoshop Course
Got our FREE Easy Panel for Photoshop
And have our FREE Essential Guide To Luminosity Masks E-Book
Perspective Correction – Continued
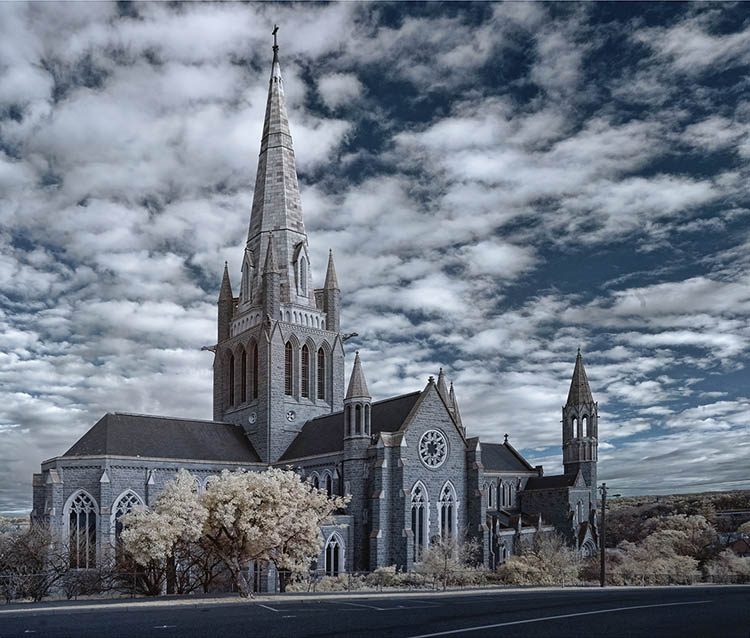
The next image is another image of the Sacred Heart cathedral, shown from a diametrically opposite aspect. Although I was standing higher on the hill to take this shot than the previous one, I still had to angle the camera upwards in order to fit the church spire within the frame – in fact this is a stitched panorama of two portrait orientation photographs. Once again its an image in the infrared light spectrum, which is why the colours look strange. In this case the converging verticals were not as severe as in the previous instance, and the image as shown has already been adjusted because I like it better that way. You might note that, even though I was standing only across the road from this sizable cathedral and using a wide-angle lens to take the photo, with the vertical perspective adjustment applied the image appears similar to one that might have been taken from much further away using a telephoto lens.
Before I launch into some processing instructions, let me show you one more example of the Sacred Heart cathedral, from yet another angle. In the next image you can see that there is not a huge difference between the before and after – I’ve only tweaked it a little bit. As with all these kind of adjustments, it is mostly a matter of personal preference. In the original image I felt like the top of the church was a little crowded, but I didn’t want to change the angles altogether. So, you can see that you don’t have to change the image completely, in this example I just made a relatively minor adjustment that I thought made the composition more balanced. Sometimes a series of small changes can make all the difference to an image – you may notice that I have adjusted the exposure, colour and level of detail between the original and final images too. Please note that in this case the “original” image was the actually the result of hdr tonemapping using Photomatix on five hand-held photographs.
So far I’ve concentrated on talking about the effects of vertical perspective, when you tilt the camera up or down to compose a photo, but of course the same effect is seen in the horizontal dimension. Its just that, for the most part, horizontal perspective results from a choice made by the photographer in composing the picture – if you don’t like the horizontal perspective its usually just a matter of choosing another angle or location from which to photograph. Unless you carry a ladder with you its not so easy to make the same choice in the vertical dimension, which is why this is more often an issue to deal with in post-processing.
In the following I will present step-by-step explanations of how I have gone about processing two different images. The first example deals primarily with vertical perspective correction, whilst the second also delves into lens distortion correction and horizontal perspective.
Example #1 – Vertical Persepctive Correction
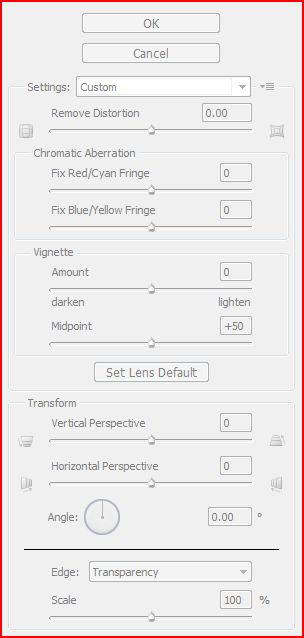
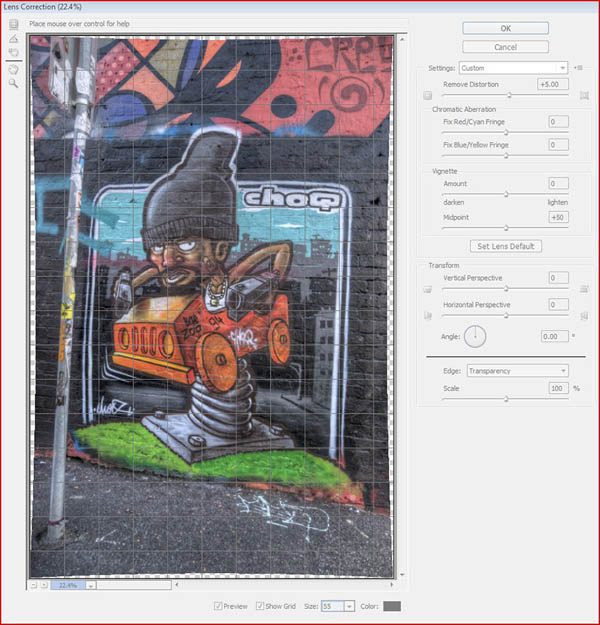
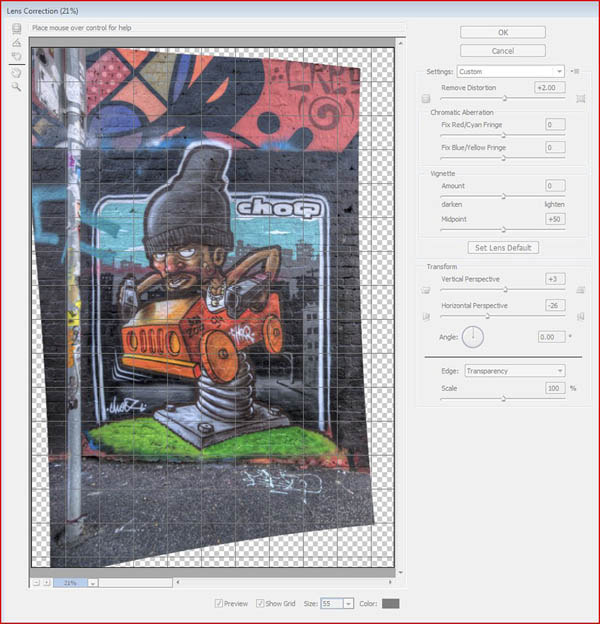
There are several different ways to deal with perspective correction in Adobe Photoshop details may also vary between versions. The method I use the most relies on the functions provided in Photoshop under Filter → Lens Correction. The main control panel for these functions is shown in the image below. The main functions that I’ll be referring to in the following processing examples are the Remove Distortion slider (near the top) and the Transform – Vertical Perspective & Horizontal Perspective sliders (toward the bottom of the control panel). As you can see there are a number of other functions available here also, such as sliders for dealing with Chromatic Aberration, but we won’t get into these right now.
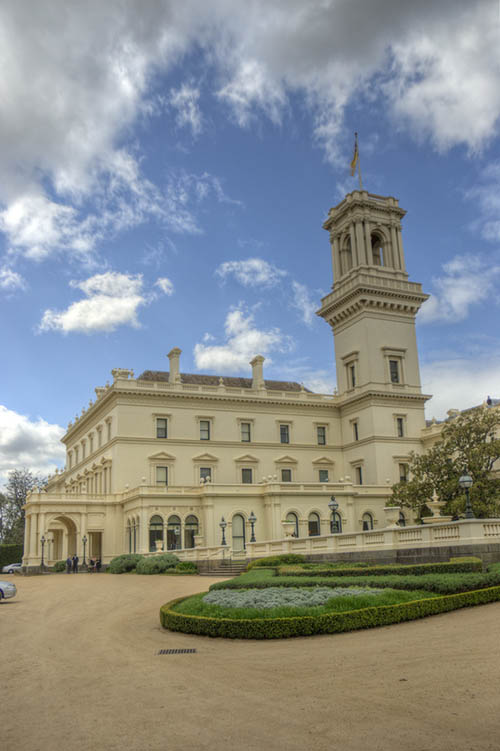
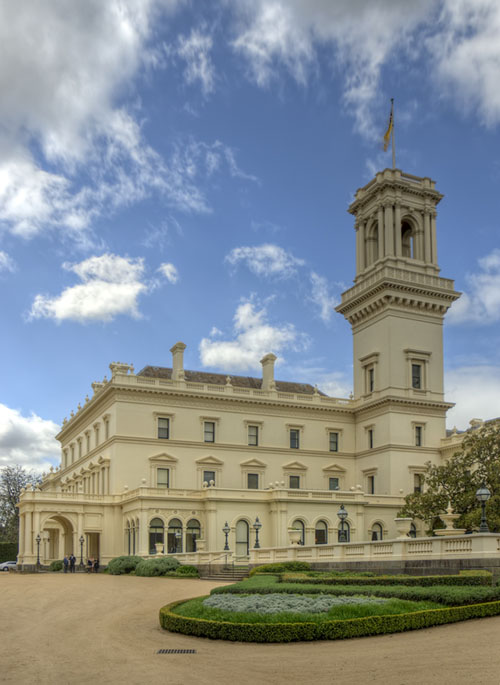
Below is an image I’d like to adjust. This is an image that I processed from five hand-held exposures showing Government House located in the midst of the Royal Botanic Gardens in Melbourne, Australia. The public is not generally allowed into this area but I was lucky enough to be invited to a function there when I took this picture. I like the image generally, but its definitely a little out of whack and I can’t easily get back there to take better photographs. Besides the vertical perspective distortion because I had the camera tilted up relative to the building, the whole thing is a bit tilted. So, how to go about fixing it?
The first thing to do is to fix the tilt. In my opinion this is an issue that should be considered in relation to just about every image. If you got it right in camera then all the better, but it’s easy to be just a little bit off. Of course it is valid to compose a photograph at an angle for a particular purpose, but its rare for a picture to be improved by a slight unintentional tilt.
Every image editing program will provide at least one way to straighten a tilted photo. When the subject matter is a landscape with a nice flat horizon the job of straightening is easy – just adjust the image angle so that the horizon is horizontal. But what do you do when there’s no visible horizon and the other straight lines might be warped by perspective distortion? Well, the key is that vertical and horizontal lines that extend through the centre of the frame are not affected by the distortion and can be used as a guide to fix the tilt.
In the case of the Government House image I’ve chosen the vertical edges of the window frames near the centre of the picture as my reference. Since I’m looking to correct the vertical perspective and not the horizontal, I find it better to look for a vertical reference to correct the tilt first. I’ve chosen to take the photograph looking at the building from a perspective that is angled horizontally, so I don’t expect the roofline, for example, to be necessarily horizontal in the picture.

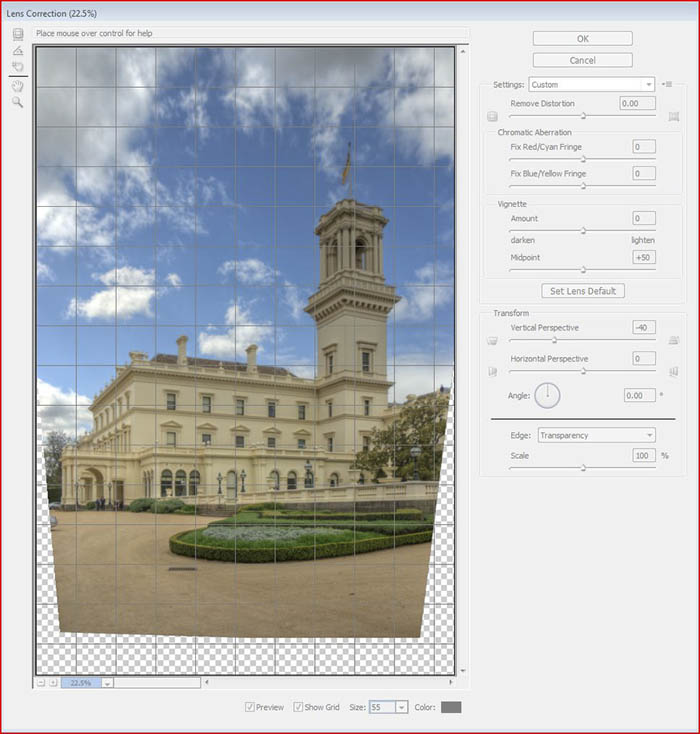
Above shows how I have corrected the image tilt in the Lens Correction control panel using the Angle controller. There are several ways to correct an angled image in Photoshop, and this is one of them. I’ll show another way in the second example.
You can change the angle in the Lens Correction controller using the mouse pointer on the little circular slider, but it is difficult to fine tune it that way. I tend to zoom into the centre of the image and then type in a number into the Angle control box and compare my reference in the image against the grid line. Negative numbers rotate the image clockwise, positive is anticlockwise. With a bit of practice you can refine the angle to within a tenth of a degree within a few tries. You can see above that I have settled on -2.0 degrees in this instance, which makes the vertical edges of the windows near the centre of the frame pretty close to parallel with the vertical grid lines (you can adjust the size of the grid at the bottom of the panel).
So now the image is straight in the centre, but the verticals on either side are still on a slant – look at the tower on the right and the columns on the left. This is because of the vertical perspective distortion. In order to correct it we can use the Transform Vertical Perspective slider as shown in image below. The perspective distortion has caused the building to look narrower at the top than at the bottom, so we want to move the Vertical Perspective slider to the left which will narrow the bottom of the image to compensate. Just move the slider until the vertical edges toward the left and right edges of the image are parallel to the grid lines. In this case I have moved the Vertical Perspective slider to -40 so that the edges of the tower on the right and the columns on the left are parallel to the grid.
Obviously this operation has changed the shape of the image at the bottom of the frame, so a crop is required as below.
The final result is seen in image below. You will notice that I’ve cropped out some of the foreground and a little of the sky to get a nicely balanced image. The corners at the bottom have been fixed with the clone tool, and I’ve also cloned out the nose of a car at the bottom left which was a little distracting.
Lens Distortion
Let’s have a quick look at lens distortion. Different lenses exhibit different amounts of distortion – some barely detectable even under the most stringent testing, others use distortion as a feature (e.g. fish-eye lens). Zoom lenses often exhibit different amounts (and sometimes different types) of distortion at different focal lengths.
Whether or not lens distortion is noticeable in a photograph depends not only on the lens but also on the subject matter in the picture. If it is not noticeable then there’s probably no need to apply a correction. Subjects with straight lines that appear near the edges of a photo are the most noticeable. I happen to take a lot of photos of in the city where there are many straight lines which makes the lens distortion stand out.
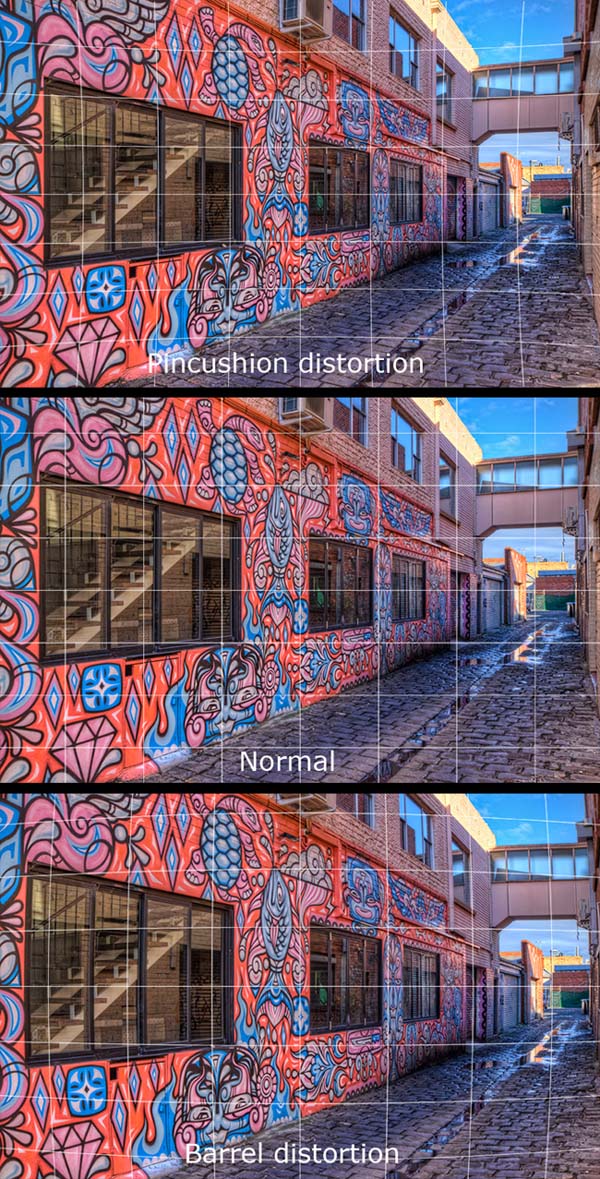
The below image illustrates the most common modes of lens distortion – pincushion distortion and barrel distortion. These pictures have been exaggerated to make them easier to see. Pincushion distortion is noticeable where it makes straight-lines toward the edges of the frame bow inwards. Conversely, barrel distortion effects the image by making straight-lines toward the edge bow outwards. The differences are most noticeable in below if you look at the edge of the window frame on the left.
In the next example I’ll show you how to deal with pincushion or barrel lens distortion, as well as vertical and horizontal perspective. Some lenses, however, show modes of distortion that are not wholly barrel or pincushion in nature (e.g. wave) and these are more difficult to correct for, at least using Photoshop tools. There are other software tools available that are dedicated to fixing lens distortions which may do a better job in such cases.
Example #2 – Lens Distortion, Vertical & Horizontal Perspective Correction
One of the things I like to photograph around Melbourne where I live is some of the interesting and colourful street art in the alleys and laneways around the inner city. Sometimes it can be challenging to get the composition I want because of the city obstructions and constrictions. Also, because of all the straight lines and edges, any lens and perspective distortions are particularly noticeable. By the way, I use high dynamic range processing for these pictures, not because the dynamic range is necessarily greater than the camera sensor, but because I find I can get a richer range of colours and textures than by just using one exposure.
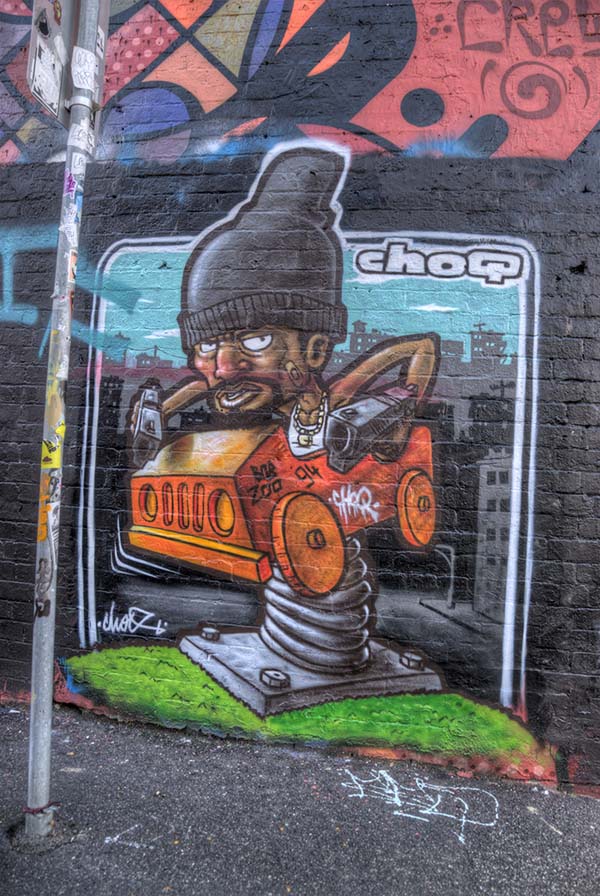
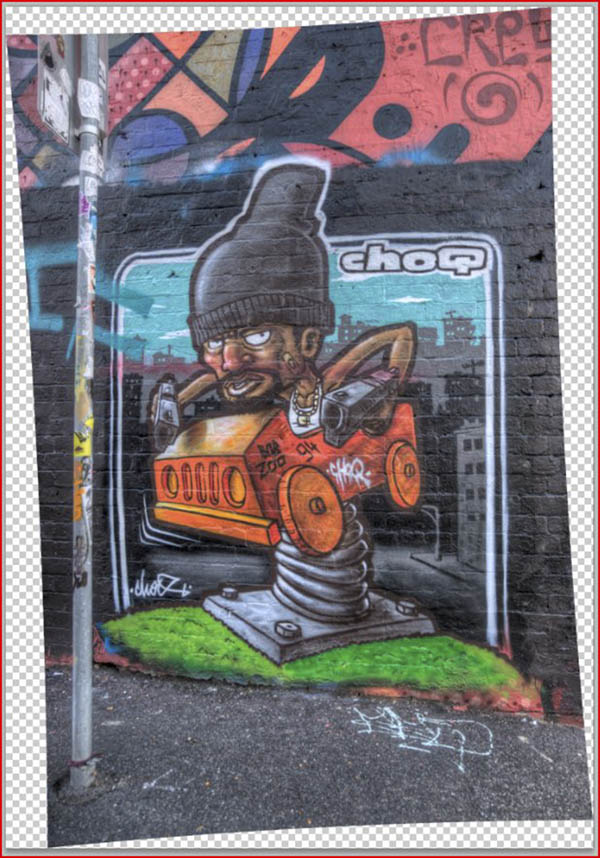
The abvoe image shows the original composition of a picture of some street art I like by a visiting French artist, Choq. The image is tonemapped from three hand-held exposures. In reality, if you stand right in front of the artwork on the street the signpost at the left of the image obscures part of the painting, so I had to take the photos from an angled horizontal perspective. That’s why the parallel line of the rows of bricks seem to converge toward the left of the image. Also, in reality I know that signpost is straight and vertical, but in the image it leans and bows slightly outwards. If you look closely you can see the lines of bricks toward the top also bow outwards in the image. The bowed lines indicate to me that the lens has introduced some barrel distortion, whilst the leaning post indicates the image is tilted and/or out of kilter in the vertical perspective.
So how do we go about addressing all these issues in a single image? Just to be clear, I want a final image that appears like you’re viewing the artwork from directly in front, with all the brick lines horizontal, and the signpost straight and upright. It is usually best to adopt a systematic approach:
- Lens distortion
- Image angle
- Perspective distortion
I think it is best to deal with the lens distortion issue first of all, because the Remove Distortion controls are designed to operate on the photo as it came out of the camera. A small adjustment to the image angle before fixing the lens distortion won’t make a huge difference to the result, but it is better to do it the other way around if possible.
The below image shows the lens distortion correction. Since I identified the image as having barrel distortion (edges bowing outward) I have moved the Remove Distortion slider to the right which distorts the image edges inward to compensate. I have moved the slider to a position where the signpost on the left of the image looks roughly linear, even though at this stage it’s still not vertical.
With the lens distortion largely fixed I now need to straighten the tilt of the image. In the previous example I did that in the Lens Correction controller, but in this case I’m going to use another method. As you will see below, I have selected the Ruler tool and drawn a line following a row of bricks that passes through the centre of the image – this is my reference that I wish to make horizontal. You can see toward the top of the Photoshop window that the Ruler tool has determined the angle of the line to be 177.1°. Horizontal lines should be at 180°, which means the image is tilted by 2.9°. You don’t have to remember all that because Photoshop will do it for you. Just go to Image → Image Rotation → Arbitrary… and the measured angle will be there. Click on OK and Photoshop will rotate the image by the amount you measured.
Below shows the result of the image after the tilt angle has been adjusted.
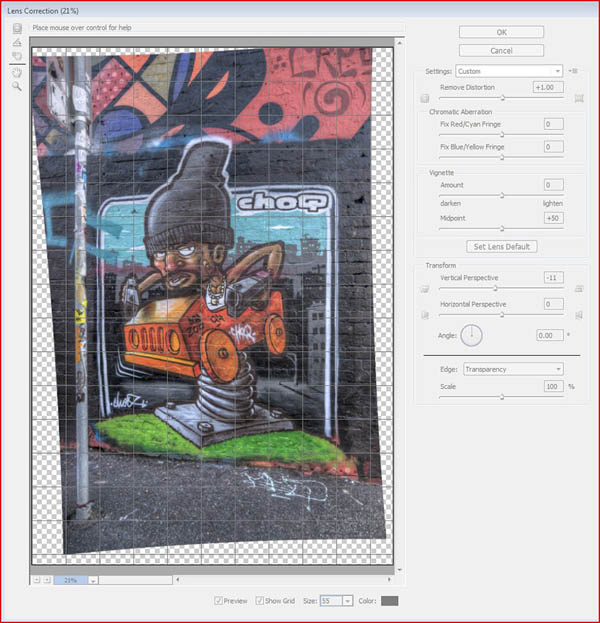
Although it is not readily apparent in image above because I forgot to turn the grid on (tip: you can toggle the grid in Photoshop using Ctrl-‘ ), in addition to the obvious horizontal perspective distortion there is a little vertical perspective distortion as well. You can tell because the signpost on the left still leans inward toward the top, just slightly. Below illustrates how I have corrected the vertical perspective in the same way as in the first example, by using Filter → Distort → Lens Correction and moving the Vertical Perspective slider to the left. Here I’m looking to make the signpost on the left and the painted white line on the right appear vertical. The signpost still looked a little bent, so I’ve tweaked the Remove Distortion slider a bit more too.
That just leaves the horizontal perspective to fix. Please note that in each stage of the example here I have performed the transformation by clicking OK and then re-opened the Lens Correction filter again to show the separate operations – you can do it all in one instance of the Lens Correction filter if you want to.
Below illustrates the horizontal perspective correction. My aim was to adjust the Horizontal Perspective slider until the lines of bricks toward the top and bottom of the image are parallel with the grid lines. In this case I have moved the slider to the left by an amount of -26 to get the right alignment. Once again I’ve tweaked both the Remove Distortion control and the Vertical Perspective control a little because I didn’t quite get them right the first time. In the result, however, all the rows of bricks are pretty much horizontal, and the signpost looks straight and vertical.
Lastly, the crop I’ve applied to the image after all the distortion adjustments. Clearly you need some room to play with on the edges of your image in order to do this because in the end I have cropped out a fair bit, particularly from the top and bottom in this instance.

the final result of the image after I’ve applied a few techniques to make the artwork stand out (I’ll save that explanation for another day).

If you’ve read this whole article I hope I haven’t wasted your time, but if these techniques are new to you I’m almost certain you will be able to find some application for them. As with most things a bit of practice and experimentation is usually required to get the best results, so don’t be afraid to try. As long as you have the original image saved there’s nothing to lose by experimentation.
Addendum to article on photographic perspective correction
In Photoshop there is another way to adjust the apparent perspective of a photograph, in addition to the Filter → Lens Correction tools discussed previously. This alternative method is outlined below and utilises the Crop tool.
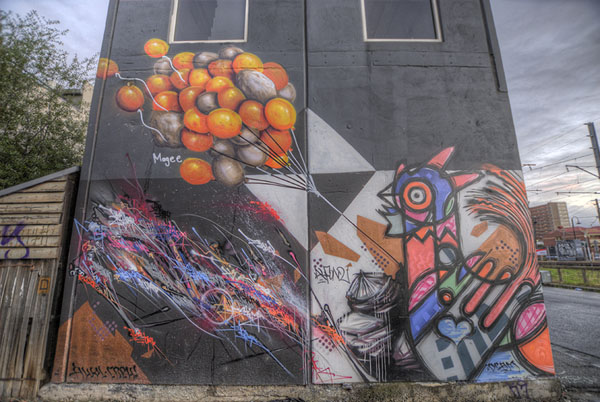
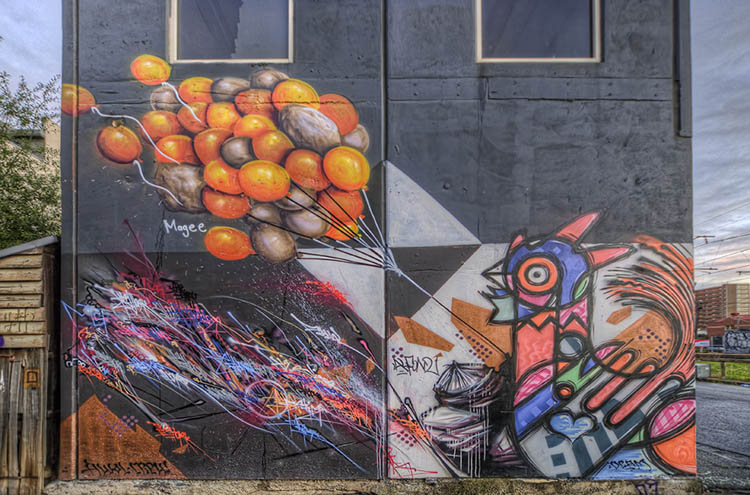
Below is a picture I took the other day because I like the artwork on the side of this inner suburban house (artwork by Fintan Magee, Deam, and Slicer). This aspect of the house is on a narrow laneway, and taking the pictures I was right up against the far side of the lane. As you can see I had to point the camera up quite a bit in order to fit all of the art in one frame. The picture is hdr tonemapped from five hand-held exposures, using a Sigma 10-20mm lens @10mm.
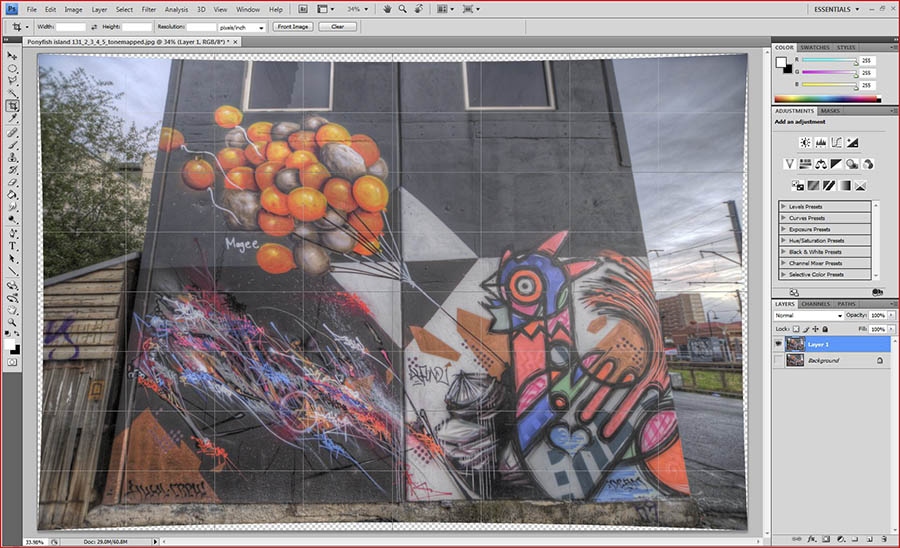
If I want to compensate for the vertical perspective distortion there is a way to accomplish it using the Photoshop Crop tool. First, I will correct for the barrel lens distortion using the Lens Correction tools as previously discussed. The result of that is shown in below, where I have applied +5 on the Remove Distortion slider.
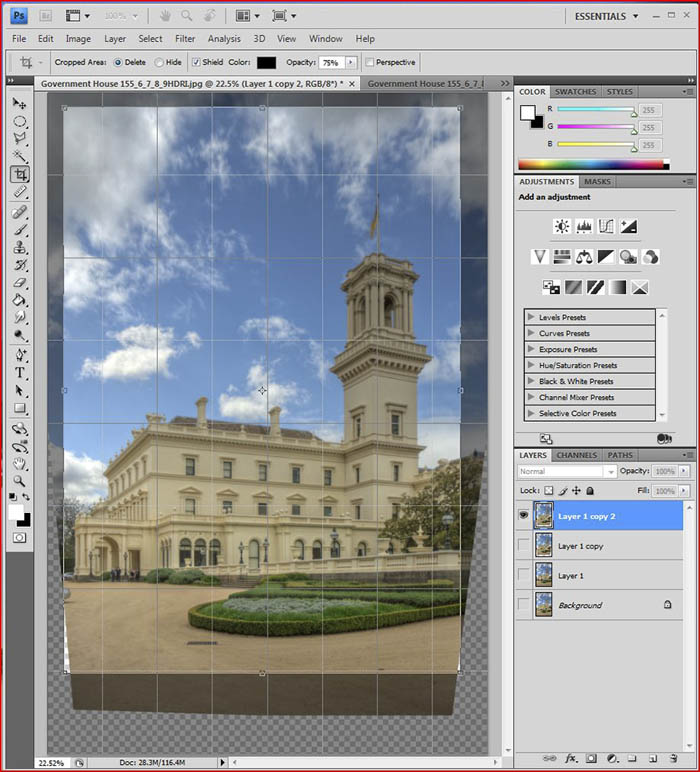
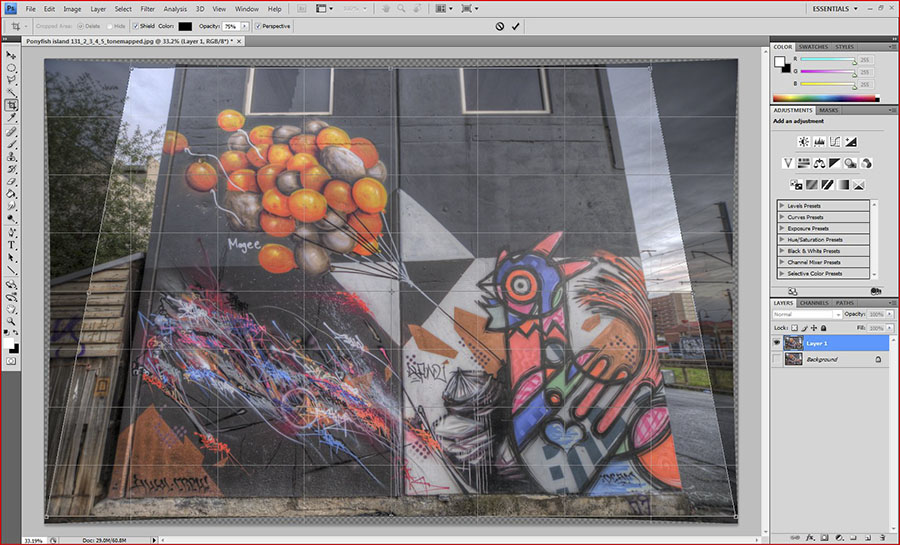
The next stage is to use the Crop tool and draw the crop selection around the whole image. Once a crop selection has been made you will see a check-box on the top tool-bar marked Perspective – make sure that box is ticked (as below). With the Perspective option active it is possible to move the corners of the crop selection independently from one another. Using this function I have moved the top corners of the crop selection inward, as seen below so that the sides of the crop selection are parallel to the edges of the wall that I want to make vertical. I’ve also moved the top and bottom of the crop selection in to get rid of the blank space introduced when I fixed the lens distortion.
The result of applying the crop as shown below. As you can see the wall edges are now largely vertical.
Chris Mitchell counts himself as many things, photographer amongst them. Although he has been taking pictures for many years, it was his discovery of the possibilities offered by high dynamic range (hdr) techniques that really fired his passion for the art of photography. He is based in Melbourne, Australia and most enjoys landscape and architectural photography as well as creative documentation of the rich and colourful local street art scene. The progression of Chris’ photographic work can be seen at http://www.flickr.com/photos/phase-one/