
Sky Replacement Tutorial in Photoshop – Gradient Mask
Following on from our recent article on the benefits of Luminosity Masks in Digital Blending, There is another, very effective way to blend exposures in Photoshop. It is quick, clean, and can easily replace a blown out sky for one which is properly exposed. Essentially this article is a sky replacement tutorial in Photoshop but there are other uses for this technique which we will explore in future tutorials.
What we are looking at is creating a feathered layer mask using the Gradient tool. It is a very similar result to using a Graduated Neutral Density Filter. While GNDs are effective additions in capturing a wider range of light in your images, we can achieve a similar effect in Photoshop with 2 exposures.
As with GNDs, this technique works best with a flat horizon. It is possible to use Gradient Masks on uneven horizons but it requires a little more work.
This article supposes the reader has knowledge of Layer Masks. If not, please visit Adobe’s site and watch the video attached.
Below is the written tutorial, but first here is the video tutorial for those who prefer to watch and learn.
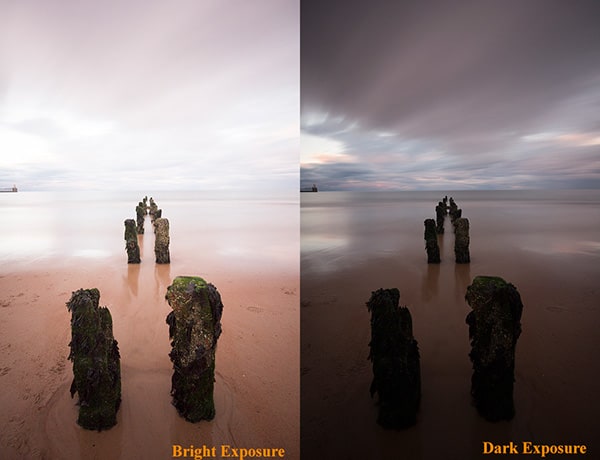
The Exposures
On the left we have our normally exposed image which is our base exposure. The sky is completely blown out. On the right we have our dark exposure which contains a well-exposed sky. The mission: to smoothly blend the sky from the dark exposure over the sky in the brighter exposure using a single mask in Photoshop.
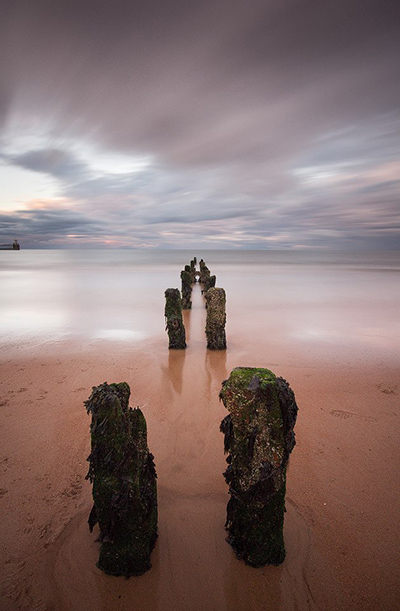
The Final Image After Sky Replacement
How to use the Gradient Mask to Replace a Sky
Below you will see a visual representation of the whole process. Beneath the two images, there are step-by-step instructions for you to follow.


1. Place your two exposures on top of each other in Photoshop. Place the dark exposure on top of the bright exposure.
2. Below the Layers panel there is a square with a circle in it. This is the Layer Mask icon. While holding Alt (Option on a Mac), click the left mouse button on that icon. Beforehand make sure only the top layer is selected. This will create a black layer mask to the right of the dark exposure’s thumbnail and it will make that layer invisible.
3. Click on the Gradient Mask icon to the left. If you don’t see it, right click on the Paint Bucket icon and you will see a few options appear. Choose Gradient Tool from those options.
4. Make sure your foreground colour is set to white and the background set to black. This can be done quickly by pressing the small black and white icon to the left of the foreground colour. Now, look at the second image above and make sure your settings are the same.
5. This is where we create the mask. Take your mouse cursor to the centre of the image, just above the horizon. Next you will drag your mouse cursor from that point (follow the red line in the image above) downwards, just below the horizon. The line must be straight. To draw a straight line, while you press your mouse button, also hold the shift key! You will now see the overexposed sky disappear to be replaced with the correct sky.
6. If you look at the layer mask next to the underexposed thumbnail, it now has a gradient going from white to black. This is the feathered layer mask you just created.
Finished.
How does the Gradient Mask Work?

In masking, whatever is white is completely visible, and whatever is black is invisible. Along the monochromatic scale, the darker the tone the less visible the selection.
Therefore, the Gradient tool is simply creating a steady monochromatic gradient which is dependent on where you draw, and how long you draw, the line in your image. To the right is a similar (although landscape) Gradient Mask that was created in the above image.
The beauty of the Gradient Mask is that it can create a lovely smooth transition between exposures which looks entirely natural!
Enter your email below and join our community of more than 100,000 photographers who have also
Subscribed to our newsletter.
Downloaded our FREE Photoshop Course.
Got our FREE Easy Panel for Photoshop.
And, have our FREE Essential Guide To Luminosity Masks E-Book.
To go directly to any of our products, simply click on the image below.


