The Fastest Way to Edit a Photo in Photoshop
We’re always looking for convenient ways to edit in Photoshop. Fortunately, there are panels, and plugin that we can use to help us with this. For us using Zone Editor is by far The Fastest Way to Edit a Photo in Photoshop. Zone Editor is one of the panels that is included with Raya Pro The Ultimate Luminosity Mask Plugin For Photoshop. Within Zone editor, you will find our most commonly used editing techniques that can all be applied to any image to transform its’ mood, style, drama, and much more. It is so simple to use and so intuitive, that anyone can now edit photos in photoshop, from beginners to professionals. Check out the video tutorial below and the step-by-step guide below.
If you wish to experiment with this, I would really appreciate it if you included my name (Duke McIntyre) and www.shutterevolve.com when you publish your image. If you post your published image on our Facebook page I’d be happy to check it out.
How to Open Zone Editor in Photoshop
Zone Editor was added to Raya Pro 6.0 in October 2021. If you have an earlier version of Raya Pro you can update your version at any time here: https://www.shutterevolve.com/raya-pro-user/
Once you have purchased, downloaded, and installed Raya Pro using the instructions included, follow the instructions below. If you are already an avid user of Raya Pro, skip this section and scroll down to the tutorial below.
Photoshop CC2016-CC2020 (Version 17-21)
To open Zone editor in Photoshop CC2016-2020 click on the Window menu. When the Window menu opens hover your mouse cursor over the Extensions menu. You will then see a sub-menu appear and you should see the various Raya Pro 6 panels, including Zone Editor. Click on PR6 Zone Editor to open the Zone Editor panel.
Photoshop CC2021-CC2022 (Version 22-23)
To open Zone editor in Photoshop CC2021-2022 click on the Plugin menu. When the Plugin menu opens hover your mouse cursor over the Raya Pro menu. You will then see a sub-menu appear and you should see the various Raya Pro 6 panels, including Zone Editor. Click on Zone Editor to open the Zone Editor plugin.


-Tutorial Continued Below-
The Fastest Way to Edit a Photo in Photoshop using Zone Editor
1. Open up Zone Editor by clicking on the ZE icon.
2. Click on the Apply Zone Editor button.
3. This will create a new group in the layers panel called Zone Editor that contains some of our go-to editing techniques.

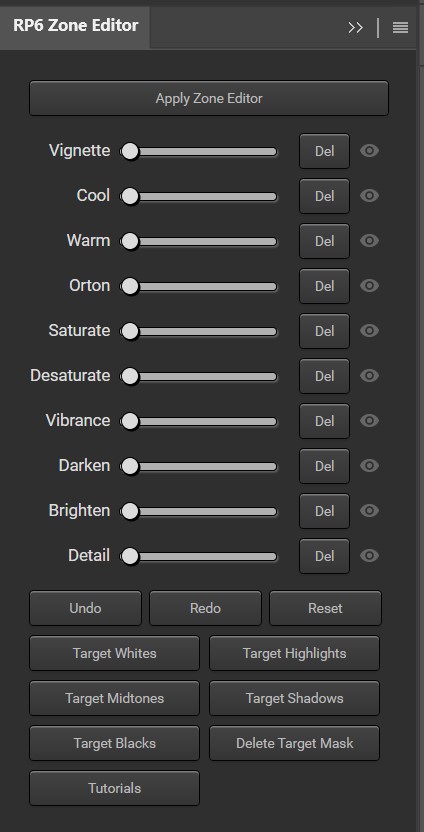
4. Underneath the Apply Zone Editor button you will find a series of effects and a control slider. All you need to do to apply an effect is move the slider over to the right. The further right the slider goes, the stronger the effect. For example, we apply a fairly strong Vignette by placing the slider control right of the centre point.

5. You can apply as many effects as you like really easily by placing the sliders wherever you want by clicking on the range line or by dragging the slider control.

6. All of the effects are applied globally, which means they affect the entire image. To restrict the applied effect, click on the small > arrow next to the folder icon of the Zone Editor group in the layers panel.

7. This will expand the group. Find the effect that you want to restrict and left-click on the layer. In this example, we have selected the Zone Warm Layer.

8. Now, we only want to warm up the highlights. So, all we need to do is click on the Target Highlights button in the Zone Editor panel.
9. This will apply a luminosity mask to the Zone Warm layer the targets the highlights.

10. Click on the next layer that you want to restrict, as below, we moved onto the Zone Orton layer.

11. The Orton effect applies brilliantly to the brightest parts of an image. So, this time we click on the Target Whites button to apply the Orton effect only to the very brightest parts of the image.

12. Once you have made all of the adjustments, click on the little >> arrow icon in the Zone Editor panel to hide Zone Editor.

13. Click on the V arrow next to the folder icon of the Zone Editor group to minimise the folder.

14. To see the before and after quickly, toggle the layer visibility to clicking on the eye icon of the Zone Editor group layer.

You can always go back and change the strength of the applied effects at any time by adjusting the sliders. Target Whites, Highlights, Midtones, Shadows, or Blacks with our carefully created luminosity masks. It really does take no time at all to edit in photoshop using Zone Editor.


