How To Enhance Details In Photoshop – Local Contrast Tutorial
Have you ever looked at your image and thought it was too flat? You’ve increased and decreased contrast but that didn’t help. Or, maybe you’re shooting in hazy, humid conditions and you need something to create local contrast that will cut through the haze. Here is a possible solution, follow this tutorial to learn How To Enhance Details In Photoshop.
Being able to enhance details through fine contrast adjustments can work wonders in these conditions and often draw out beautiful texture.
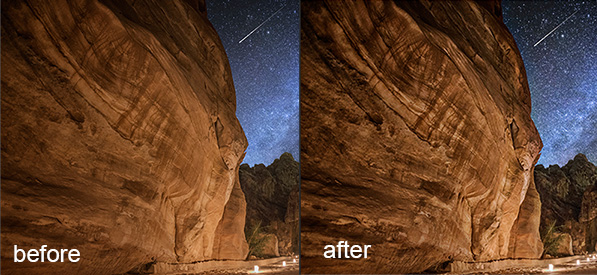
Detail Enhancement was applied to the walls and floor of this image of Petra, Jordan

The below image is a before and after comparison to show you the detail enhancement effect. The effect on the after image is extremely strong, probably too strong. This was just for demonstration purposes.
Enter your email below and join our community of more than 100,000 photographers who receive regular tutorials and have also

Subscribed to our newsletter,
Downloaded our FREE Photoshop Course
Got our FREE Easy Panel for Photoshop
And have our FREE Essential Guide To Luminosity Masks E-Book
How To Enhance Details In Photoshop
Photoshop Steps
1. Duplicate your current layer. You can do this by pressing Ctrl + J, or CMD+J on a Mac.
2. Invert this layer by pressing Ctrl+I, or CMD+I on a Mac.
3. Call the new layer Details. Change its Blend Mode to Vivid Light.
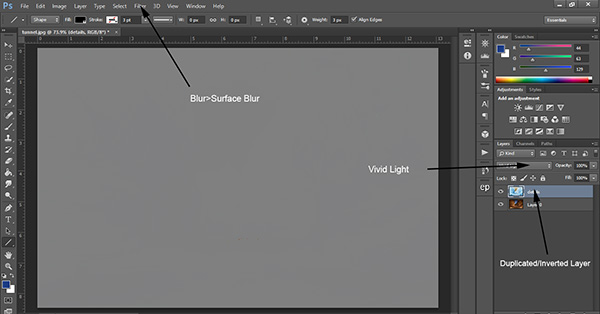
4. Your image should now be grey. Go to Filter>Blur>Surface Blur. Set your Radius to around 34 and the Threshold at about 36. Press OK. It may take a few seconds to render.
5. We need to now change the Blend Mode again but since we can’t do this twice on the same layer, we need to merge the two layers we have in a non-destructive way. We can do this by pressing Shift+Ctrl+Alt+E or selecting both layers, right-clicking on them, and while holding Alt, clicking on Merge layers. This will create a new layer which is the two previous layers below merged, but we should still be able to see those layers.
6. Delete the Details layer. Now change the Blend Mode of the new layer to Overlay. You will now have your detail enhance layer.
Tip: It’s easy to overdo detail enhancement. The steps above will produce a very strong effect. Bring the opacity down where needed. Be sure to use it selectively and subtly. Watch out for any halos which appear around objects. Mask them out when you see them.
Thank you for reading this article on How To Enhance Details In Photoshop, be sure to sign up for our newsletter for more tutorials and great offers.
Enter your email below and join our community of more than 100,000 photographers who have also
Subscribed to our newsletter.
Downloaded our FREE Photoshop Course.
Got our FREE Easy Panel for Photoshop.
And, have our FREE Essential Guide To Luminosity Masks E-Book.
Other Articles That Might Interest You
How To Create Dreamy, Magical Landscapes
Using the Dodge & Burn Tool Non-Destructively