Before we begin the digital blending process, it is important to prepare our RAW files correctly. Fortunately we have the wonderful, Adobe Camera RAW (ACR) to do the job! We can tap into the potential of our RAW files and correct colour, make sure we have no clipped highlights and shadows and reduce lens distortions.
In this article, I’ll explain some of the steps I take to prepare my images for digital blending. The process is significantly different if I were editing a single exposure. In which case I would use ACR as much as possible. That way we can benefit from the vast stores of our RAW files, before being converted in Photoshop.
Note: ACR uses the same RAW editing engine as Lightroom so anything you learn here, can be transferred to Lightroom if you prefer.
Preparing images in ACR

If you wish to experiment with this, I would really appreciate it if you included my name (Jimmy McIntyre) and www.shutterevolve.com when you publish your image. If you post your published image on our Facebook page I’d be happy to check it out.
Adobe Camera Raw Preparing Images Batch vs Individual Processing
The first thing we need to do is inspect each one of our exposures to decide what changes need to be made. If you want to make changes to individual files, just select the relevant file on the left and begin editing.
For colour correction and lens corrections, it’s important to select all files so that all exposures experience the change. This is because we need the colours to be consistent across exposures, and when we apply lens corrections, it often changes the perspective of the image slightly. If the changes aren’t applied to all exposures, they won’t align properly in Photoshop.
Simply press Select All to choose all of the exposures you wish to edit.
Enter your email below and join our community of more than 100,000 photographers who receive regular tutorials and have also

Subscribed to our newsletter,
Downloaded our FREE Photoshop Course
Got our FREE Easy Panel for Photoshop
And have our FREE Essential Guide To Luminosity Masks E-Book
Adobe Camera Raw Main Sliders
Click to Enlarge
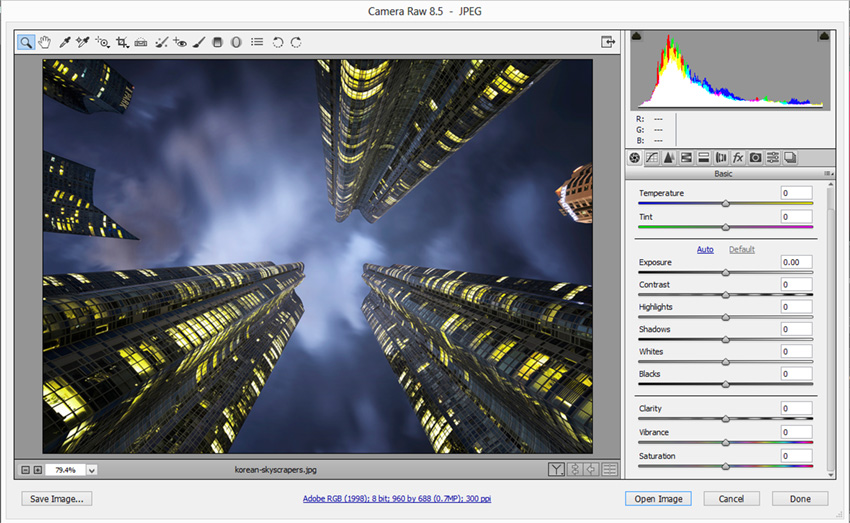
Temperature
The first thing we look at is the overall colour of the image. The Temperature slider is a quick way to make global colour corrections. If the image is too cold, we can slide the Temperature slider to the right until we’re happy. Do the opposite if the temperature is too warm. We may then adjust the colour again later on in Photoshop, but for now, we’re just looking for a solid colour foundation from which to work.
Exposure
This will increase or decrease exposure. Since this article is about preparing for digital blending, we should have bracketed our shots. If we bracket with an EV difference of 1, we’ll have a good selection of exposures to work with. Therefore, we rarely need to change the exposure of any image.
Contrast
If we’re working with a single RAW file then we may consider increasing the contrast slightly, but other than that there isn’t too much need for this slider. Since this workflow involves exposure blending at the beginning, we need to keep the RAW files flat. By increasing contrast at this stage, we may lose important detail in the highlights or shadows.
Highlights
With this slider you can affect specific changes to the highlights, making them brighter or pulling them back. If we’re working with a single exposure with blown out highlights, or the highlights in our darkest exposure are too bright, we can move this slider to the left in order to recover them as much as possible.
Shadows
As with the Highlights slider, the Shadows slider makes specific changes to a targeted area – this time the darker parts. It’s is best if we try not to use this slider too much. Recovering shadows is a sure-fire way of creating noise. Even with the Nikon D800 I prefer to blend in a brighter exposure to recover underexposed areas than to recover shadows too much in ACR.
Lens Correction in Camera Raw
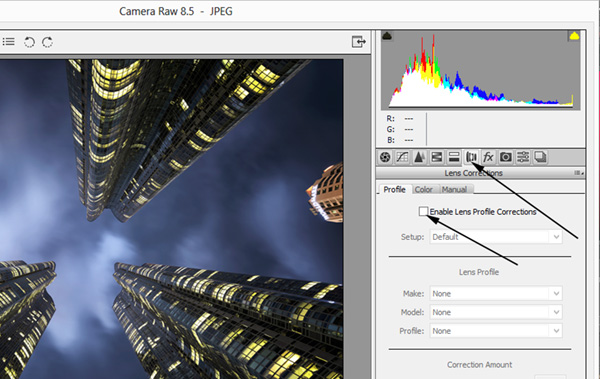
At this point, we should have our exposures ready for blending. The highlights, shadows, and colour should all be well controlled. Now we just need to do some final cleaning of the images. Click on the Lens Corrections tab to the top right.
Under Profile, check the box that says Enable Lens Profile Corrections. If ACR has the profile of your lens, then it will attempt to reduce distortion and at the same time reduce vignetting.
You can also make these adjustments manually if you do down to Correction Amount and adjust the sliders to suit you.
Finally, click on the Color tab and check the box called Remove Chromatic Aberration. This should help to reduce any CA in your image. As with the Profile Corrections, you can also make manual adjustments to this if you want to by moving the colour sliders below until you’re happy.
Now we’re ready for the digital blending process. Make sure you have all files selected and go to Open Images to open the images in Photoshop.
Thank you for reading this article Prepare Your Images in ACR Before Digital Blending in Photoshop, You might also be interested in the articles below. Be sure to sign up for our newsletter for more tutorials and great offers.
Enter your email below and join our community of more than 100,000 photographers who have also
Subscribed to our newsletter.
Downloaded our FREE Photoshop Course.
Got our FREE Easy Panel for Photoshop.
And, have our FREE Essential Guide To Luminosity Masks E-Book.
Take your imagery to professional standards with The Art of Digital Blending course
Recent Articles on Shutter…Evolve
How To Create Your Own Luminosity Masks
How Many Exposures Do I Need For Digital Blending?
Video Tutorials – Tips for Taking Better Landscape Photos
To go directly to any of our products, simply click on the image below.


