How to Edit Astrophotography Images
This article on how to edit Astrophotography images is by Steve Bell. If you would like to write for us, please read here.
THIS IS A FOLLOW ON ARTICLE. TO READ THE FIRST ARTICLE PLEASE SEE STEVE BELLS ASTROPHOTOGRAPHY PLANNING ARTICLE.

Editing Multiple Astro Images and Stacking
If you look at the three images that I have included each of them is a stacked image. By this, I mean that I have taken multiple images over a period of time and then used software to align all of the images. When stacking an image, the software averages out the noise in the image and you get a much cleaner result. The more images you take the less noise.
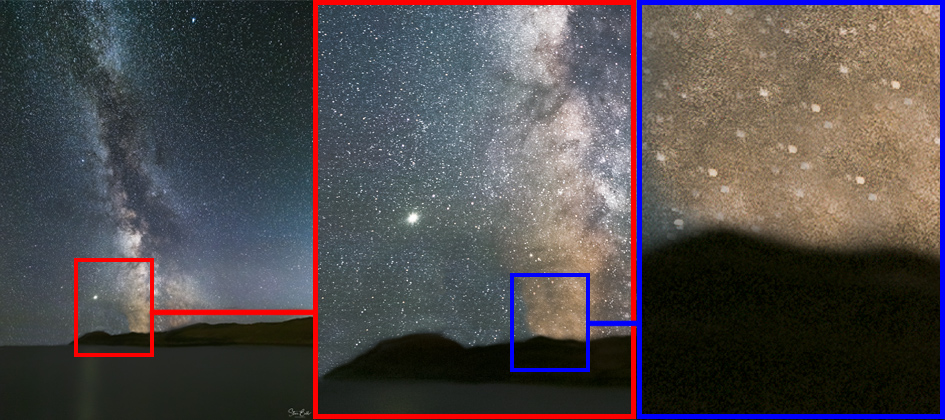
Let’s look at the image that was taken on the Isle of Harris in more detail. I have included one unedited raw image and the final image for you to have a look at. If you zoom in, you will see that in the unedited image there is a huge amount of noise. If you simply increase the shadow slider then it will add even more noise into the foreground. Yet in the final image all of the noise has gone.
For this image my settings were are follows:-
- Aperture f2.8
- Focal Length 16mm
- Exposure 15 seconds
- ISO 6400
I took 20 images.
The reason for this is that I wanted to let as much light into the camera as possible but wanted to avoid any chance of star trailing. (In the corners of an image you sometimes get elongated stars, this is not due to trailing, it is an effect called Coma that lenses sometimes produce)
Enter your email below and join our community of more than 100,000 photographers who receive regular tutorials and have also

Subscribed to our newsletter,
Downloaded our FREE Photoshop Course
Got our FREE Easy Panel for Photoshop
And have our FREE Essential Guide To Luminosity Masks E-Book
Astrophotography Post Processing
Once I have taken all of the images I needed, it was a case of post-processing the images to create the final composition and I will walk you through these steps.
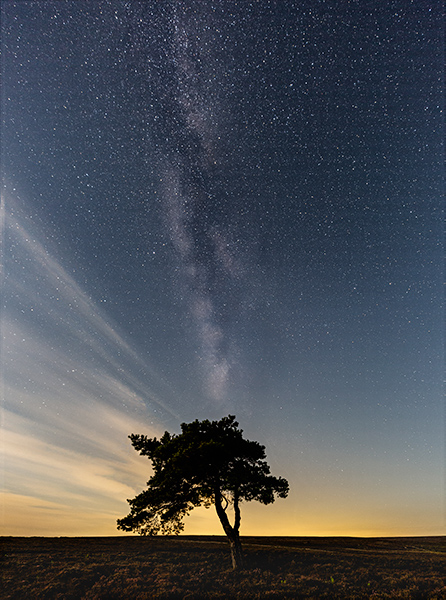
This first was taken on Egton Moor on the North York Moors in the UK. As you can see the Milky Way has is lined up over the lone tree and I knew that it would be in this position on this given night weeks in advance due to the planning that I have previously mentioned. The image was taken about an hour after the moon had risen due to clouds being in the way. It does demonstrate the effect that the 75% full moon had on saturating the sky.
Compare the number of stars to the 2nd and 3rd images.
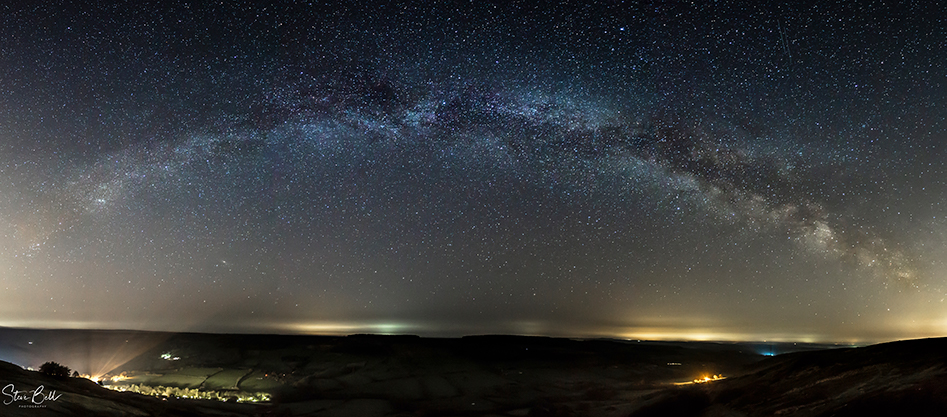
The second image was taken in Dalby Forest, again close to the North York Moors and is one of the darkest areas in North Yorkshire. However, you can clearly see that the image has quite a bit of light pollution in it. It may surprise you to know that this pollution is coming from over 20 miles away. Whilst it doesn’t ruin the image, it does affect the amount of detail that you can bring out in the sky around the horizon line.

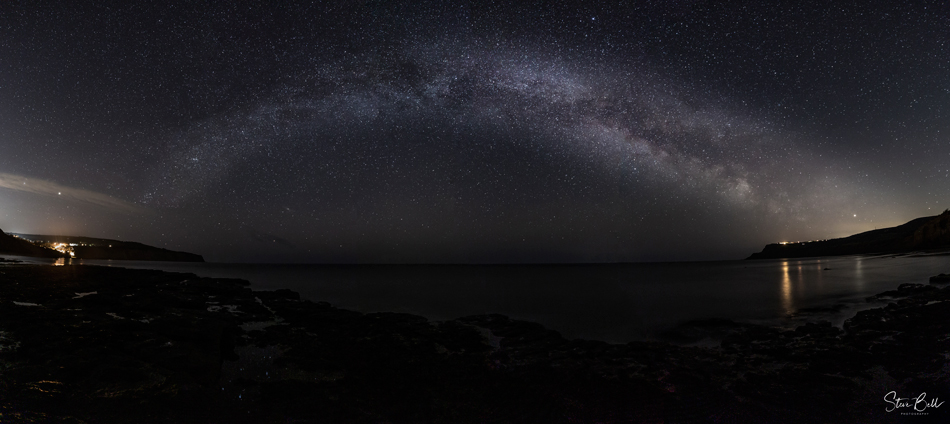
The image that we are going to be talking about in more detail was taken on the Isle of Harris in Scotland where there is no light pollution and the results are clearly visible.
Astrophotography Post-Processing Stages
Post Processing Stage 1 – Basic Editing
Once I have imported the images into Lightroom the first stage is really quite a simple one.
- First thing I always do is to click the tabs which remove chromatic aberration and enable lens profile corrections.
- I will adjust the colour of the image to get it as close as I can to the night sky by using white balance sliders.
- I will tweak the exposure levels slightly and add some contrast to the image. I also add a little bit of texture and clarity into the image.
- Finally, I will put an S into the tone curve and that’s it for now.
(for basic editing of a single image, following these steps and adding some noise reduction will give you a good first attempt at editing your image)
Having adjusted one image, I will then synchronize the changes across all of the images within the sequence and then export them as TIFF’s to a separate folder on my desktop.
Post Processing Stage 2 – Stacking
There are a couple of programs that you can use to stack images. If you are PC user then good news, Sequator is a free download and works really well. If you are a Mac user (like me) then bad news. You will need to buy a program called Starry Landscape Stacker.
I will outline the following steps using the latter. For Sequator, once again Youtube will provide you with instruction.
The process is really simple. You import the TIFF files that you created in Lightroom. This will create an image with lots of red dots in the sky. Pay careful attention that there are no red dots in any other part of the image other than in the sky. If there are then you can erase them. You can add more red dots which are alignment points for the stacking to take place, but I usually go with what the program creates.
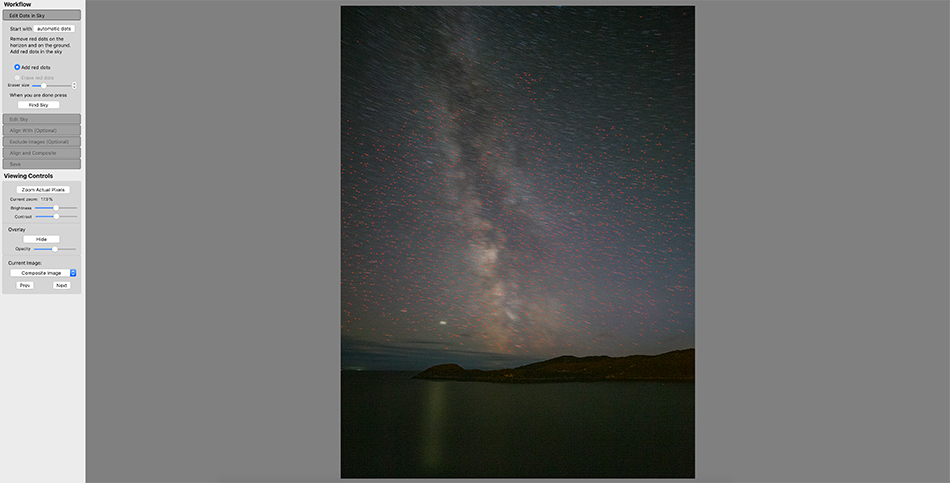
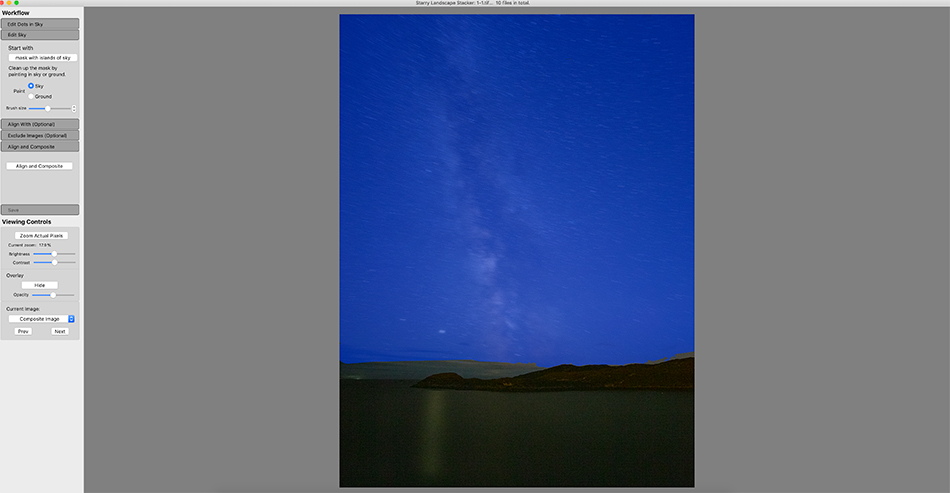
You now click on “Find Sky” and this will create a blue mask over the sky. If there are parts on the image in the sky that have not been found, you can simply paint this in. Again, double-check that none of the foreground has a blue mask over it.
I then move straight to Align and Composite ignoring the “Align With or Exclude Image tabs. I would only use the Exclude Image tab if there had been any more light added to the image, for example, the headlight of a passing car.
Pressing align and composite will then set the program running and it will take a few moments to work its magic as it aligns all of the stars but just uses the foreground of one image. Once the image has been created then I use the option, “minimum horizon noise” which I find creates the cleanest image and then save it.
If you now import the saved image back into lightroom you will find that the noise has disappeared and you have a much cleaner image. Before we go back to lightroom there’s another quick tip that I have discovered works really well.
In stacking the image, you have only reduced the noise in the sky as that is the only part of the image that has been aligned. When you bring the shadows back up in the foreground the noise will still be there. There are 2 ways to get rid of this. Firstly, you could take a much longer exposure with a lower iso – say 5 minutes for example. Yes, the stars will trail but you will only be using the foreground aspect of this images later on. Or you could reverse the stacking process and apply the mask only over the foreground. What this does it, averages out the noise and will give you a much cleaner foreground image. The stars will look weird but again you are only interested in the foreground element. Once again save this file and call it something different to the file you saved for the stacked sky.
Post Processing Step 3 – Final Editing
If you have created an image for the foreground and sky, then from Lightroom, open then up in Photoshop. Drag one image on top of the other and auto align them. You can now simply blend the 2 images together. Or you could just use the quick selection tool to highlight the foreground and move it onto the other image. Once the image is blended then I save it back to Lightroom and make some final adjustments to the image. When aligning the image there may be a need to crop it slightly.
I will then repeat the steps that I used in the initial editing of the image until I have a finished image that I am happy with. Once done simply export it to your desktop, remembering to change your export setting back from TIFF to JPG form the steps that you took earlier if you haven’t already done so.
Astrophotography Editing – Light Painting
Let’s take a very quick look at the image from Dalby Forest. You will see that in the foreground the heather is illuminated. This has been done by simply shining my head torch over the foreground during one exposure. There is no hard or fast rule around how long you should do this for, the only advice that I would give is that you don’t want to paint the foreground for so long that you blow the highlights out. You also want to try and give the image some depth so I find the by painting from one side of the composition it will allow me to add some shadows as well as bringing the foreground to life. Just give it a go as it can add some great effects. Once again, I would recommend blending the foreground with the sky if you have stacked your images.
In conclusion, taking dark sky images is not vastly different from taking a landscape image during the daytime. Yes, it can be slightly intimidating trying to work your camera in the dark for the first time, but practise during the day. It is amazing how quickly you can create muscle memory. For me, planning is key. I would say that over 80% of my time is spent planning and researching the image, it makes the executing of the final composition that much easier and more enjoyable. Follow the 10-step guide and understand the 500 rule. By doing this you won’t go far wrong. More than anything though, just give it a go and have fun doing it. Practise will always make perfect and I am sure you will develop your own workflow that works for you. We are all constantly learning and developing, that to me is what makes photography so interesting and timeless. One thing I do know is that since I have started taking dark sky images, it has made me a better all-round photographer.
If you enjoyed this article and missed the first part on Planning an Astro Shoot then please see Steve’s post on Astrophotography Planning.
Thank you for reading this article on How to Edit Astrophotography Images, You might also be interested in the articles below. Be sure to sign up for our newsletter for more tutorials and great offers.
Enter your email below and join our community of more than 100,000 photographers who have also
Subscribed to our newsletter.
Downloaded our FREE Photoshop Course.
Got our FREE Easy Panel for Photoshop.
And, have our FREE Essential Guide To Luminosity Masks E-Book.
Other online recourses for Astrophotography Post-processing
7 ASTROPHOTOGRAPHY TIPS – ASTROBACKYARD