How To Focus Stack In Photoshop (manual and auto methods)
In this tutorial, we look at how to focus stack in Photoshop by using the easy automatic setting which takes just a couple of clicks. We also try a simple manual technique using layer masking as well as discussing why you might want to focus stack your landscape images and how to capture the original photo sequence to work with. Article by Nick Dautlich
The Finished Result
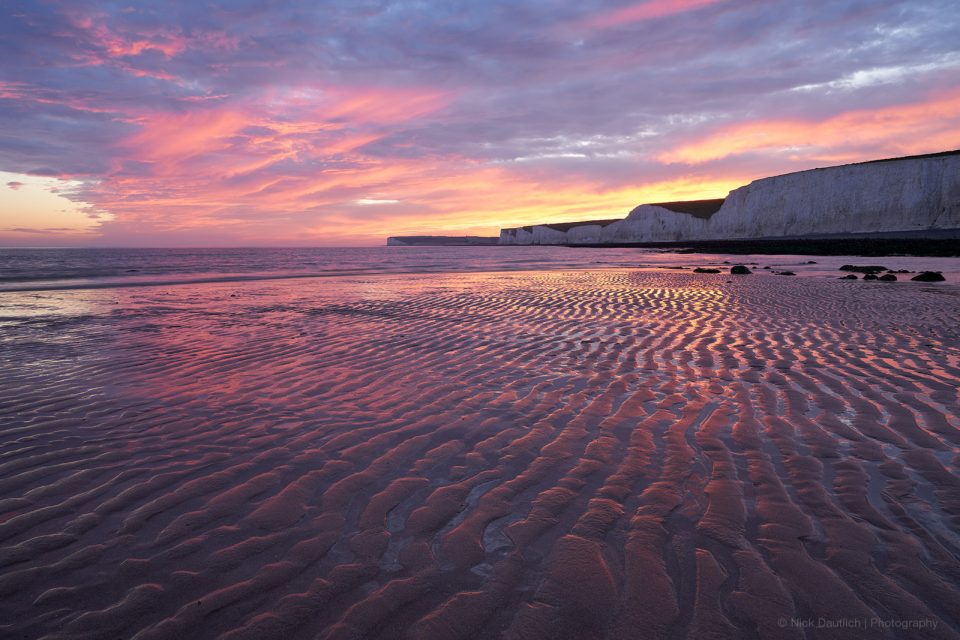
Let’s start off with the finished result of a focus-stacked image. This is a beach scene during sunset, which was made with four RAW photos in the sequence. I was lucky that the conditions all came together for this shot with light, colour, tonal balance and the tide all perfectly aligned. Lucky and persistent as I went to this location around 10 times before getting these conditions.
Why Use Focus Stacking?
The main reason to stack images is to get a deeper focal depth, with front to back sharpness, or somewhere desirable in between. For landscape photography we would generally use focus stacking when we’re shooting with a wide angle lens and need to get something close in the foreground sharp, all the way to a distant background. That’s the case with the finished example above, where the patterns in the sand is sharp, right though to the cliffs in the background.
We do get a greater depth of field with a narrower aperture, however anywhere over f/11 can cause diffraction, depending on the lens being used. This can make an image look less sharp, and if we’re focusing really close even f/30 can be too shallow. Focus stacking provides a really simple technique to overcome this limitation in depth of field.
How To Make The Images For Stacking
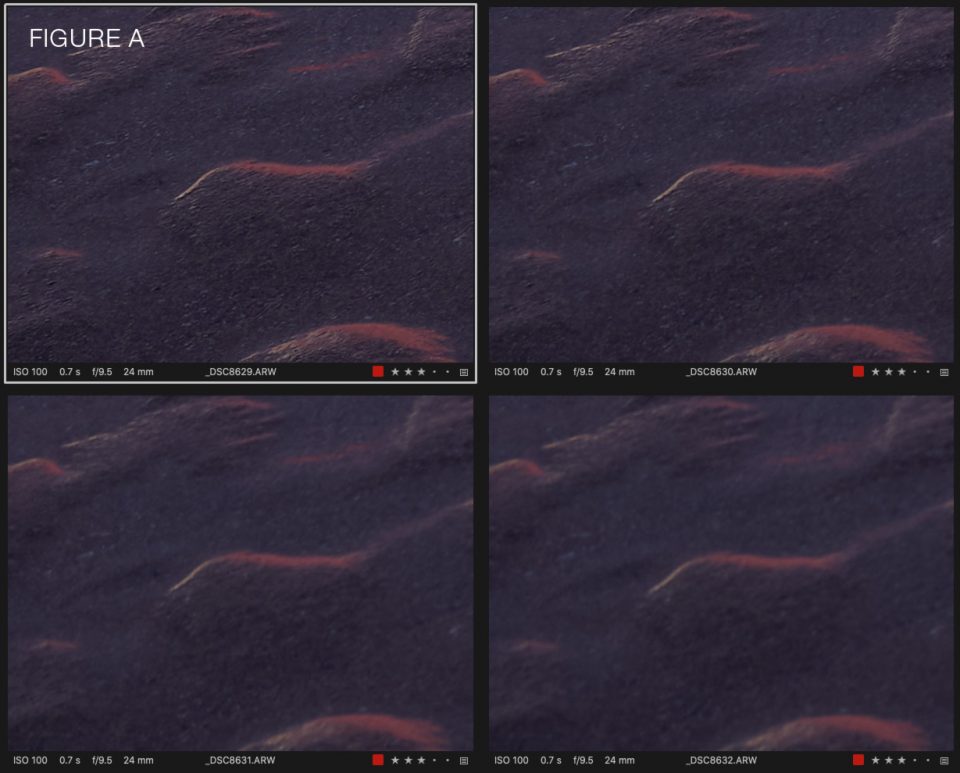
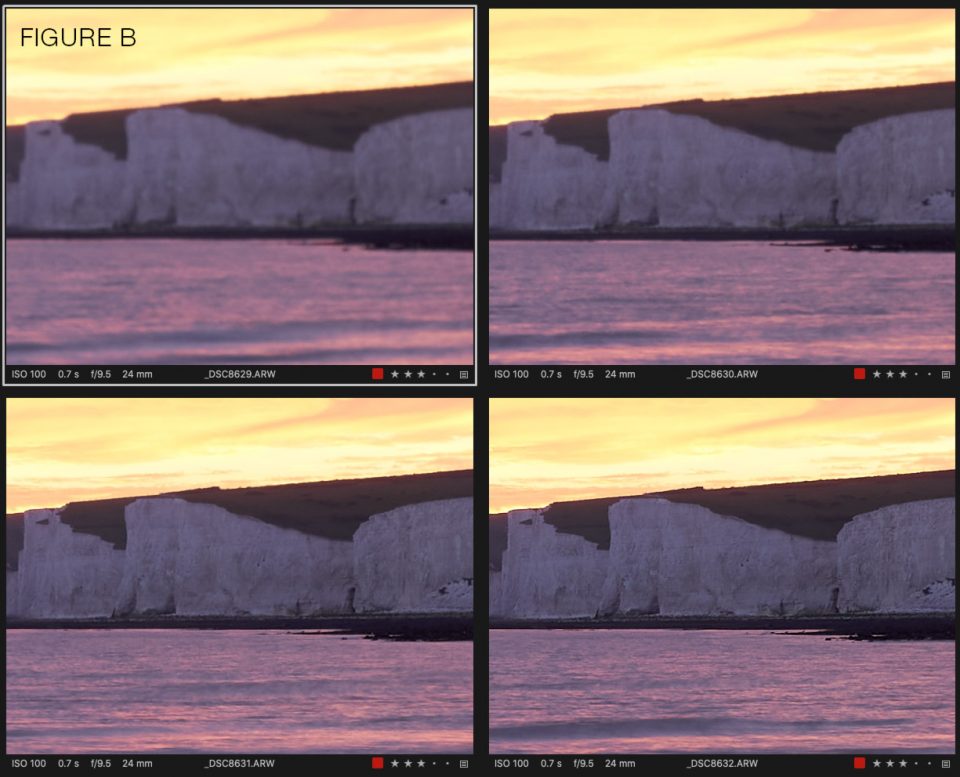
In these two examples you can see the difference in focus at 100% magnification for the areas in the front and back of the beach shot, using a sequence of four images.
The scene in front of you will typically dictate how many images will be needed to get front to back sharpness. On the whole I’ve found between three and six photos works best, depending how close the foreground is in relation to the distant background. The technique is really simple and just needs some forward thinking plus a tripod. Using a tripod is generally recommended for landscape photography and is particularly important when shooting for stacking. We don’t want the composition to change as we’ll be layering the images on top of each other in Photoshop. We have a great article here for how to get sharp photos, which can help with each individual shot for this series.
I tend to start at the closest point for the first shot, focusing on the very nearest objects in the frame. I’ll use an aperture of around f/8 which provides a decent depth of field and is the sweet spot on many lenses. For this landscape scene I focused on the sand immediately below the tripod. After this I concentrated a bit deeper into the image. You should be able to see where focus starts dropping off through the viewfinder. Work your way back through the composition until you are focused on the most distant element of your composition.
– Tutorial Continued Below –
Enter your email below and join our community of more than 100,000 photographers who receive regular tutorials and have also

Subscribed to our newsletter,
Downloaded our FREE Photoshop Course
Got our FREE Easy Panel for Photoshop
And have our FREE Essential Guide To Luminosity Masks E-Book
Some Tips For Getting The Best Images For Focus Stacking
Here are some tips to get the best images while out in the field shooting images for stacking;
1. Shoot quickly. The elements will be changing while you are busy with each frame, but we want as few changes as possible. Clouds will be moving, the light will be changing and so on. So whilst employing best practices to get sharp images, shoot quickly throughout the entire front to back sequence.
Capture more frames than you might need. Don’t leave any big gaps in case you lose sharpness anywhere. I’ve shot sequences where several metres are out of focus, which pretty much ruins the stack.
2. Use manual focus, especially in low light as your eyes are better than AF.
Avoid moving the tripod during the sequence. The comp needs to stay the same.
3. Once you’ve finished the sequence, check each image before deciding you are all done. This goes for any shoot, but is particularly important when creating a series of images which need to all work together. You will only ever get the conditions you’re shooting this one single time.
4. Shoot an image of your hand at the beginning and end of each sequence. This works really well if you are on a longer photography excursion. When you get back to your computer you’ll easily be able to see which pictures belong together in a series for a stack.
Photoshop’s Automated Focus Stacking
Once you’re back with your images you can apply any basic adjustments in your RAW editor then copy the adjustments to all of the images in the sequence. It doesn’t matter what you’re adjusting as long as all of the photos are synchronised. I used Capture One for this example, but Lightroom or Photoshop’s own RAW filter all do essentially the same thing.
Next we want them all on a single document in layers, so I opened them all as individual files then used the handy ‘stack’ feature in Jimmy’s Raya Pro.

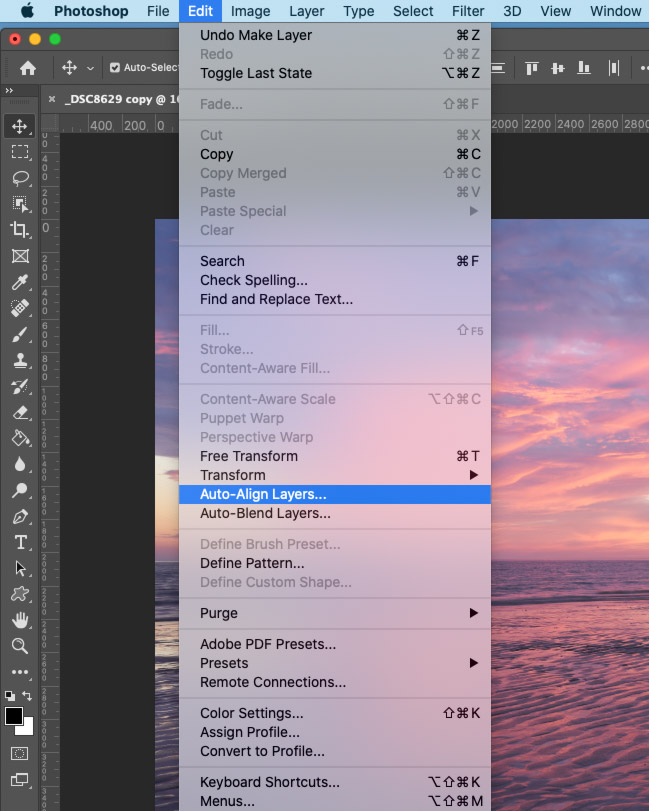
We want to make sure everything is correctly aligned once they are in the same file, so select all of the layers and choose EDIT > AUTO ALIGN LAYERS
You can leave the defaults here as we probably don’t need vignette or lens corrections.
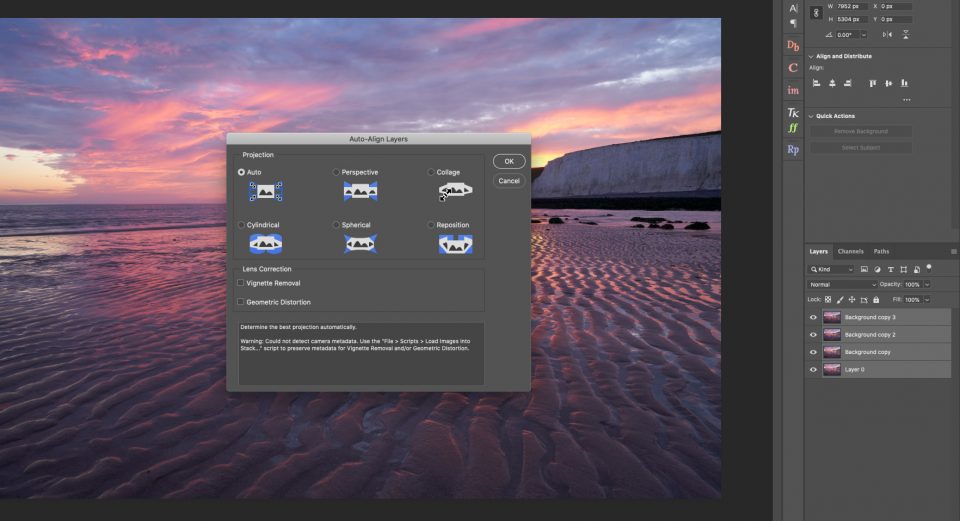
If the layers shifted slightly once complete you may see transparent pixels around the edges, but don’t worry as we can trim these off later.
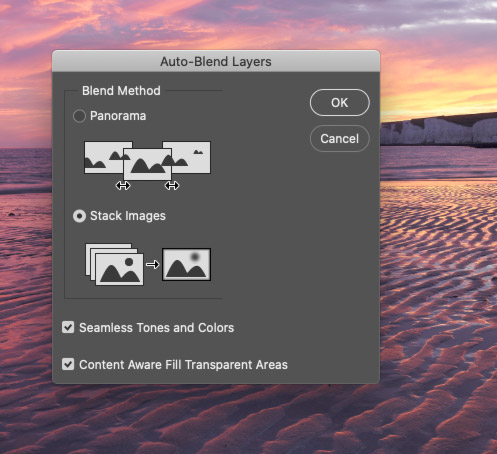
Once aligned, choose EDIT > AUTO BLEND LAYERS
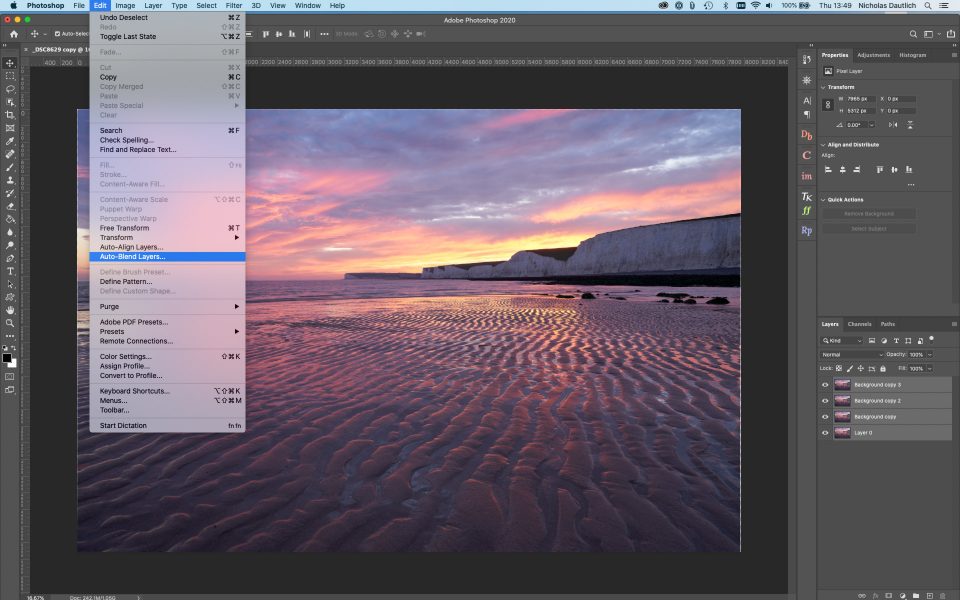
For this menu you might want to try setting either, both or none of the two options and see how it comes out. This can take a while depending on how many images are in the stack and how many megapixels each one is.
Voila, that’s it! Once finished you’ll see masks over the layers with a merged layer on top. Where there’s white on the mask the layer below shows through and where there’s black it’s masked out.
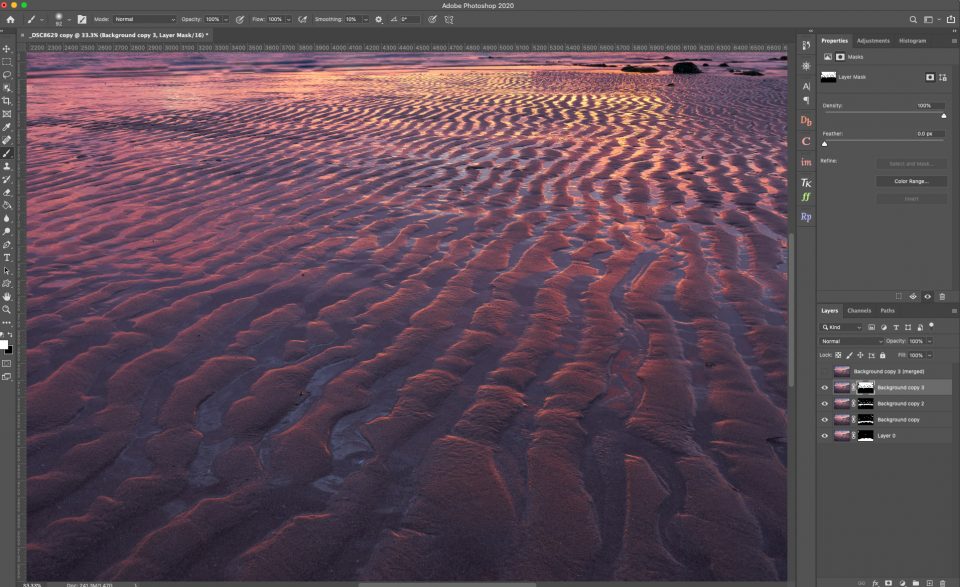
Scroll through at 100% to enjoy the front to back sharpness that Photoshop worked out all by itself. Except in this beach scene it didn’t quite work. You can see on the zoomed in background that parts of the cliffs were blurry, Photoshop didn’t quite work perfectly. I find that automated stacking works around 80% of the time. Luckily if this is the case there’s a super quick and simple manual alternative.
focus stack in photoshop
How to Manual Focus Stack In Photoshop Using Masking
For this landscape scene Photoshop didn’t quite get it 100% right so here’s a really quick and easy manual alternative using masking. If you’ve never used masking before, watch our handy video guide ‘What is masking in Photoshop’.
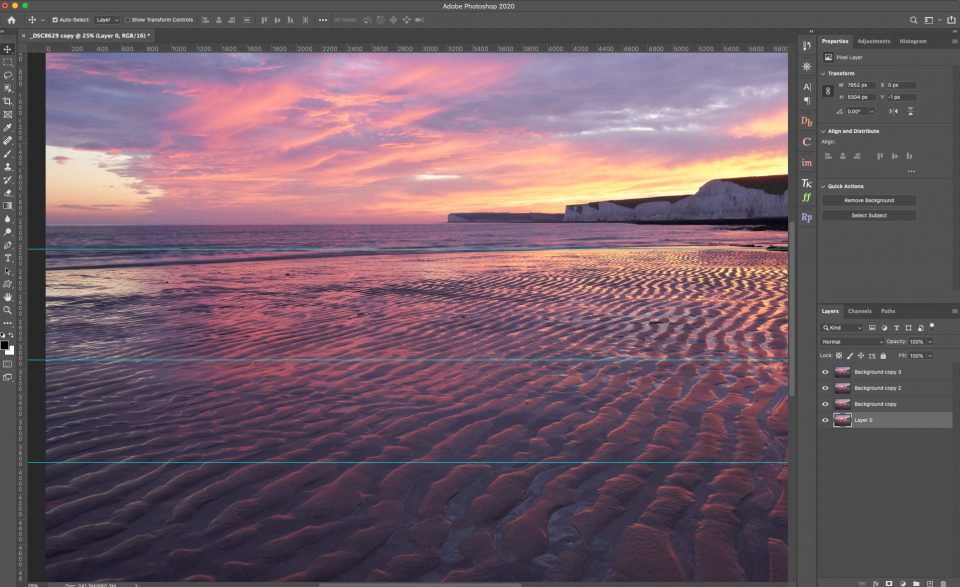
Get back to where your layers are all aligned (step four above) without any masks.
Zoom in to 100% magnification and look at where focus drops off between each of the layers. You’ll have to turn visibility on and off as you drop down the layer stack to see what’s below each one.
Drag a guide to where the focus drops off between each layer in your sequence. In this beach example you can see most of my frames were focused towards the foreground, so the guides are lower down the image.
Next add a white layer mask to each layer in your sequence. Grab the gradient fill tool set to 100% opacity and drag upwards from the bottom to get a solid line up to each guide. Make sure you’re adding the gradient to each layer mask not the images, or it’ll just be painted black.
Running down through the layers you’re now masking through the sharp image from each layer below, until you’re at the top.
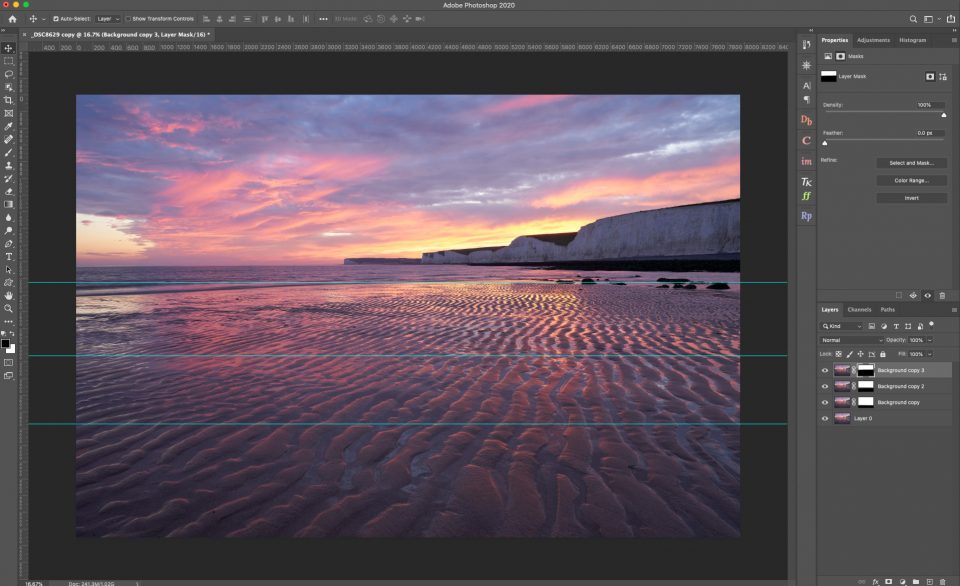
I do a second pass with the gradient tool set to 50% opacity to allow some feathering of the joins between each layer. You can also do this first time around instead of using 100% opacity. There are many ways to skin a cat and this is just what works best for me as I can clearly see what is happening at 100% opacity.
Once finished with masking, select all the layers then copy into one merged layer. This allows you to switch off the masked layers below and work on a single blended layer.
That’s it! Once you’ve gone through gradient masking each layer the finished result will be a sharp scene front to back all done manually in Photoshop. Nice one 🙂
Finishing Off The Image
If you did get any transparent pixels when aligning your layers you can easily trim them off under IMAGE > TRIM. To use this feature switch off all other layers aside from the top merged layer and trim off transparent pixels.
![]()
After editing the photo to taste I will generally finish off with a light vignette, another easy single click in Raya Pro.

Final Thoughts
Using focus stack in photoshop isn’t the answer for every scene, nor is it always required by any means, as we get plenty in depth of field from a single shot most of the time. Sometimes we might also choose to have a shallower depth of field in our landscape photos. An example might be where we are in foggy conditions and want focus to naturally fall off towards the distance. If we’re making creative images pin sharp focus from front to back isn’t always desirable, and can even appear over cooked sometimes. That being said, it’s not a bad idea to capture the photos you need for a focus stack if you see that it might be needed. Getting the choice after a shoot is always a good thing, even if you decide you prefer a single frame.
I hope you enjoyed this tutorial and that you are getting out into the landscape doing what you love. Please leave a comment below and if you want to see more of Nick’s photography visit https://ndgallery.com. Images in this article are ©Nick Dautlich.