
Landscape Photography Edit from Start to Finish
This Landscape Photography Edit from Start to Finish Article is by Brian Knott. If you would like to write for us, please read here.
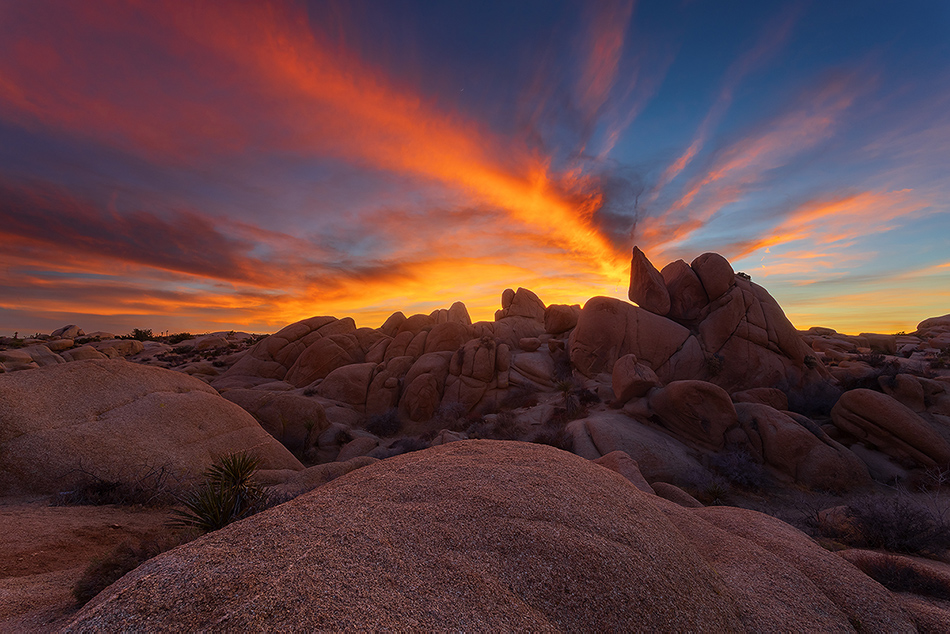
This image is from a very vivid sunset that I shot recently on a cold and windy night in Joshua Tree National Park. The dynamic range in this scene was well over two stops difference so I had to bracket exposures with the intent of blending them together in Photoshop later. I shot four exposures but after looking at them I decided I could process the image with just two RAW files – one for the foreground and one for the sky.
Here are the two images that were used in this edit.

Brights – For the Foreground 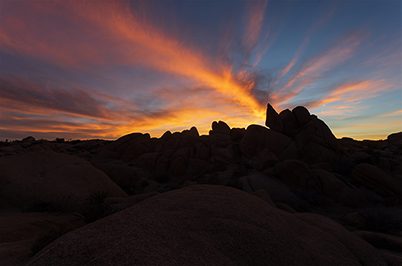
Darks – For the Sky
Landscape Photography Edit from Start to Finish
1. Prep files in Adobe Camera Raw
First things first, I open both RAW files in Adobe Camera Raw (ACR).In ACR I make sure to have the same white balance for both images, I set the Profiles to Adobe Landscape, and all the adjustment sliders are set to zero except I bring the highlights down a tad on the sky exposure and the shadows up just slightly on the foreground exposure.
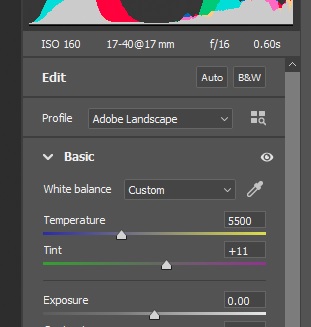
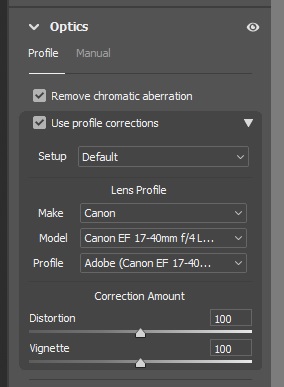
I also checkoff Remove Chromatic Aberration and Profile Corrections (and make sure the profile matches my camera and/or lens used).
Then I open both files into Photoshop.
– Tutorial continued below –
Enter your email below and join our community of more than 100,000 photographers who receive regular tutorials and have also

Subscribed to our newsletter,
Downloaded our FREE Photoshop Course
Got our FREE Easy Panel for Photoshop
And have our FREE Essential Guide To Luminosity Masks E-Book
2. Stack Exposures
In order to blend these exposures, I’ll first need to stack them by copying and pasting the darker exposure onto the brighter. With the dark exposure selected I click CTRL (PC)/CMND (Mac) A and then CTRL/CMND C to copy it. With the brighter foreground exposure selected I paste it with CTRL/CMND V. With both layers “stacked”, it’s time to blend them together.
Or, to speed this up even more you can use the Stack button in Raya Pro. Followed by the Align button to make sure the multiple layers are aligned.
3. Exposure Blending Using Luminosity Masks
I will need to create a luminosity mask with Raya Pro 5 InstaMask to blend the two layers. A brights 1 seems to be the best fit but even with adjusting the mask sliders it doesn’t quite give me good enough separation of sky and foreground so it needs to be refined further.
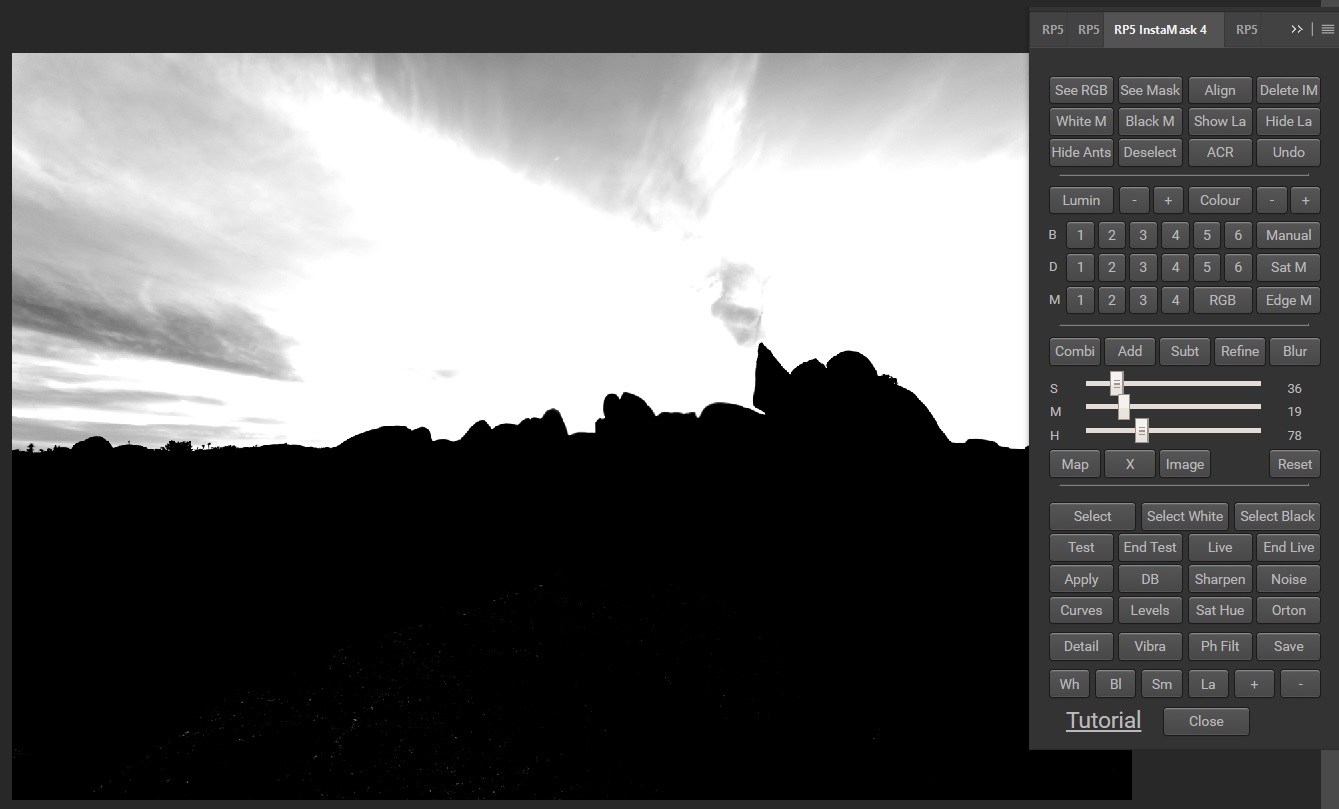
I do that by clicking the Select button on the panel to create a selection. The marching ants now show me roughly what the mask would look like – indeed there are some areas that the mask is missing.
Using the Lasso tool, I hold down Shift and draw around the areas of the sky that weren’t part of the original selection. This will add them to the selection. Inversely, if I want to remove any part from the selection, I can do so by holding down Alt/Opt and drawing around it.
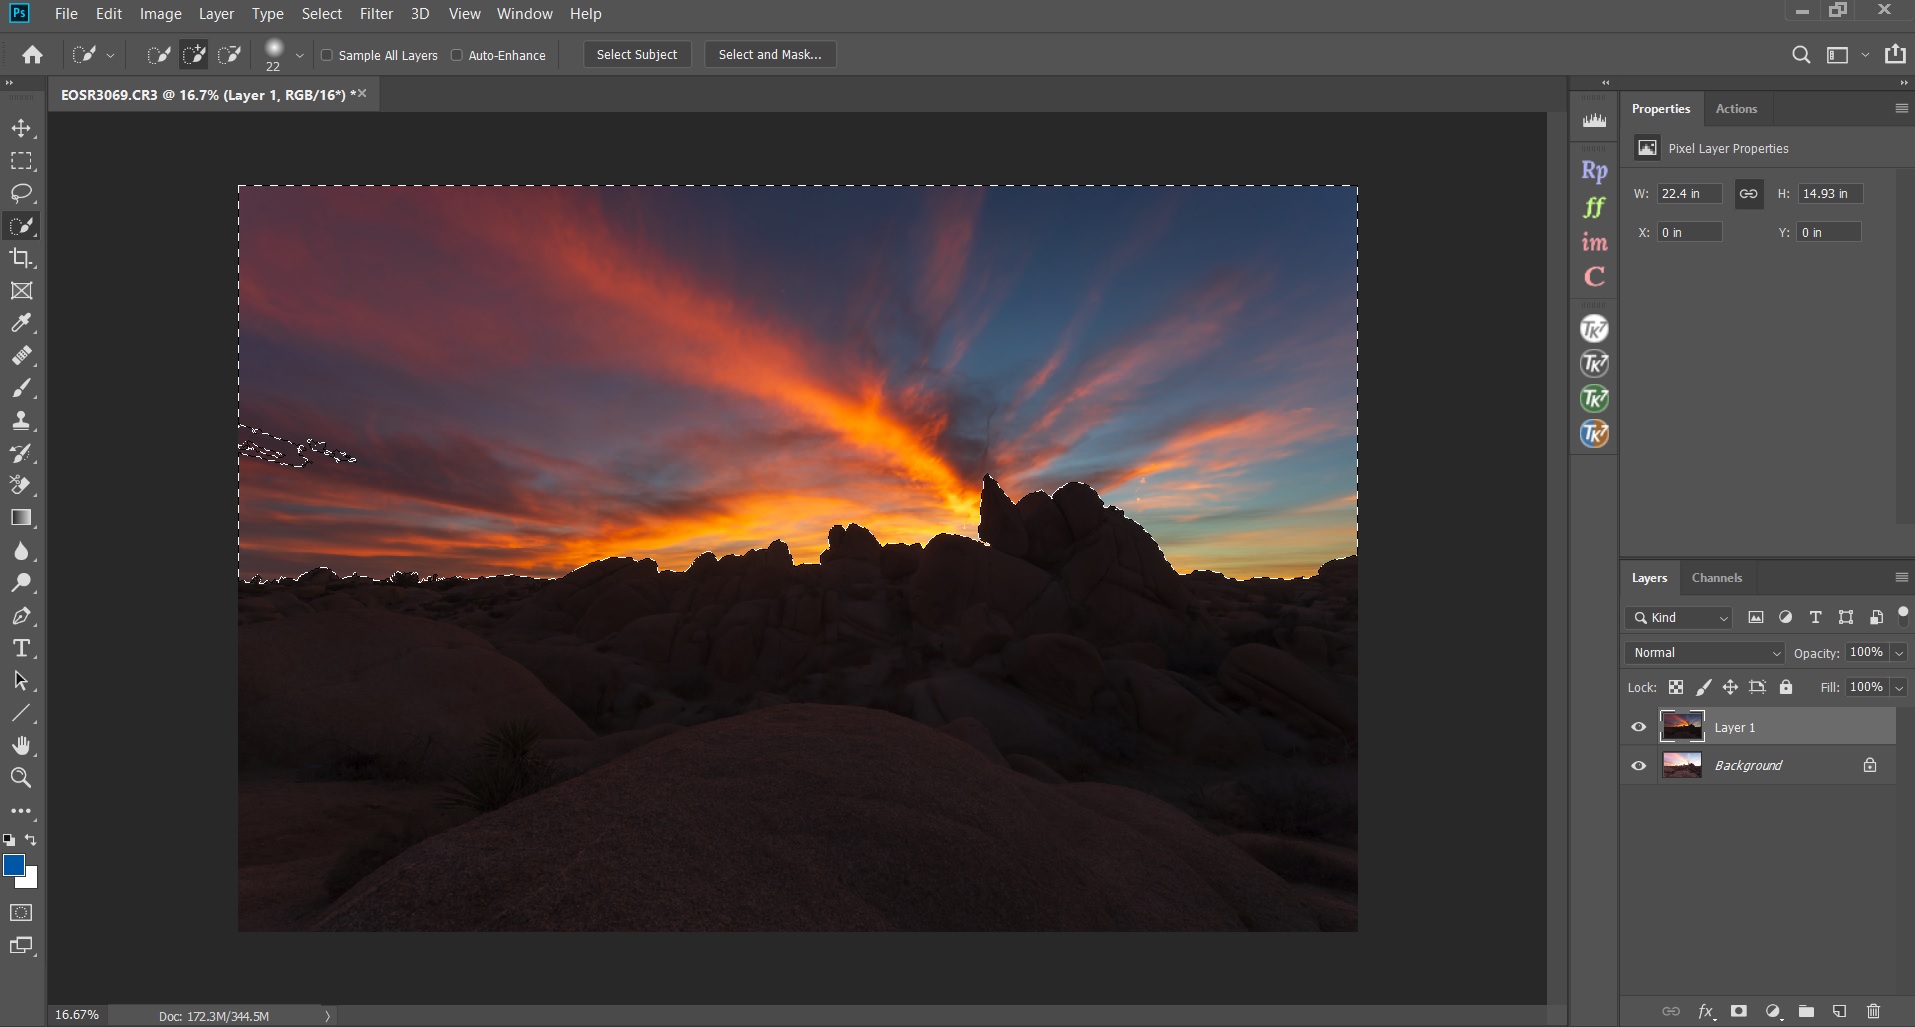
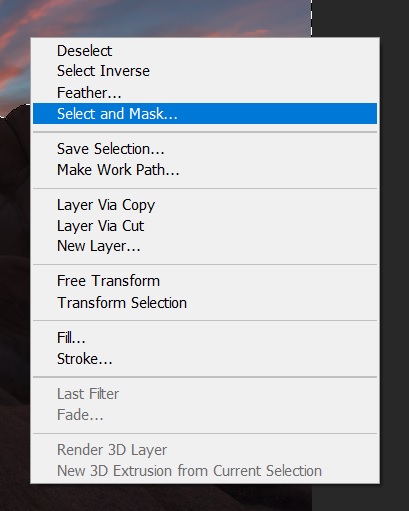
I still want to refine the edge of the horizon. Using any of the Photoshop selection tools, I right-click on the image and choose Select and Mask.
Using the cursor, I will now draw on the edges (I make sure to use a small enough brush to only work in close proximity to the edge of the horizon). The red areas indicate what will be masked out. When I’m satisfied with the mask, I click OK.

With my mask ready, I need to apply it to the top layer by clicking on the layer and then clicking on the Add Layer Mask button (rectangle with a circle in the middle) at the bottom of the Layers panel. The result is a nice balanced sky and foreground exposure in one file.
Exposure Blending,
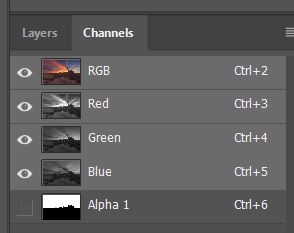
One last thing I’ll do is to save this mask in case I need to make the same selection later. I hold down CTRL/CMND and click on the mask on the layer (this will select it). Then I go to the Channels panel and click on Save Selection as Channel (again, the rectangle with a circle in the middle). It creates a layer mask automatically labelled Alpha 1.
I’ll need to merge the layers into one background layer by right-clicking on one of the layers and selecting Flatten Image.
Now it’s time to fine-tune the image.
4. Remove Dust
If there’s any dust or artefact that I want to be removed, now is the time to do it. I always do this first in my creative workflow. This is where Raya Pro’s Reveal Dust comes in handy. Now I can zoom in and scan the image for dust spots with ease. I can use the Clone Tool, Healing Brush or Content-Aware Fill to remove any spots that I find. Sometimes I try all three to see what works best.
5. Image Contrast
I add some overall contrast with a Curves layer. It’s already a contrasty image so I’ll make a very subtle Curves adjustment.
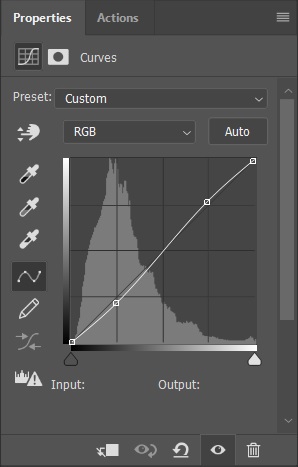
I do want to increase the contrast in the foreground a bit more to accentuate the texture in the boulders. This calls for me to use the selection I saved in the Channels panel. I select it by holding down CTRL/CMND and clicking on the Alpha 1mask. The selection I saved was for the sky but I can easily invert it (with any selection tool chosen) by right-clicking on the image and clicking Select Inverse. Now with the foreground selected I add a Levels layer and increase the white slider just enough to make the boulders pop a bit more.
With the exposure and contrast where I like them, it’s now time for some saturation.
6. Color Saturation
I very rarely use Saturation or Vibrance layers. Instead, I like to use a LAB saturation layer for more control.
6a. First, I need to duplicate the image by going to Image>Duplicate…Then check Duplicate Merged Layers Only and click OK.
6b. Now with the duplicated image, I need to change the colour space to LAB by going to Image>Mode>LAB Color.
6c. Next, I duplicate the background layer by clicking CTRL/CMND J and then change the Blending Mode to Overlay.
6d. Under Blending Options, I need to uncheck the L channel and click OK.
6e. I need to copy and paste this saturation layer onto the original file now. Viola! We have saturation. I can adjust the opacity to my liking.
See this previous post on how to use this method in more detail (https://www.shutterevolve.com/lab-saturation-layer).
7. Refining Colour
There’s a couple of things I don’t like about what my saturation layer did. First, it oversaturated some areas, particularly the red tones. I drop the layer’s opacity down to about 30% and that seemed to do the trick. It looks much more natural now. There are ways to isolate and mask out just the over-saturated areas(with the method below) but for now, we’ll keep it simple.
Second, some areas of the blue sky are a little too cyan for me. This is a personal preference, but I usually prefer to add some reds into the cyan area to give it a more purple hue (just subtle enough so that the cyan isn’t distracting). I add a Color Balance layer, then I’ll need to isolate the cyan by creating a selection. Using InstaMask again, I click the Colour button. Now I will use the colour picker to select the area of the sky that I want to adjust and click OK. I can adjust the sliders to tweak the mask if needed and then go to my Color Balance layer and click Apply. Now, with my cyan mask, I can add more red with the red slider and it will only affect the cyan areas.

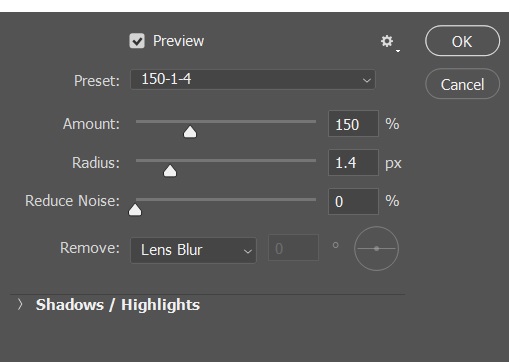
8. Photo Sharpening
Finally, I need to sharpen the image (always the last step), but first, I will save my image as a PSD or TIFF file (this keeps my layers intact) in case I need to go back and re-edit it. After it is saved, I’ll flatten the image and then duplicate the background layer. I typically use Smart Sharpen. I go to Filter>Sharpen>Smart Sharpen.
I use many different algorithms depending on the elements of the image, the output size and many more factors (I often sharpen different parts of images with different settings). But for this particular image, I’ll set the Amount to 150% and the Radius to 1.4 anticipating a large file output.
And that’s it! Here on the left, you will see the correctly exposed image. The image on the right is after Exposure Blending using Luminosity Masks and Raya Pro.
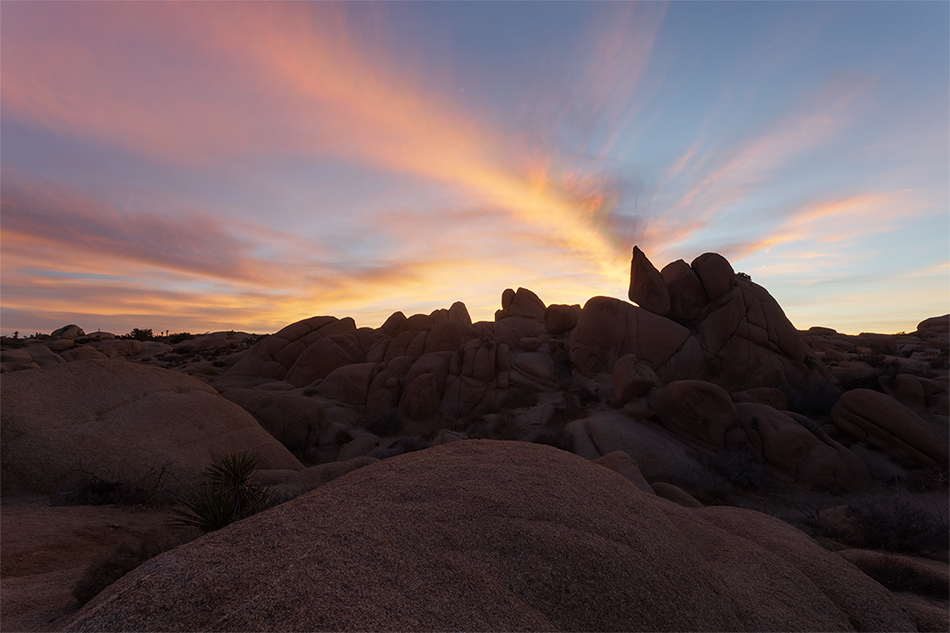
Here is the final result that I am happy with.
Additional Resources
This tutorial was written by Brian Knott. Website | Facebook
Thank you for reading this Landscape Photography Edit from Start to Finish article, be sure to sign up for our newsletter for more tutorials and great offers.

Enter your email below and join our community of more than 100,000 photographers who have also
Subscribed to our newsletter.
Downloaded our FREE Photoshop Course.
Got our FREE Easy Panel for Photoshop.
And, have our FREE Essential Guide To Luminosity Masks E-Book.
FREE Photoshop Course

The Art Of Photography

Raya Pro for Photoshop
