10 Tips For Effective Seascape Photography
Being able to capture seascapes with powerful tides, interesting rock formations and dramatic light, is one of the most rewarding experiences for any landscape/seascape photographer. Just being around the water, before sunrise, with no one around, is a calming feeling. But to come away with a beautiful seascape image as well – that is a truly noteworthy experience. You can also do this by following these 10 Tips For Effective Seascape Photography.

Below you’ll find tips around shooting, planning, and safety that are vital in capturing consistently beautiful seascapes…and staying alive in the process.
1. Know The Tides
In seascape, the tide rules all. It has the final say on what will and will not be in your composition. It is important to plan ahead, using sites like Tide Forecast, to know whether the tide will be in or out on a given day. In the image below, I had no idea that the loch on which Eilean Donan Castle sits was tidal. When I arrived to shoot, the tide was out, ruining my chances of capturing a dramatic seascape, overlooked by an ancient castle.
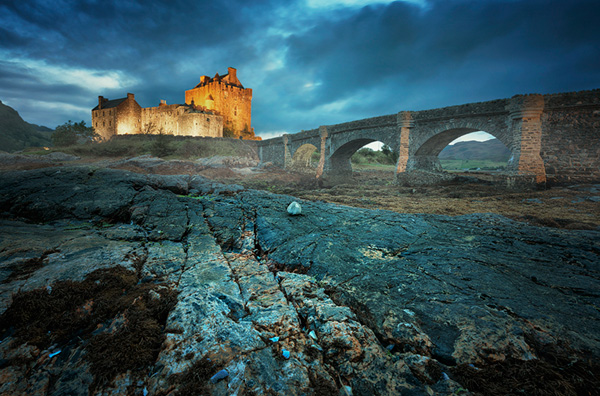 Eilean Donan castle
2. Use Outgoing Tides – Stay Alive!
Following on from our first point, tides don’t just determine what will be in your final image. They also decide if you’ll walk out alive. This sounds dramatic but from personal experience I know what happens when you don’t read the situation correctly and find yourself very quickly surrounded by strong currents. In one respect it is better to shoot when the tide is going out. An incoming tide can trap you in no time. On the other hand, an outgoing tide won’t converge on you, but if you’re actually in the water, the undercurrent tends to be stronger. In either situation, always have your wits about you.
-Tutorial Continued Below-
Enter your email below and join our community of more than 100,000 photographers who receive regular tutorials and have also

Subscribed to our newsletter,
Downloaded our FREE Photoshop Course
Got our FREE Easy Panel for Photoshop
And have our FREE Essential Guide To Luminosity Masks E-Book
3. Use Different Shutter Speeds To Change Water Texture
How you decide to capture moving water will have a huge effect on the overall mood of your image. Your shutter speed will also be influenced by the movement of the water your shooting. Quick shutter speeds can capture the water in action, giving your image more dynamism as it splashes around (if it’s splashing around). Shutter speeds of a couple of seconds tend to add a feeling of movement, especially if you capture the tide slowly drawing out. Longer shutter speeds of around 20-30 seconds, especially in choppy water, create a frothy, white texture in the water. Choose which compliments the mood you’re trying to capture in your image.
 5 seconds – capturing the tide receding
4. Get Low Dow
When composing, get as low as possible to capture the beautiful texture of the rocks or sand in the foreground. If you’re standing upright while shooting a seascape, try lowering the tripod as low as it will go. It will open up a world of new composition possibilities for you.
5. Bring A Torch/Flashlight
This should be fairly obvious. You’ll have very little light to work with before sunrise/after sunset, so a headlamp or torch is vital to allow you to adjust camera settings, guide your path as you walk, and help composing.
 20 seconds and low composition – Frothy, white water
6. Before Sunrise, After Sunset
I’m often surprised by how late photographers turn up to sunrise shoots, or how early they leave after sunset. While this is down to personal taste, of course, I find that the best time to shoot seascapes extends beyond sunset, and well before sunrise. We can capture some beautiful blue hour colours either side of day if we hang around a little longer. And if you’d like some longer exposures, but don’t own an ND filter, the lack of light immediately allows you to draw out your exposure times, to create some interesting effects in the water.
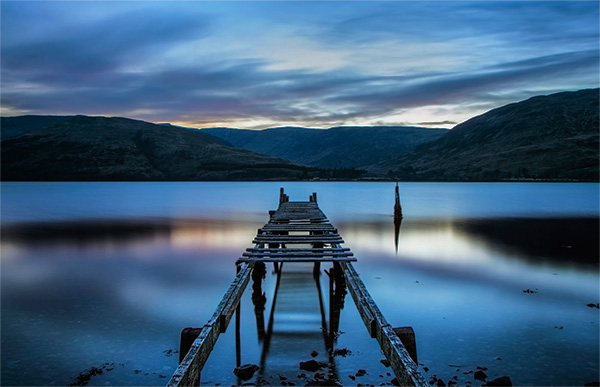
Blue Hour in the Scottish Highlands
7. ND & GND filters
ND filters are perfect for seascapes. Choppy water in a 5-minute exposure can leave us with mind bogglingly surreal effects. And using Graduated Neutral Density filers is probably easiest and cleanest in seascape photography. Since you’re less likely to come up against hugely inconsistent horizons, you’ll avoid the dark edging that can often accompany GND images.
10-stop ND composite
8. Contrast Rocks Or Sticks Against The Water
You’ll see that in every image I’ve used in this article, apart from the Eilean Donan castle shot, I’ve contrasted water in various states, be it reflective, smooth, frothy, or moving, against interesting foreground elements. Learning to contrast the fine details in rocks or sticks against the colour and texture of water, will change your imagery forever. These interactions, where smooth meets jagged, or movement hits solidity, tell a story and build a plethora of mood that almost every seascape should endeavor to capture.
 Patagonia, Chile
9. Bury The Tripod Legs And Then Clean Them
Very often you’ll find you and your tripod standing on sand about to be greeted by a wave. At the moment of impact, your tripod will either shake or sink, unless you’ve planted it firmly into the sand.
Make sure to get each leg as deep into the sand as possible so that when the water hits, it isn’t greatly impacted and doesn’t ruin your shot. But make sure you clean your tripod once you get home. Depending on your tripod, getting sand in the joints can weaken the clamping mechanisms. Regularly cleaning your tripod is good practice anyway!
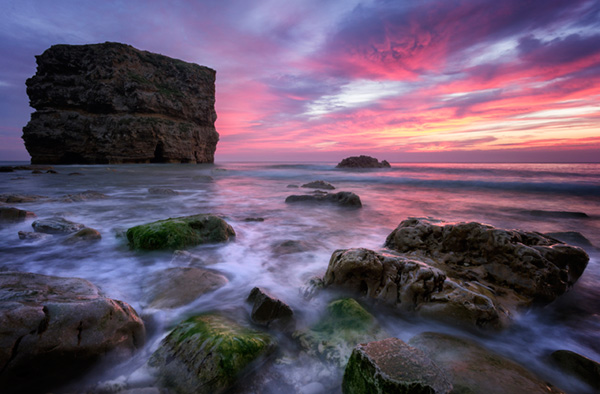
10. Accentuate Green Moss
As photographers, we are aware that certain colours compliment other colours. However, for me, certain colours compliment a scene, regardless of the colours around it. Be it blue hour, a stunning sunset, or cloudy long exposure, I love it when photographers accentuate the green moss often found on sea rocks. It adds an extra living world to the scene. You can do this by opening up a Colour Balance layer in Photoshop, and sliding the green slider to the right. Fill the adjustment layer mask with black and slowly mask in the areas you wish accentuate, with a white brush.
I hope you’ve enjoyed this article on 10 Tips For Effective Seascape Photography. Feel free to check out the latest articles published on Shutter…Evolve.
More Articles on Shutter…Evolve
Luminosity Mask Workflow + How To Remove Lens Flare In Photoshop
Magical Macro Photography That Will Take You To Another World
A Guide To Marketing For Photographers – Part 1, Motivation & Where To Begin
Enter your email below and join our community of more than 100,000 photographers who have also
Subscribed to our newsletter.
Downloaded our FREE Photoshop Course.
Got our FREE Easy Panel for Photoshop.
And, have our FREE Essential Guide To Luminosity Masks E-Book.
To go directly to any of our products, simply click on the image below.


