32 Shooting & Planning Tips To Instantly Improve Your Landscape Photos
I absolutely love landscape photography. I’m never more comfortable than when I’m surrounded by nature’s beauty with my camera. Over the years I’ve made a lot of errors, many of which I’ve learned from, and have hopefully improved my whole landscape shooting experience.
Being a full time photographer, I need to maximise my chance of coming out with the best possible image. In this article, I share with you 32 shooting & planning tips that have drastically improved my landscape photos. I hope you find some useful too, and enjoy the read.
1. Plan for every shoot.
We’ve all heard the phrase, ‘Plan for success’. In photography, planning every shoot will definitely increase your chances of coming out with some great images. With landscape photography we often need to account for factors such as the position of the sun, avoiding rainy or overly sunny seasons, tides, moon cycles, moon position etc.
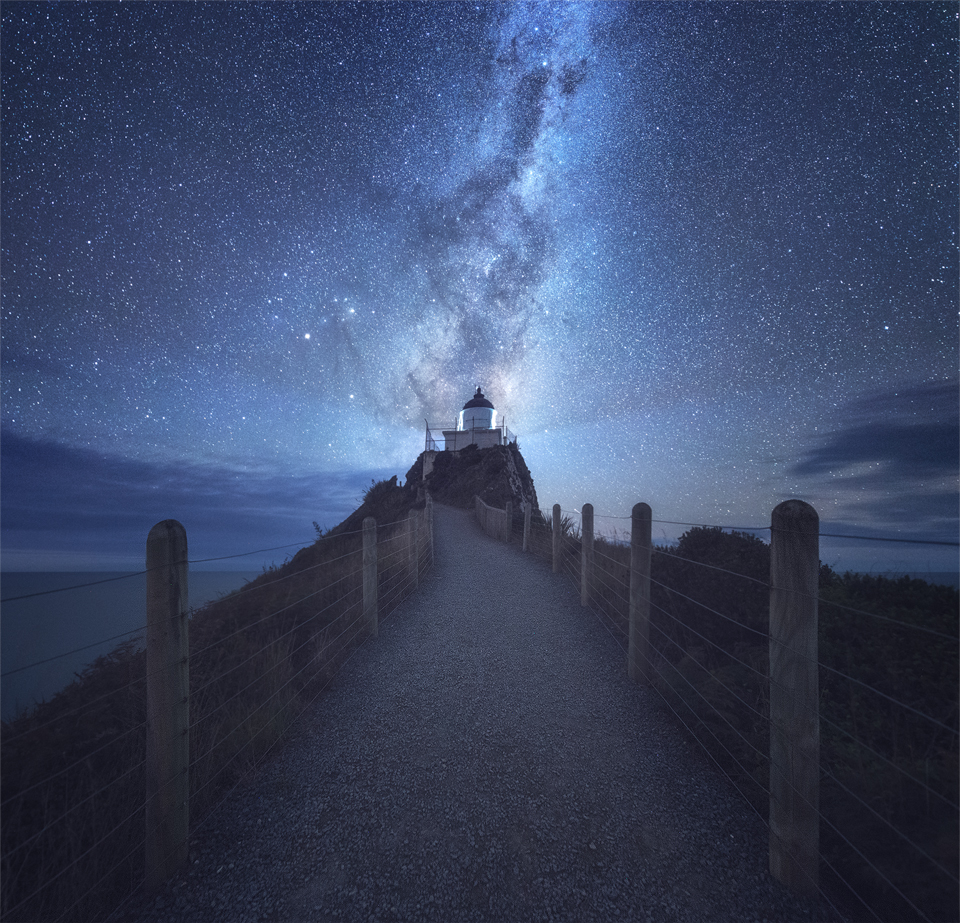
I use an app called PhotoPills (I don’t get paid for mentioning PhotoPills. I’m just an avid user of the app). Not only can I plan shoots well in advance with this app, I can also use the augmented reality features when I’m on location to tell me where the sun/moon/galactic centre will be in relation to any object, and at any time.
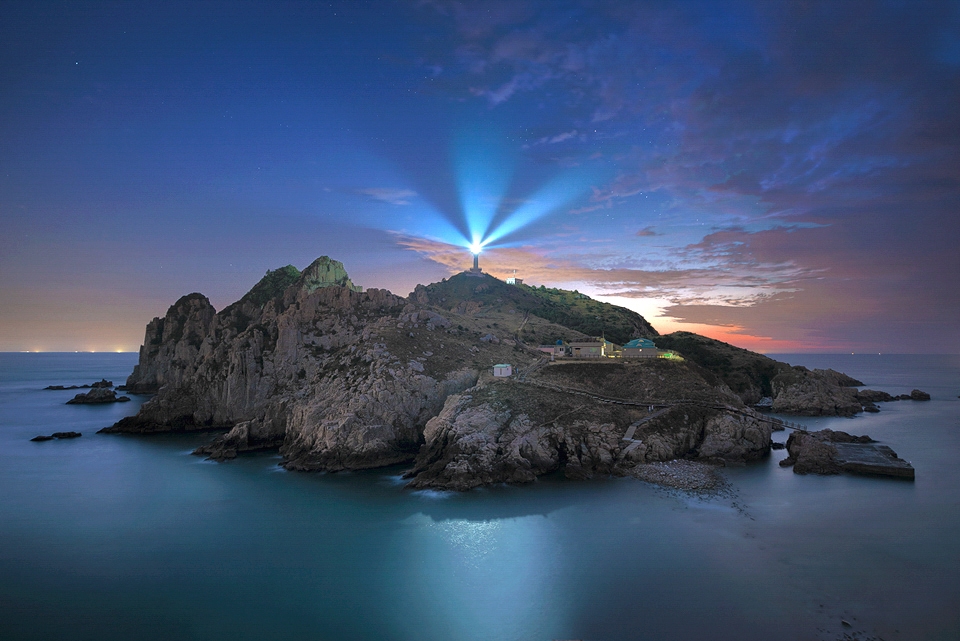
For example, I was able to plan this shoot at Nugget Point, months before. I knew when the galactic centre would be over the lighthouse, and at what time during the new moon phase. I just had to keep my fingers crossed that the weather would play ball.

2. Plan around the moon phase.
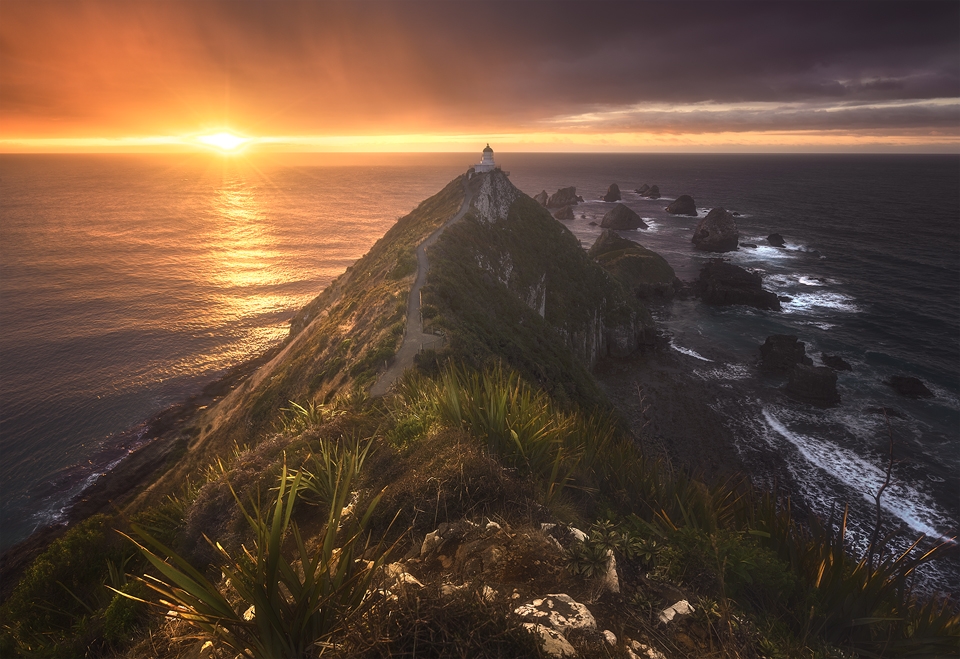
Speaking of planning, if you’re going away for a couple of weeks and you have a few great locations in mind, why not coincide it with a new moon? That way, you may capture the lovely image you initially wanted, and also a bonus astro shot! The image below is my sunrise shot of Nugget Point, the same location as above. I got two for the price of one.
3. Foreground is everything.
When surfing popular photo sharing sites, one thing the most popular landscape photographers have in common is the use of a good foreground. While it is great for us to capture a beautiful mountain, or waterfall or sunset, to really complete an image we have to make sure the rest of the frame is filled with something equally interesting, or which compliments the major element in our scene.
When thinking about your composition, it is often helpful to first ask what is the most impacting element in the frame. Then pull your eyes towards the foreground and ask what elements in the foreground work nicely with the that object of interest.
4. Get down close.
This leads us nicely to one of my favourite compositional techniques – getting down and close to our foreground elements. The closer we get to objects the more we can feel their textures, and the greater sense of grandeur we give our main subject. By moving closer, and getting in among the foreground elements, we create a stronger feeling of intimacy, of actually being part of the scene – rather than a distant onlooker.
In every shoot I go to, where there are other photographers, I notice far more photographers shooting at eye-level, than those shooting much lower. Some may say this is a matter of taste, and I think that is true for many. However, it seems very coincidental that so many people shoot at the level which is clearly most comfortable for their height – eye-level.
Why not get lower and closer than you usually feel comfortable and see what happens with the final product. You may be surprised.
5. Focus Stack
Again, linking in with the point above, if you’re getting close to your foreground, you may need to focus stack in order to make sure your image is sharp throughout. In other words, take an image where you’ve focused on the background. The foreground may be a little bit blurry. Now keep your camera still and re-focus on your foreground. Once you have these two images you can combine them to make one sharp photo.
To learn how to focus stack, please see the following article: Easily Focus-Stack Using a Photoshop Feature You Probably Didn’t Know About
6. The histogram is your friend.
Always rely on the histogram in your Live View instead of just inspecting the image. The histogram tells you everything you need to know. Sometimes in Live View it may seem like you have clipped highlights or shadows, but the histogram will give you a better idea of what is going on.
7. Shoot into the sun.
There was an old rule of photography which warned photogs not to shoot into the sun. Many still believe it. The two justifications I’ve hard for this are: you will damage your eyes, or you will destroy your sensor.
To save your eyes from damage, use the Live View to compose and focus your shot. In terms of damaging the sensor, unless you’re going to be doing this regularly, I really don’t see how it is possible to damage the sensor.
I’ve had my D800 for 3 years now and have shot fairly often into the sun, as have many other photographers out there, without any problems.
Shooting into the sun will completely transform your images. Not only will you add a wonderful point of energy into the frame, it will change and enhance the entire balance of light in your frame. I cannot recommend it more. And if you’re worried about flare from the sun, have no fear. You can see in this tutorial how the photog avoided flare in his image: Challenge Jimmy 2: Perfect Exposure Blending by Combining 3 methods in Photoshop
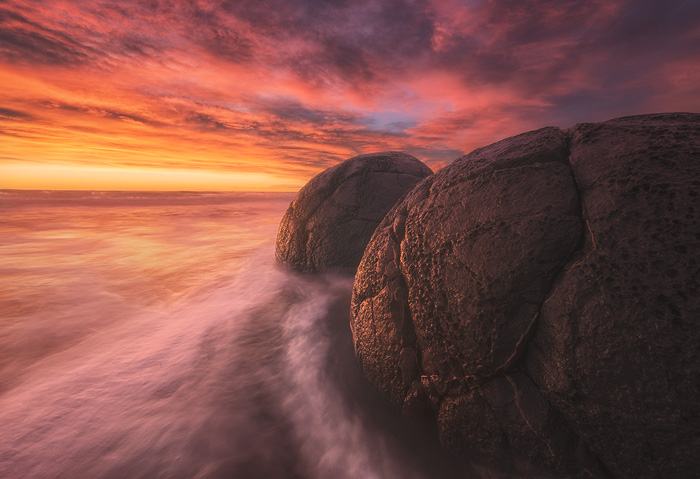
8. Capture complimentary water movement
Water is a wonderful element to include in your frame. It can drastically alter the mood of the entire image, going from calm, crystal clear reflections to violent, choppy currents. To learn more about how to capture different water textures, feel free to read my article:
Reflections, Smooth, Frothy – How To Photograph Water To Get Different Effects.
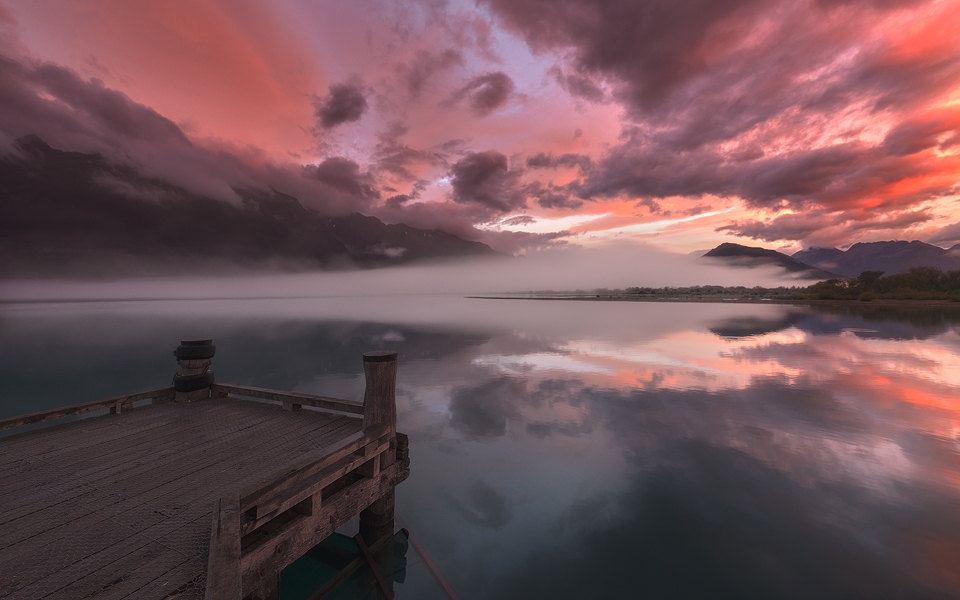
9. Stick around after sunset.
This is a simple one – after the sun has set, why not stick around for blue hour and night time? Or, if you’re getting up for sunrise, try to get there a lot earlier. Often the moonlight can create a lovely effect, and the drop in temperature sometimes means low-lying mist, which is a big mood enhancer!
10. Use an ND filter.
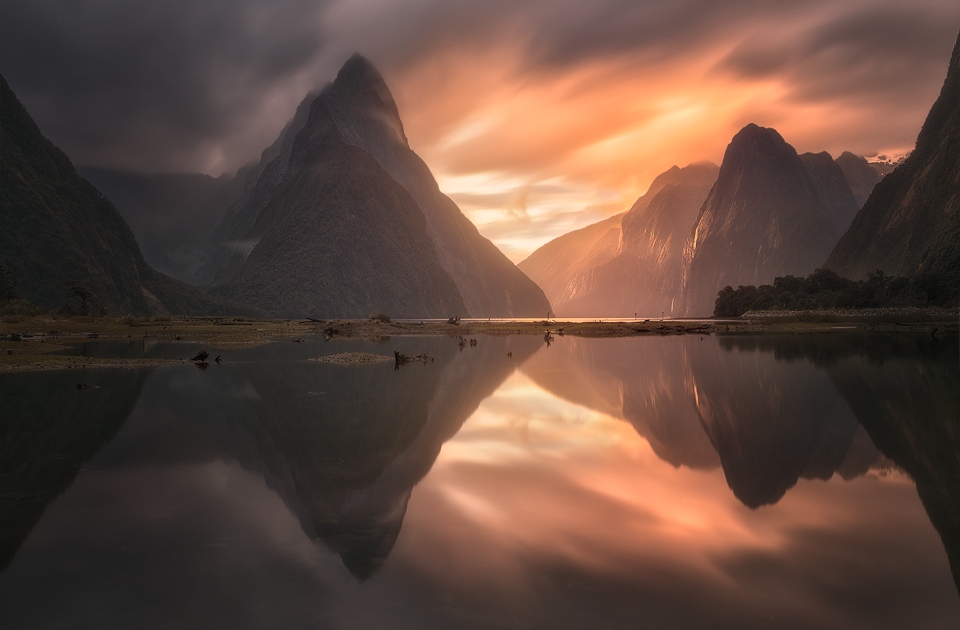
ND filters are a great set of tools that can allow us to transform a scene into something completely different. In a short exposure image we may find that the clouds are a little bit dull, or the water not clear enough for a good reflection. Using a good ND filter can add life to those clouds by capturing their movement. And, as you can see below, the longer shutter speed of the ND filter created a nice, crisp reflection, where the short exposure wasn’t particularly clear.
11. Find a strong light source.
We’ve seen in previous tips that shooting into the sun can drastically effect the mood of your image. And waiting around after sunset to catch moonlight can also produce some lovely scenes.
In reality, any strong light source can greatly enhance our scene, provided it compliments and works with the other elements in the frame.
The wonderful thing about strong light sources is that they not only pull the viewer’s eye, and add an interesting element to the scene, they can also create long, drawn out shadows. And, if we’re lucky, the light may bathe objects in a beneficial way, which either enhances textures or, as in the image below, adds extra depth to the scene.
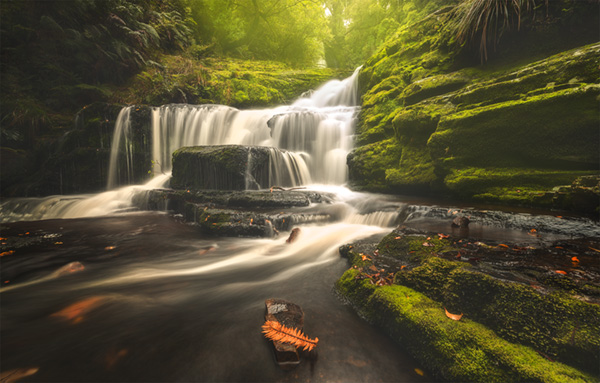
12. Add your own foreground elements.
This definitely cheating! I placed the large leaf in the foreground in that position. As long as you’re not breaking anything, harming anything, or disturbing the natural habitat of the creatures around, I think it’s okay to move a leaf, stone or fallen branch sometimes.

13. Look for morning mist.
Mist is more prevalent in the morning. So if you’re not usually an early riser, maybe the occasional early morning alarm will allow you to capture some moody mist!
14. Use K-Mode when shooting.
All cameras have the ability to set the white balance manually. This setting is usually called ‘K-Mode’ (Kelvin mode). While it isn’t imperative that we set the white balance in-camera, because we can fix this later on in post, doing so will help you to better visualise your final shot while out in the field. As photographers, trying to get it right in-camera should always be a priority.
15. Don’t flog a dead horse.
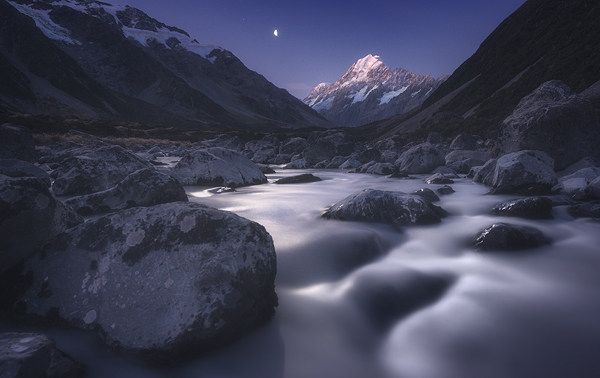
This basically means, if there isn’t a great scene in front of you, look for something better instead of trying to make the most out of a bad situation. For example, I was shooting at Mt. Cook recently. The light was non-existent, as there was a cloud-less, uniform blue sky. There wasn’t the typical pink glow on the side of the mountain as the sun set. The water in the foreground, which often has a clear reflection, was murky and uneven. There weren’t any large chunks of ice that you sometimes see there. In all, it really wasn’t going to be a great image.
Yet almost a dozen photographers were trying frantically to make the most out of the mood-less situation. They were dragging smaller ice chunks out of the water and putting them on the stony shore. Now that they had some ice they were all crowding around it trying to create something beautiful. But they knew they were flogging a dead horse.
Before the sun had set, I’d already marked a different location along the route, should sunset be a bust. That location is the same one you see above, with the moonlit river, which, for me, was a much more impressive scene.
I know it’s not a great feeling when you’ve travelled to a famous place, and the conditions aren’t great. But that is something we all deal with. Sometimes we have to pass on the well-known location if the conditions aren’t great, and look for a spot that does work with the current conditions.
16. Buy wellies or waders.
Essentially, this point is about being well equipped so that you don’t miss the image. I’m fairly bad in this area. Until recently, I didn’t own wellies – instead I just got wet. I personally know a few photogs who won’t get the shot they want because they’ll get wet. If that’s they case, and you’re really not a fan of wet feet, get some wellies.
Although I do have wellies now, normally I use some Nike water shoes, which mean I still get wet, but they don’t feel as slippery on rocks.
17. Don’t worry about the weather forecast (unless it’s a dangerous location).
My wife is a professional weather-forecast-checker. She loves to know what weather to expect. For photography, this isn’t always a great thing. I have lost count how many times the weather was supposed to be heavy rain, or 100% cloud cover, only for us to experience a stunning sunrise/sunset. Regardless of the weather forecast, go to the location anyway – you never know.
18. Keep going back to the same location if possible.
This is easier said than done. Some photographers are on a whirlwind tour of an area and can only visit a location once. However, having the ability to return to a location a few times will drastically improve your chances of capturing some beautiful light.
For my time in New Zealand, I’ve had to wait an average of 3-4 days for a dramatic sunrise or sunset. It’s a tricky thing to judge; do we spend two weeks going to as many locations as possible, taking the risk that we may not get decent light on any of them? Or do we visit fewer locations, coming out with fewer unique images, but improve our chances of catching that all important light?
19. Ask local photographers when they think the best time of year to come is.
Non-photographer locals are not always the best people to ask for ideal times to visit their region. To a non-photog, the clearest skies means the best weather. As you know, that isn’t ideal for us, unless doing astro photography.
Instead, try and contact local photographers through Facebook, Flickr or wherever else, to see when they think the best time of year is. You may even get some extra advice, like when flowers are blossoming, or morning mist is most common.
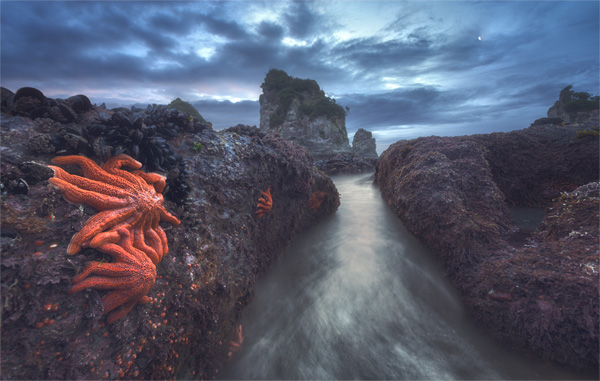
20. Get the tide right.
This is a big one for two reasons. Firstly, some locations are incredible at low tide, while some really shine at high tide. Getting the tide wrong will mean you end up with a less-than-great scene. So make sure you know which tide is most appropriate and when it will coincide with sunset/sunrise/night time.
The second major reason is safety. There is nothing more terrifying than when you’re focused on shooting, and time passes by and you suddenly find yourself surrounded by water. This has only happened to me once and it was enough to make me extra cautious when shooting seascapes. An outgoing tide is best because there is less chance the water will creep up on you. But never get too confident, regardless of the current situation. Things can change very quickly.
21. Shoot a panorama just in case.
Often I like to approach a situation with a ‘just in case’ mindset. So even though I’ve usually decided on my composition beforehand, I will still try different angles, just in case. I’m sure most photographers do this, too. However, I also like to pan my ball head around and take a panorama (if it’s possible).
This gives us two advantages; firstly it means we can come away with potentially two images – the one we planned, and a bonus panorama, if the image looks good.
And secondly, we’re covering our backs. If we get home and look at our planned composition, we may find that we’ve accidentally chopped off an interesting element that we didn’t see originally. Having an extra exposure can allow you to stitch in that extra element.
22. Bracket your exposures.
Some people bracket all the time, some bracket occasionally, and others not at all. Even if you prefer working with a single RAW file, it may be worth your while to start bracketing.
Even if exposure blending isn’t your style now, you never how your tastes may change in the future. And bracketing, apart from being great for controlling clipped areas, also gives us a greater ranges of exposures to choose from even if we are working on just a single image.
23. Arrive early to find compositions and get the best spot.
I’m obsessively early to pretty much everything. But photography brings me to the next level of OCD earliness…and I wouldn’t change it for the world. I have lost count of the number of people who arrived at sunset or sunrise but missed the early light show.
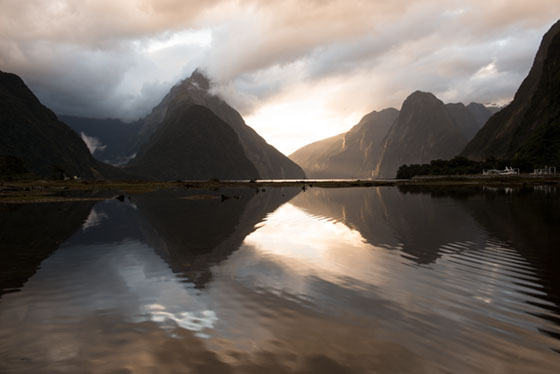
For example, in the Milford Sound image above, where I presented a long and short exposure comparison, the beautiful light through mountains only lasted 10-15 minutes about 50 minutes before sunset. By the time I had a big smile on my face reviewing the image I’d just captured, a handful of photographers made their way to their chosen spots and set up their cameras, seemingly oblivious of what they missed.
That image, on top of my enjoyment of shooting and creating it, also had the added bonus of being my most popular image ever. And I was literally the only photographer there.
Arrive earlier than you think is necessary. This will help you get the best seat in the house, and ensure you don’t miss anything.
24. Manually focus.
I can’t emphasize this one enough. If you want consistently razor sharp images, manual focus is the best way to go. Auto focus is getting better, but in low light it doesn’t compare to the human eye.
For more advice on getting sharp photos, see my article: How to get sharp photos
25. Capture a sun spike.
Sun spikes can look awesome. They can add a very dynamic element to your scene. For a great example of this, and a little explanation of how it is done, please see Patrick Ong’s lovely Kofa Mountain image: Golden Spikes
26. Take a risk. Don’t move your camera the entire time.
Earlier I mentioned having a ‘just-in-case’ mindset. The opposite of this is the resolute, confident mindset. This is where we decide on a composition, are confident with that composition, and choose to leave our camera completely still the entire time.
The advantage of this is that we can capture our subject during various changes of light, from day, to golden hour, to blue hour and final night time. Wonderful unexpected things may happen during this time.
And, if you like to be creative, you can combine these exposures to come out with a uniquely blended image. The shot below was shot over an hour, combing the water from sunset, the sky from blue hour and the lighthouse lights were shot after blue hour.
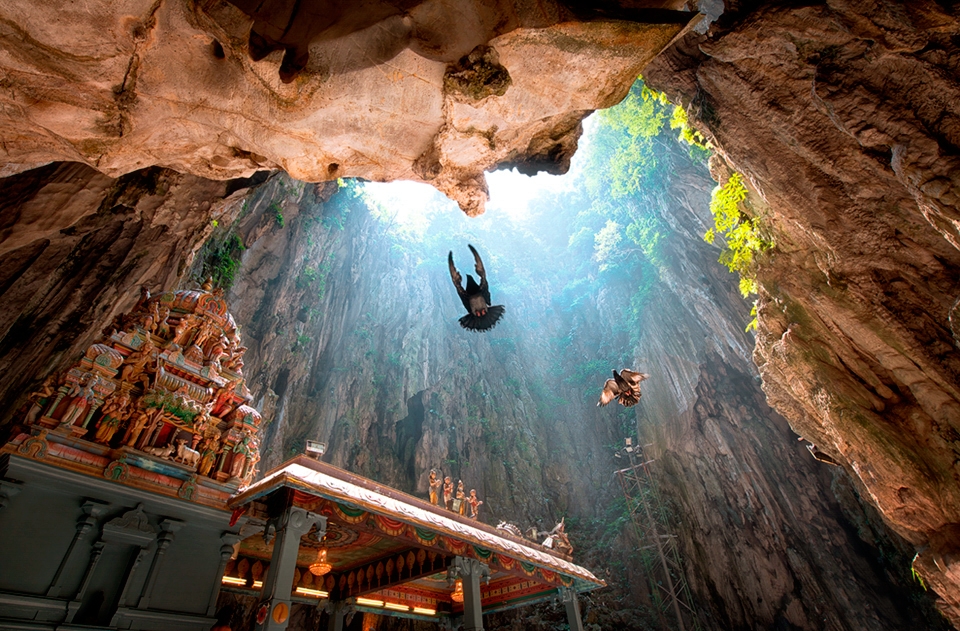
27. Be persistent.
Sometimes we have a solid vision of how we want a shot, but for whatever reason, no matter how hard we try, we just can’t catch a break. I’ve been there, many times, and completely understand the frustration. However, if you really want the shot, and a strong part of you thinks it is possible, then persist – you will be thrilled if you finally pull it off.
The below shot took hours of sitting in bird poop, with intense heat and humidity, to finally capture these lovely birds in flight. It was absolutely worth the wait.
28. Use water reflections wherever possible.
We’ve spoken about water before, but one of the most powerful uses of water is reflection. With crisp reflections we are literally doubling the amount of wonderful light or interesting objects in our scene – that can only be a good thing.
Look for reflections in everything, especially puddles on the floor, which often make for a unique composition.

29. Shoot with post-processing in mind.
This is one of personal taste, but when I shoot, I try to visualise what will be involved in post-processing, and how flexible I can be. Having a good working knowledge of Photoshop or Lightroom will give you more ideas and options out in the field.
For example, for the lighthouse shot that you see above, where I suggest not moving your tripod, I was able to fully plan the shoot and post-processing in my head, before pressing the camera shutter. I knew how to blend all of the exposures, so with that confidence I was able to plan my shoot around that knowledge.
30. Carry the sun on your head.
Having an immensely strong headlamp is an absolute most for landscape photographers. Not only will you be able to light up objects near and far, making composing and focusing much easier, you will have less trepidation about staying out late, knowing you can illuminate your way without any problems.
I used to use cheap, relatively weak headlamps. Now I’m willing to pay top dollar for something much more robust. And use a headlamp over a torch so you can free up your hands.
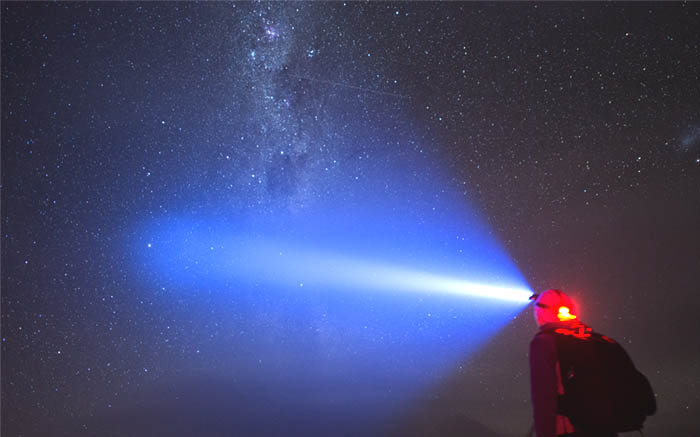
31. Use a red LED for astro photography.
While on the subject of lights, when shooting astro photography it is more beneficial to use a red LED rather than any other conventional light. You will be surprised how much you can see with that little light, even in the darkest of landscapes. And the benefit is that it takes no time for your eyes to adjust to the darkness when turning the light off.
Some headlamps also include a red LED option.
32. Clean your lens before every shoot!
Just as I’m verging on OCD with arriving early, I’m also very particular about cleaning my lens. I use a watered down solution, micro fibers, and duster to make sure that there is no dust or dirt before every shoot. This will minimise the amount of lens flare you get when shooting towards areas of strong brightness.
Enter your email below and join our community of more than 100,000 photographers who have also
Subscribed to our newsletter.
Downloaded our FREE Photoshop Course.
Got our FREE Easy Panel for Photoshop.
And, have our FREE Essential Guide To Luminosity Masks E-Book.
To go directly to any of our products, simply click on the image below.


