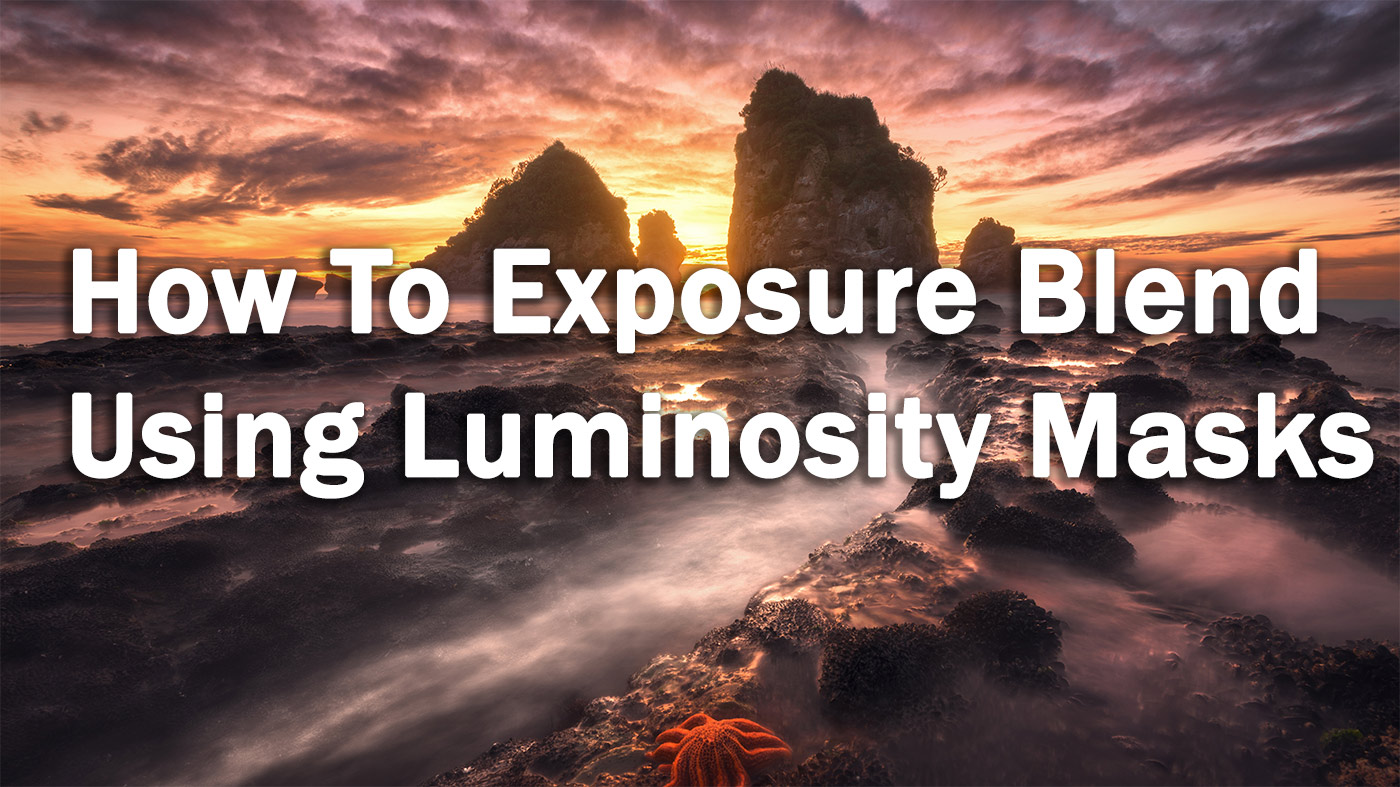
How To Blend Exposures With Luminosity Masks

Since the slow and painful death of HDR tone mapping, many photographers are now wondering the exact same thing: How to blend exposures with luminosity masks. The good news is, you can look no further. I’ve been using and teaching exposure blending for years, and this guide will put you firmly in the luminosity mask driving seat.
If you’re new to luminosity masks, check out part 1 in this series, Essential Luminosity Masks Tutorial for Beginners.
And at the very bottom of the page you will see the other parts in this 6-part luminosity mask guide.
To follow along with this tutorial, you are welcome to download the example images here.
For a complete course which covers everything you’ll need in your photography — including advanced luminosity masking — see my most popular course: The Art of Photography
- How To Blend Exposures With Luminosity Masks
- Exposure Blending Video Guide
- Download Luminosity Mask Software
- What is Exposure Blending?
- Examples of Exposure Blended Images
- Why Use Luminosity Masks To Blend Exposures?
- Who Uses Luminosity Masks?
- How to Prepare for Exposure Blending With Luminosity Masks
- How Many Exposures Do I need?
- Choosing the Correct Exposures
- Exposure Comparison
- How to Stack Exposures in the Layers Panel
- Which Order Do We Place Our Layers?
- Which Exposure To Build Mask Around
- How To Blend Exposures with Luminosity Masks
- How To Blend Exposures With an Active Selection
- Exposure Blending FAQ
- End of Part 2
- To go directly to any of our products, simply click on the image below.
- Shutter Evolve Complete Product Range

Exposure Blending Video Guide
If you’re a visual person and prefer to learn from video tutorials, I’ve created a very popular YouTube video which will take you through the same steps in the article.
Download Luminosity Mask Software
Luminosity masks software makes life a lot easier. It’s a complicated process creating and intersecting luminosity masks. Much better, and quicker, just to press a button and have one created for you. If you don’t have a luminosity mask generator, that’s okay. I’ve got a couple for you.
The Free Option — Easy Panel
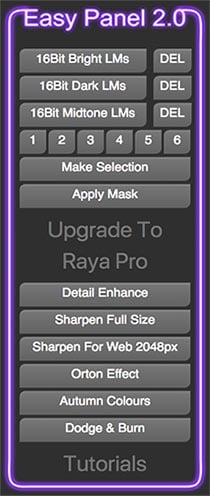
You can download my Easy Panel for free which, with over 100,000 downloads, is probably the most used 16 bit Luminosity Mask panel in the world.
Premium Option — Raya Pro

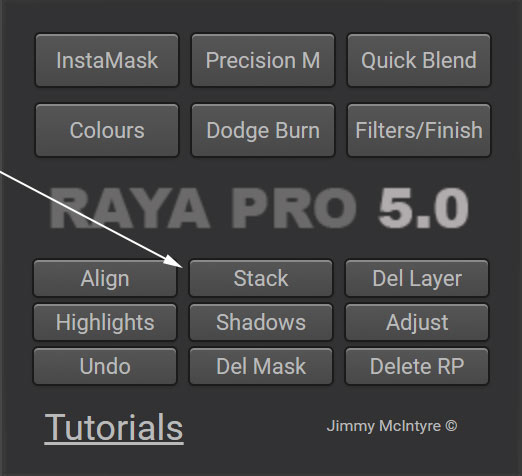
Raya Pro, used by over 25,000 photographers, is the daddy (and mammy) of luminosity mask panels. It’s also a total workflow solution, where you can access advanced PS features with just one click.
What is Exposure Blending?
Exposure blending, as the name suggests, is the process of merging multiple exposures of the same scene so that our final image has no over/underexposed areas. We come out with an image that should have a natural balance of light throughout.
Wait a minute…isn’t that just HDR?
In some ways it is, but the difference between exposure blending with luminosity masks and using HDR software is vast. To put it mildly, luminosity masking will produce far more natural and clean results than any HDR program. The reason: it works directly with your RAW files, but does not alter them in any way (the colour, sharpness etc.) as HDR does.
See the differences between HDR and Exposure Blending in the video below.

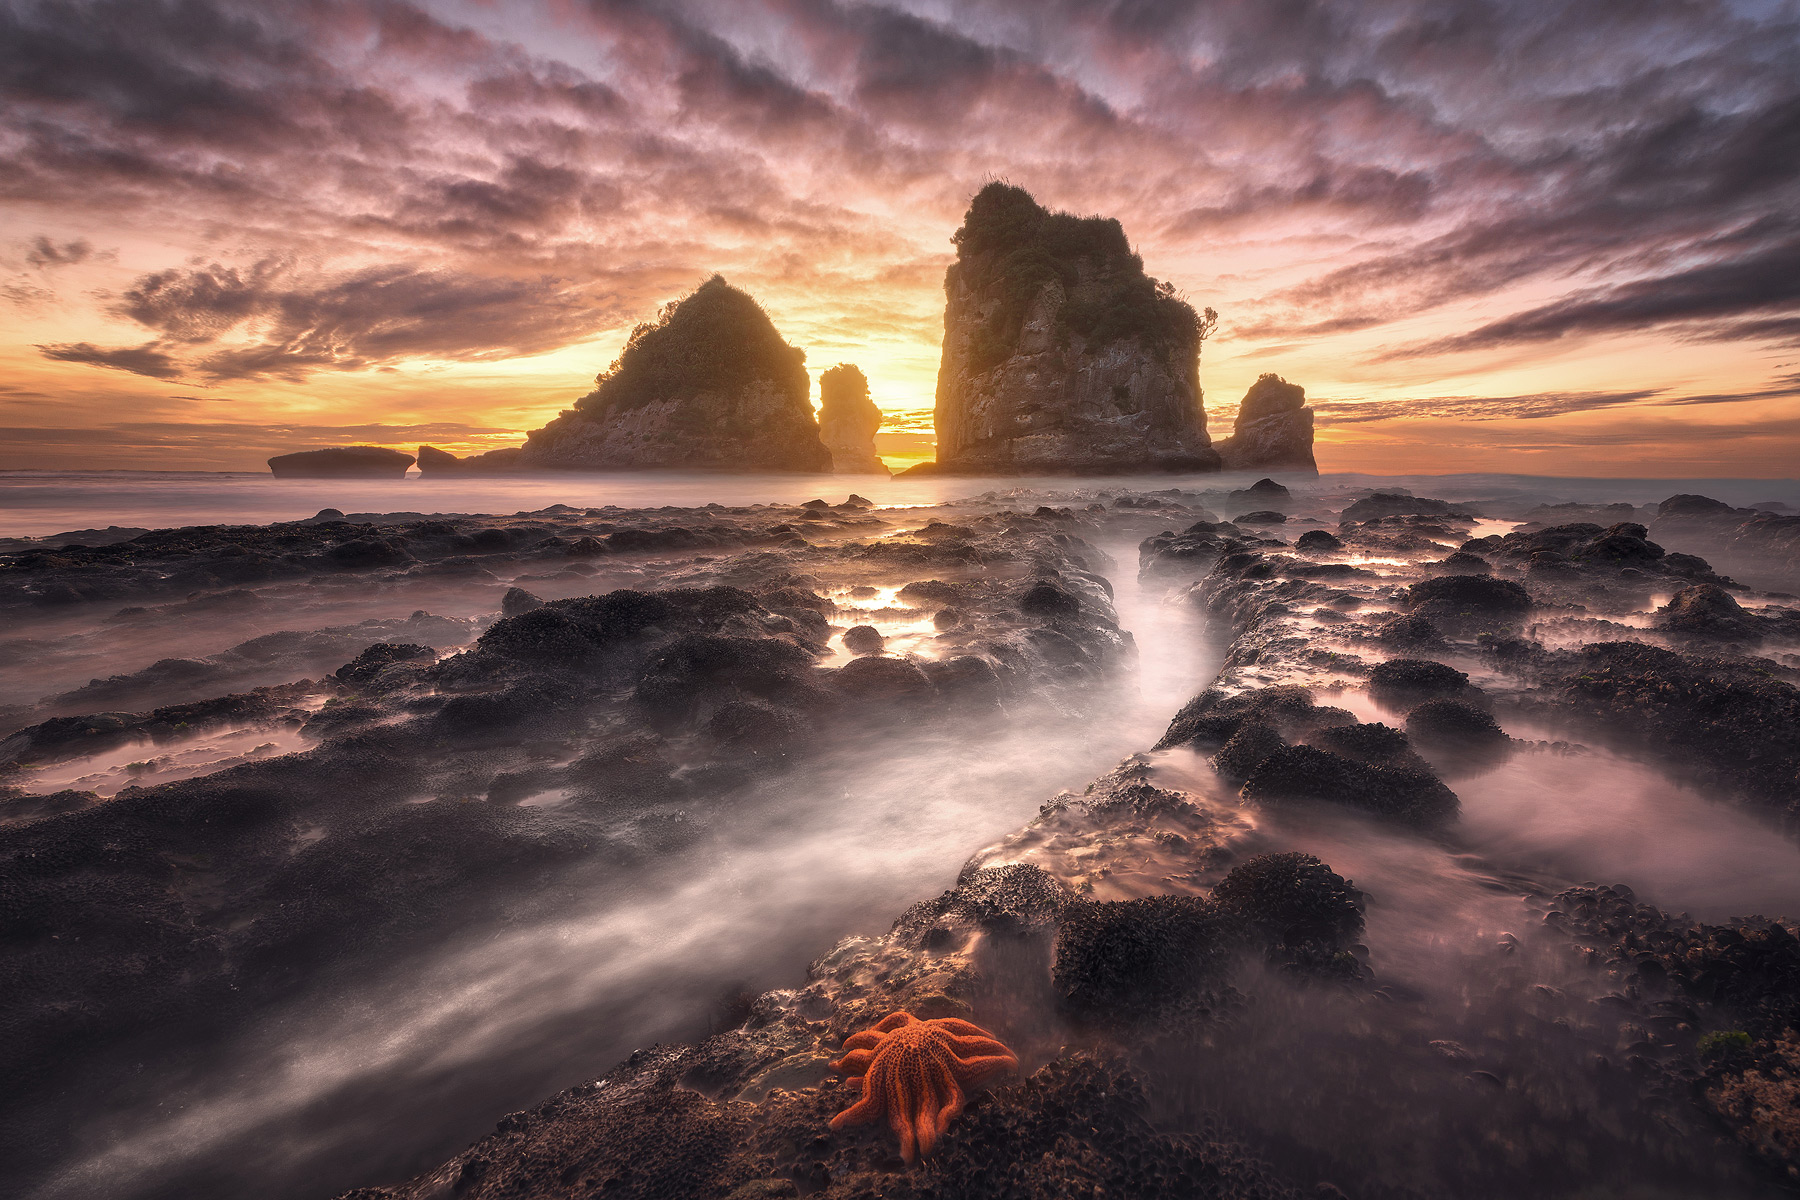
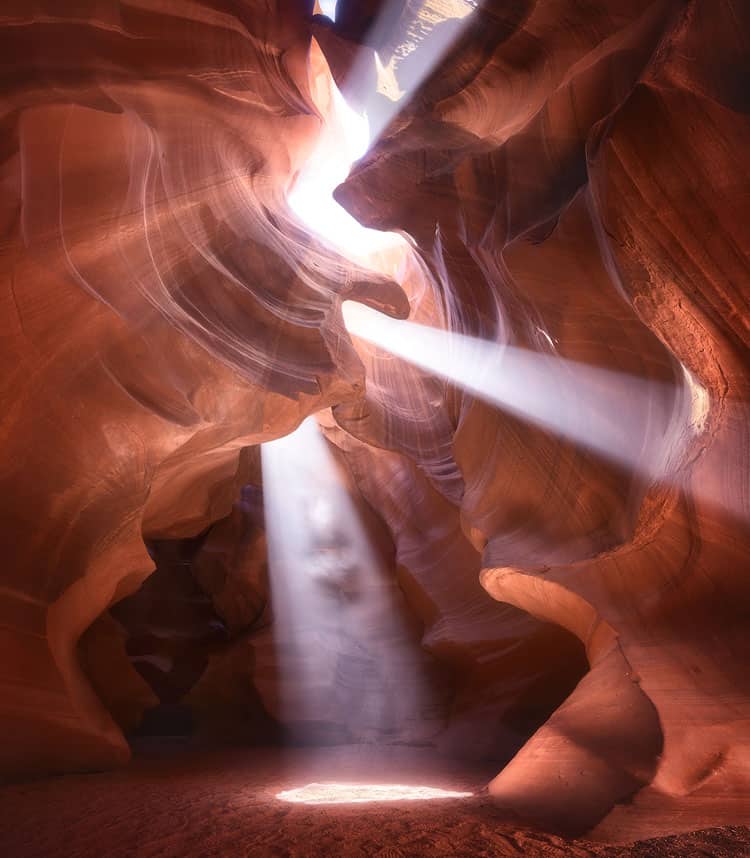
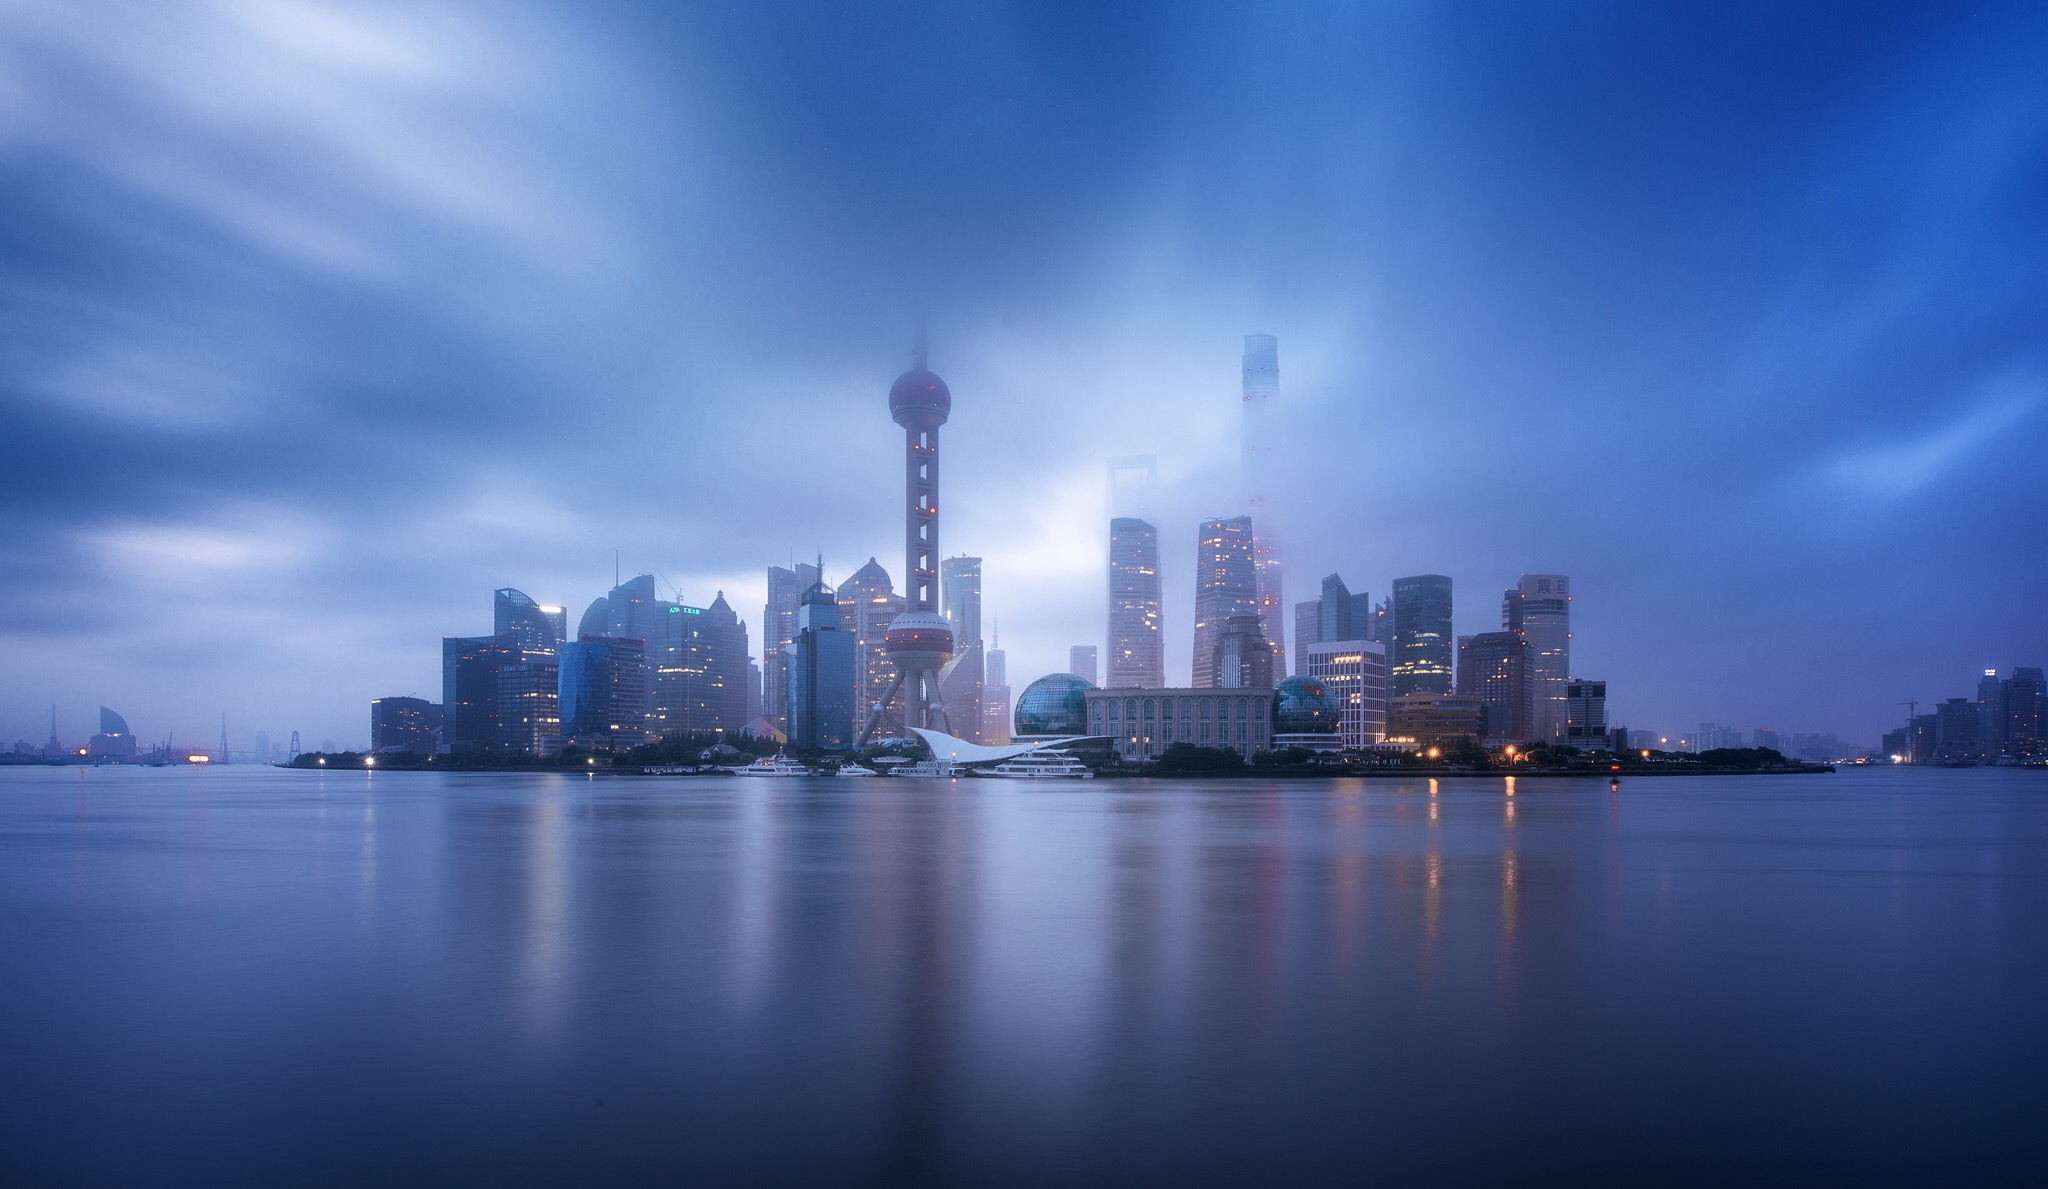
Examples of Exposure Blended Images
These are a few of my images that were exposure blended using luminosity masks. See more here: Portfolio

Why Use Luminosity Masks To Blend Exposures?
If you watched the video above, you’ll know by now that exposure blending is far superior to HDR tone mapping. But there are different types of exposure blending, like the Quick Blending sliders in Raya Pro. What makes luminosity masking so important?
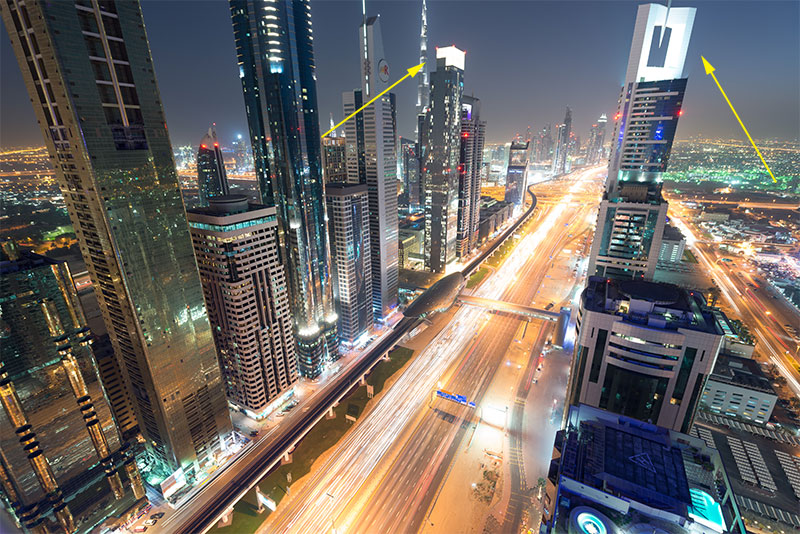
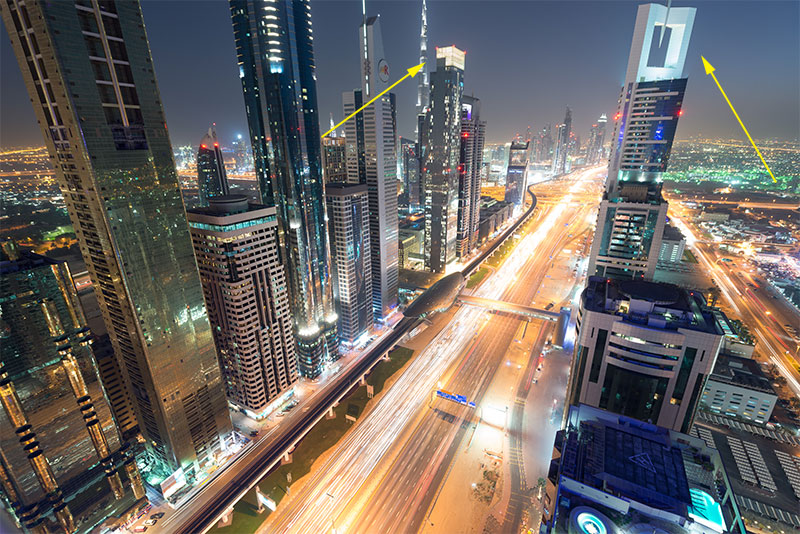
Undoubtedly, luminosity masks give us far greater control and precision in our selections. We’re able to make extremely fine changes that affect only the narrowest parts of our scene. Check out the shot below. On the left you’ll see the image before using luminosity masks. On the right is the image where I have recovered only the overexposed areas in the tops of the buildings. Essentially, we have blended just two small areas of the scene without affecting anywhere else. No other exposure blending option offers that level of control.
Who Uses Luminosity Masks?
More or less every genre of photography can find use in luminosity masks. It isn’t just a landscape photographer’s tool. I’ve personally used it with cityscapes, interiors, astro shots, landscapes, black and whites, seascapes, long exposures. The below buttons are pop up videos showing different ways and scenes where exposures were blended using luminosity masks. Credit to Michael Woloszynowicz (portraits) and Peter Zelinka (astro).
You can also see some excellent uses of luminosity masks on the Luminosity Mask forum.
How to Prepare for Exposure Blending With Luminosity Masks
Before exposure blending, we need to do a couple of quick things. These all relate to the brush tool. As you move further on down the tutorial you will learn that there are two ways to blend exposures using luminosity masks: Applying the mask directly and painting in a selection.
To paint in an active luminosity mask selection, we need to set our paintbrush correctly. This means selecting the paintbrush in Photoshop, going to the top menu and setting Flow to 100% and Smoothing to 0%. To the left of those settings, you will see a dropdown box which says ‘Mode’ next to it. Make sure the blend mode is set to Normal. And finally, make sure the brush has a hardness of 0.

How Many Exposures Do I need?
In scenes of low contrast, two exposures will usually do the trick, like the exposures used below in this tutorial. Scenes of higher contrast, three exposures are usually ideal. On very rare occasions, where the dynamic light in a scene is particularly wide, we will need more exposures. This is covered in more detail in Part 5 of this series: How Many Exposures Do I Need for Exposure Blending?
Choosing the Correct Exposures
Choosing the correct exposures for blending is one of the most important steps in the exposure blending workflow. The rule of thumb is: the exposures you choose should cover the full range of light in your scene. In other words, your brightest exposure should have no underexposed shadows. While the darker exposure should have no overexposed highlights.
However…
Not all exposures are equal. The second rule of thumb is: your exposures should be as close as possible in terms of stops. The closer together, the smoother the blend.
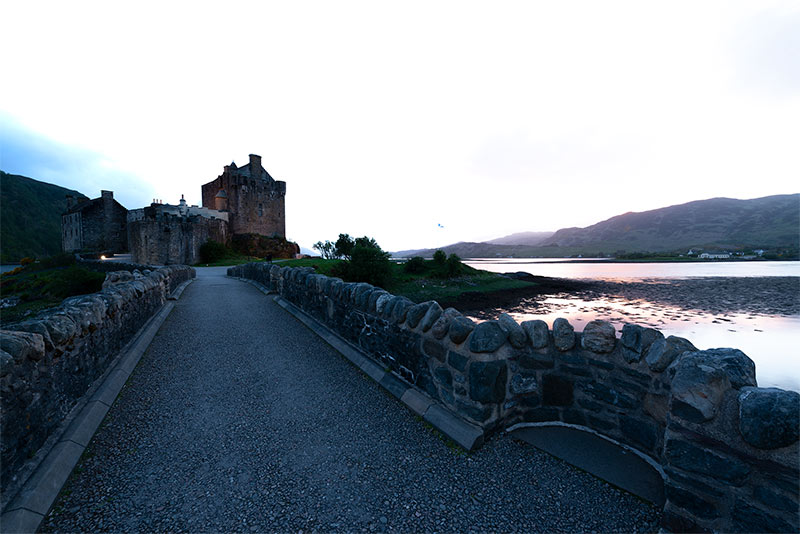
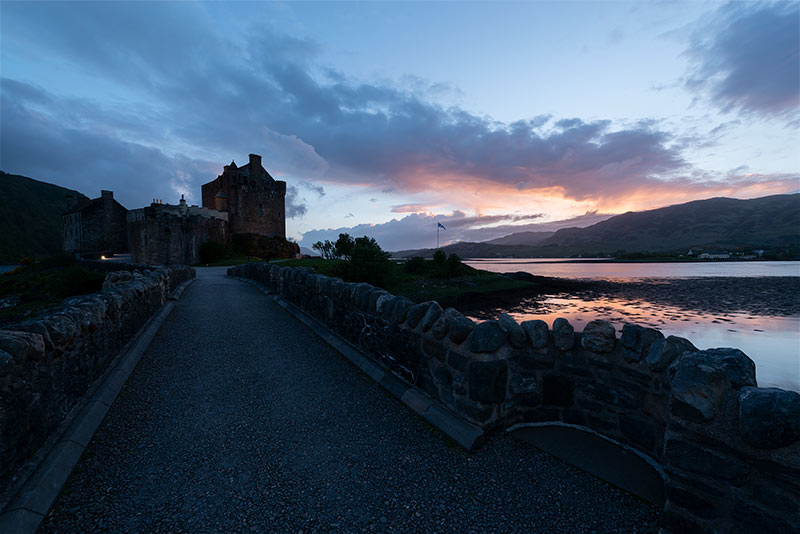
For example, see the three images below. The first one is our brightest exposure, also know as our base exposure because it contains most of the information in the scene. We just need to recover the sky from a darker exposure.
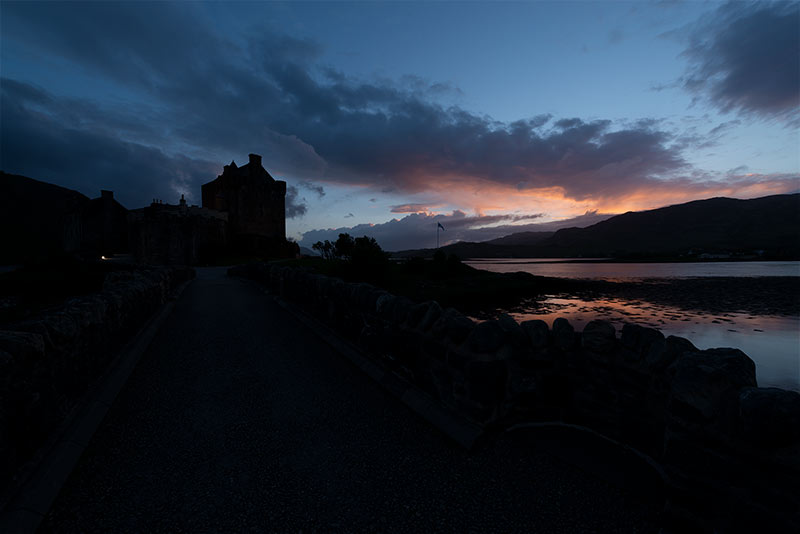
The image below that is the darker exposure we will use in this tutorial. Notice how it is dark enough to contain all the necessary information in the highlights.
But the final exposure is also dark and contains no overexposed areas, and yet if we try to blend that into our base exposure, the final result will not look good. This is because it is too dark.
Exposure Comparison
To demonstrate the importance of choosing the right exposures, look at the slider below. The left image is the result when we blend the base exposure and the dark (not darkest) exposure together. To the right is the result when we blend the base exposure with the darkest exposure.
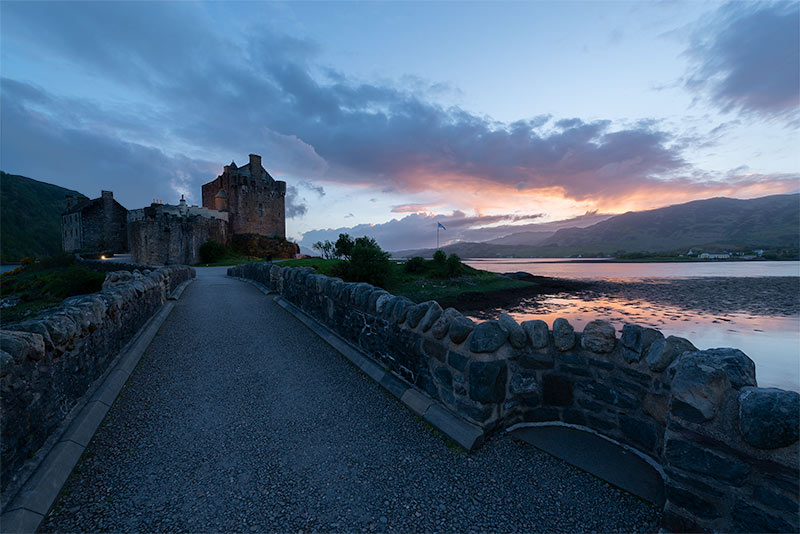
No other adjustments have been to this image. Just a straight exposure blend. The image to the right looks entirely wrong and will take extra steps to clean up. But just using an exposure 1 stop brighter, we managed a much smoother blend without additional adjustments.
How to Stack Exposures in the Layers Panel
To exposure blend we need our exposures to sit on top of each other on our layers panel.

In Raya Pro that’s simple. We open our images (works with RAW files, JPEGS, smart objects) in Photoshop and click Stack in the Raya Pro Hub.
If you don’t have Raya Pro and are working purely with JPEGs, you can open and stack multiple exposures in Photoshop by going to File>Scripts>Load Files Into Stack.
However, if you’re working with smart objects as I tend to do, you have to stack exposures manually. In which case, it is much easier to see it done than replicating the steps here. So please click on the button below to see how to manually stack layers. Skip to 3:42 in the video.
Which Order Do We Place Our Layers?
We now have our layers stacked on top of each other. We have to determine which order we want to put them. I always put my base exposure at the bottom. This is my best exposure which contains most of the information I will need. On top of that I will place the darker exposure. And if I’m working with a third exposure, let’s say a really bright one, that will go on the very top.
Which Exposure To Build Mask Around
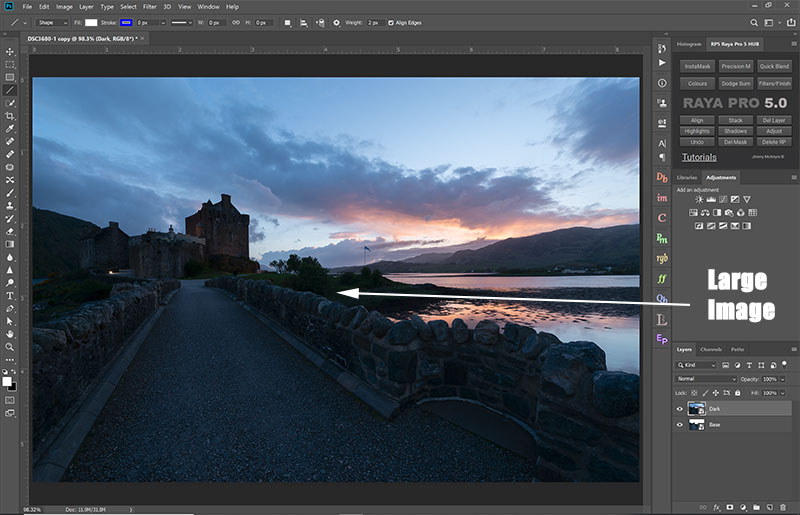
If you’ve pulled your images into Photoshop and stacked them, you’re ready to build luminosity masks. The first question we have to ask ourselves is, which exposure do we build our mask around? What I mean by this is, when we create a luminosity mask — let’s say a brights 1 luminosity mask — how is it created? Where does it get its information from?
The answer to that is simple: luminosity masks are based on whatever the big image is on our screen. It doesn’t matter what layer we have selected in the Layers panel. The only thing that matters is that large image that takes up most of your workspace.
Why is that important?
Well if you remember in part 1: Essential Luminosity Masks Tutorial for Beginners, I said that whatever is white in our mask is selected, and whatever is grey is partially selected. Black is completely deselected. So in our example image above, we wanted to blend the sky from the darker exposure into the brighter one. And that means we needed a selection of the sky. So we needed the sky to be white or light grey in the mask.
Look at the brights 1 luminosity mask that is created when I make the dark exposure visible in Photoshop.
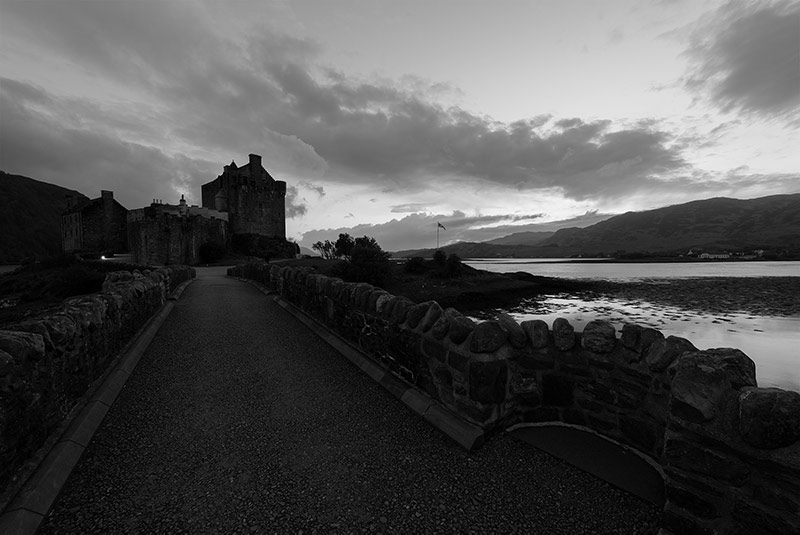
Is the sky selected in this mask? Not really. Okay, there are some lighter grey tones there, but we want the sky to be fully selected. Therefore it needs to be white.
Now look at what happens when make the dark exposure invisible and build the same brights 1 mask around the base exposure (brighter exposure).
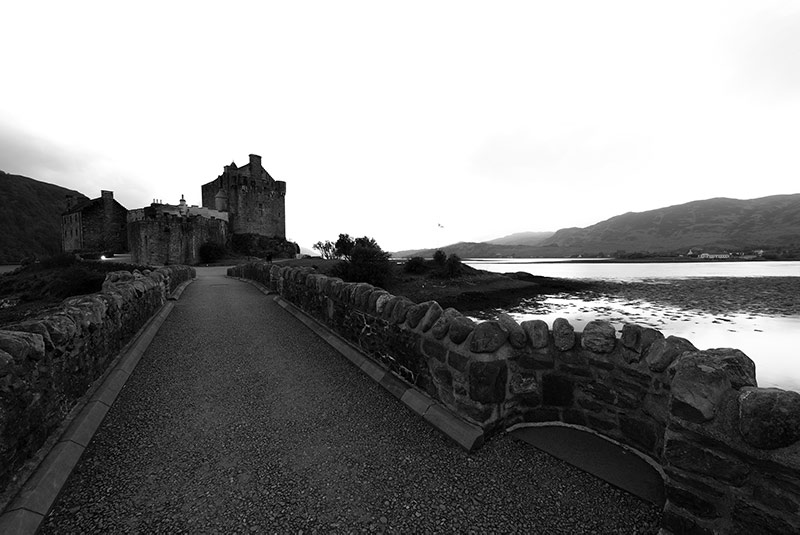
Is that an improvement? It most certainly is. The sky is now white (which means selected). The foreground is dark so that means we won’t bring too much of that dark exposure foreground through.
Why is this mask so much better than the one built around the darker exposure? The answer is straightforward: the sky in the brighter exposure is white. Therefore the sky in the mask will be white.
And this leads us to what a brights 1 luminosity mask is — it is quite simply the black and white version of your large image.
So when you’re about to build a mask, ask yourself what you need to be selected in the mask. Most of the time, you will simply need to build the mask around the base (brighter) exposure.
How To Blend Exposures with Luminosity Masks
Okay, I know all of that seemed like a lot but trust me, once you’ve understood this stuff, it all becomes second nature. And now the next steps — the actual exposure blending — will seem very simple.
So, how do we blend our exposures? We’ve got our layers in Photoshop, our base on the bottom and the dark one on top and we’re raring to go.
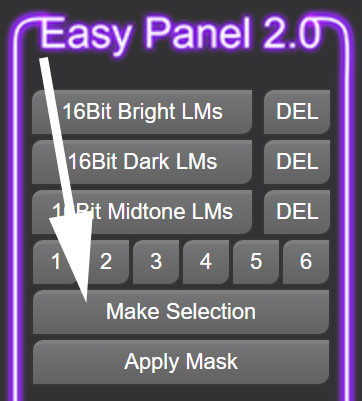
In this section we are going to create a brights 1 mask, then apply it to dark exposure.
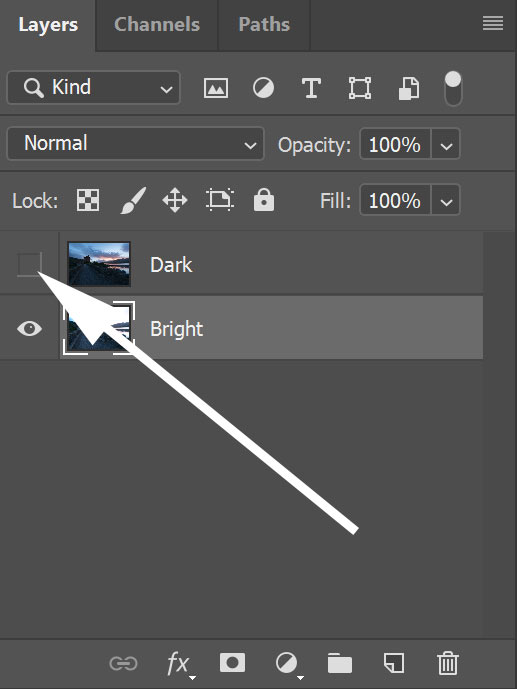
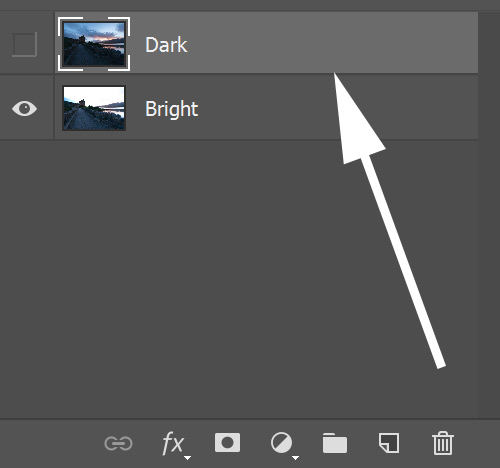
Step 1: Make your darker exposure invisible by pressing the eye icon next to the layer. Your base exposure should be visible on the large workspace now.
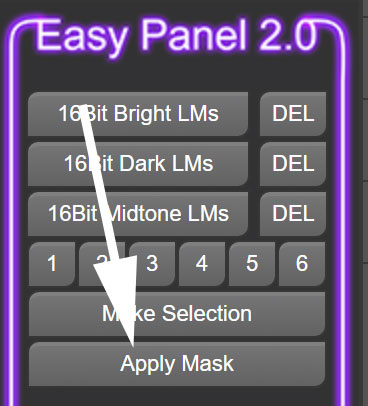
Instructions for the Easy Panel
Step 2: Select the dark layer.
Step 3: Press 16Bit Bright LMs.
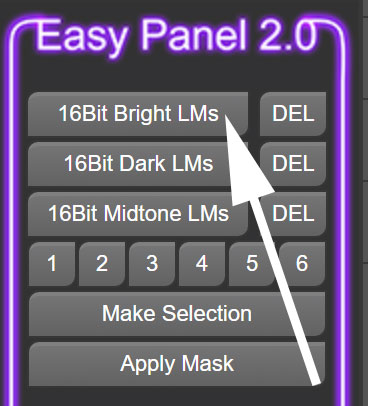
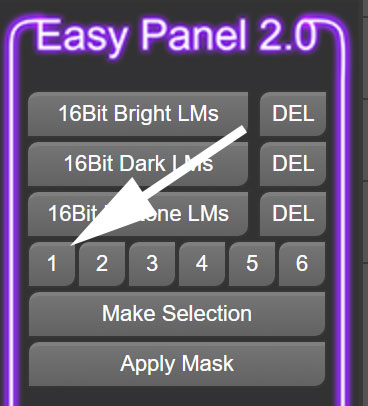
Step 4: Press the number ‘1’.
Step 5: Press Apply Mask.
Instructions for Raya Pro
Step 2: In InstaMask, press B1.
Step 3: Select dark exposure and press Apply.
And that’s it. Just make your dark exposure visible again and you’ll see your exposures are now blended.
You should now have an image that is exposure blended. See the before/after slider below. Naturally, there’s still work to do, like contrast/colour adjustments, but we’ve taken our first and possibly most important step in the workflow. We’ve now got a balanced image from which to work.
How To Blend Exposures With an Active Selection
The process above is superb for blending most exposures, but when we press Apply as we have, we apply the luminosity mask to the whole image. What if we wanted to make more targeted changes like in the cityscape image we saw earlier where only a few highlights were recovered?
In this case we need to manually paint in our mask. We do that by converting the luminosity mask into an active selection. Don’t worry, it’s simpler than it sounds (especially with Raya Pro).
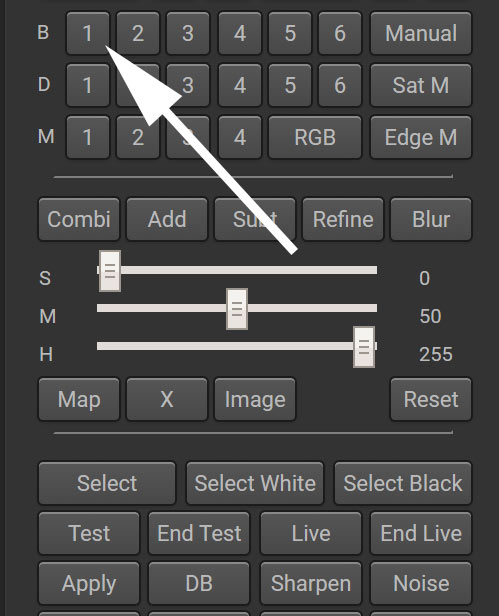
Easy Panel Instructions
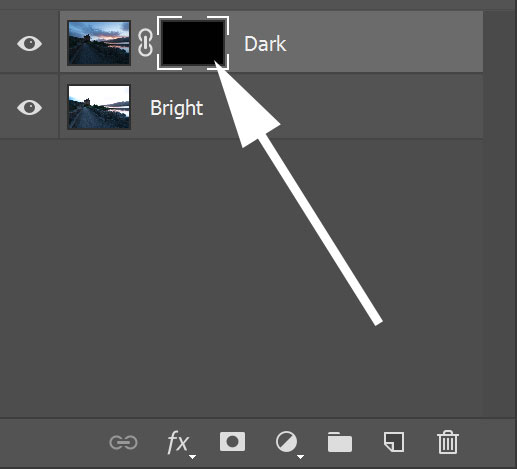
Step 1: Select the dark exposure.
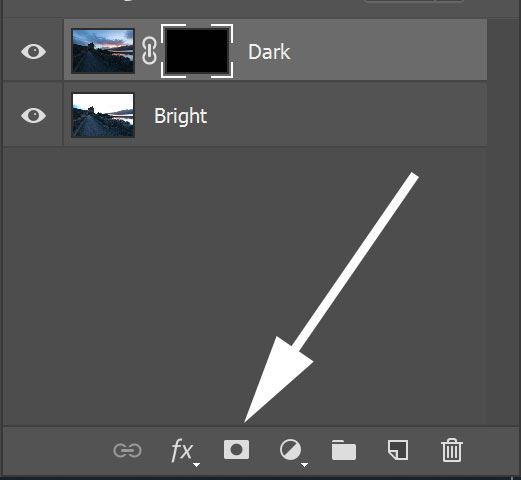
Step 2: Create a black mask on the dark exposure by holding alt (option on a Mac) and pressing the Add a layer mask icon at the bottom of the Layers panel.
Step 3: Press 16Bit Bright LMs in the Easy Panel.
Step 4: Press the number ‘1’.
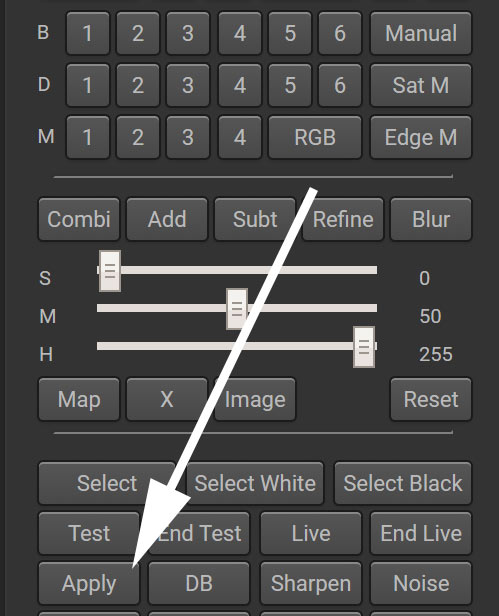
Step 4: Press the Make Selection button. You will now see marching ants on your screen which show your active selection.
Step 5: Press ctrl+h (command+h) to hide the marching ants. The selection will still be active but not visible.
Step 6: Select the black mask of the dark layer by clicking on it.
Step 7: Choose a paintbrush with a white foreground.
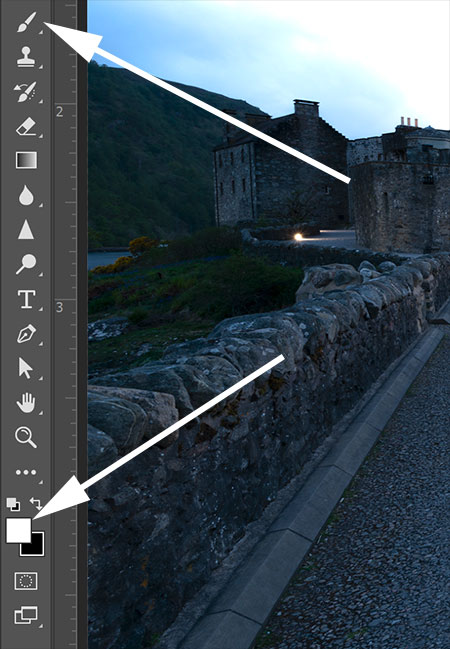
Step 8: With a large brush (settings: 100% opacity, 100% flow, 0% smoothing, 0% hardness), paint across the whole sky in one sweeping movement. Don’t take your finger off the mouse button until you’ve covered every area of the sky.
Step 9: At this point, the darker exposure sky should be through and looking good. However, you may notice to the left in the sky above the mountain it’s a little bright. With active selections we can go over the same area multiple times to reinforce the effect. So once again, sweep the brush across the sky.
Step 10: You must press ctrl+D (command+D on a Mac) to deselect your active selection.
Raya Pro Instructions
Step1: Make the dark exposure invisible, just as before.
Step 2: In InstaMask press B1.
Step 3: Now press Select White

Step 4: Now you’re ready to start painting. With Raya Pro you don’t need to do the other steps needed with the Easy Panel. Raya Pro does that for you. With a large brush (settings: 100% opacity, 100% flow, 0% smoothing, 0% hardness), paint across the whole sky in one sweeping movement. Don’t take your finger off the mouse button until you’ve covered every area of the sky.
Step 5: At this point, the darker exposure sky should be through and looking good. However, you may notice to the left in the sky above the mountain it’s a little bright. With active selections, we can go over the same area multiple times to reinforce the effect. So once again, sweep the brush across the sky.
Step 6: You must press ctrl+D (command+D on a Mac) to deselect your active selection.
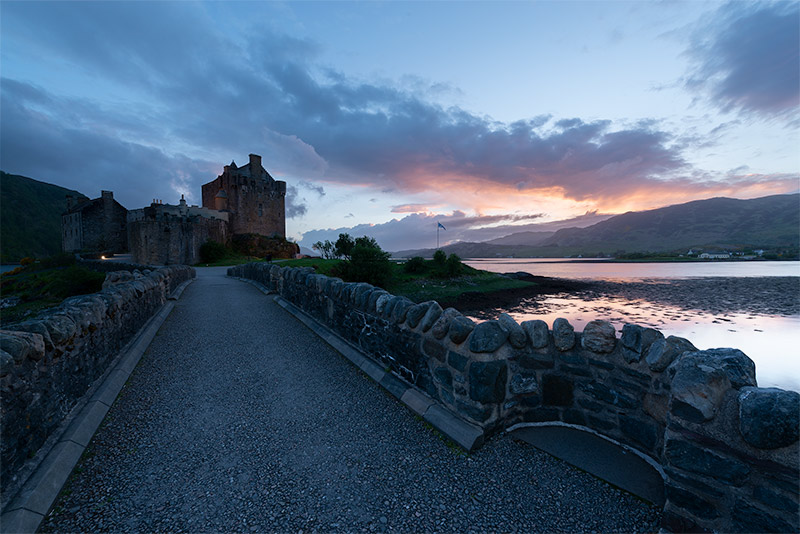
Congratulations! You have now blended your exposures. You should have a final image that looks like this.
Exposure Blending FAQ
Luminosity masks have been available since Photoshop CS3, but panels like Raya Pro and the Easy Panel work in later versions (CS6 and CC).
No, just Photoshop and other similar image processors.
Of all the post-processing tools available to us, luminosity masks are certainly more advanced. But I believe, with a little patience, that anyone can learn to use the.
Both. Set your workspace to whichever you like and the luminosity masks created will reflect that. But 16 bit luminosity masks will be higher quality.
That’s right. All active selections, which we haven’t covered in this tutorial, are 8 bit. So if you make a selection from a 16 bit luminosity mask, the resulting selection will be 8 bit.
End of Part 2
That concludes this tutorial on how to blend exposures using luminosity masks! See below for the other parts in this series.
Part 1: Essential Luminosity Masks Tutorial for Beginners
Part 3: How To Deal With Moving Objects in Exposure Blending
part 4: How To Shoot for Exposure Blending
Part 5: How Many Exposures Do We Need For Exposure Blending
Part 6: Luminosity Masks — Why Can’t I Paint Inside The Selection?
Other Luminosity Mask Resources
Introductions to Luminosity Masks Tutorial: https://capturelandscapes.com/introduction-to-luminosity-masks/
Creating Luminosity Masks in Affinity Photo: https://lenscraft.co.uk/photo-editing-tutorials/creating-affinity-photo-luminosity-masks/
Boosting Contrast with Luminosity Masks: https://www.photoshopessentials.com/photo-editing/luminosity-mask/
Creating Luminosity Masks in Gimp: https://www.gimp.org/tutorials/Luminosity_Masks/
Enter your email below and join our community of more than 100,000 photographers who have also
Subscribed to our newsletter.
Downloaded our FREE Photoshop Course.
Got our FREE Easy Panel for Photoshop.
And, have our FREE Essential Guide To Luminosity Masks E-Book.
To go directly to any of our products, simply click on the image below.


